Monthly Archives: March 2016

NSDebugScrolling

I’m working on some heavy NSTextView, NSScrollView, NSClipView type stuff in MarsEdit. This stuff is fraught with peril because of the intricate contract between the three classes to get everything in a text view, including its margins, scrolling offset, scroll bars, etc., all working and looking just right.

When faced with a problem I can’t solve by reading the documentation or Googling, I often find myself digging in at times, scratching my head, to Apple’s internal AppKit methods, to try to determine what I’m doing wrong. Or, just to learn with some certainty whether a specific method really does what I think the documentation says it does. Yeah, I’m weird like this.

I was cruising through -[NSClipView scrollToPoint:] today and I came across an enticing little test (actually in the internal _immediateScrollToPoint: support method):

0x7fff82d1e246 <+246>:  callq  0x7fff82d20562            ; _NSDebugScrolling

0x7fff82d1e24b <+251>:  testb  %al, %al

0x7fff82d1e24d <+253>:  je     0x7fff82d20130            ; <+8160>

0x7fff82d1e253 <+259>:  movq   -0x468(%rbp), %rdi

0x7fff82d1e25a <+266>:  callq  0x7fff8361635e            ; symbol stub for: NSStringFromSelector

0x7fff82d1e25f <+271>:  movq   %rax, %rcx

0x7fff82d1e262 <+274>:  xorl   %ebx, %ebx

0x7fff82d1e264 <+276>:  leaq   -0x118d54fb(%rip), %rdi   ; @“Exiting %@ scrollHoriz == scrollVert == 0”

0x7fff82d1e26b <+283>:  xorl   %eax, %eax

0x7fff82d1e26d <+285>:  movq   %rcx, %rsi

0x7fff82d1e270 <+288>:  callq  0x7fff83616274            ; symbol stub for: NSLog


Hey, _NSDebugScrolling? That sounds like something I could use right about now. It looks like AppKit is prepared to spit out some number of logging messages to benefit debugging this stuff, under some circumstances. So how do I get in on the party? Let’s step into _NSDebugScrolling:

AppKit`_NSDebugScrolling:

0x7fff82d20562 <+0>:   pushq  %rbp

0x7fff82d20563 <+1>:   movq   %rsp, %rbp

0x7fff82d20566 <+4>:   pushq  %r14

0x7fff82d20568 <+6>:   pushq  %rbx

0x7fff82d20569 <+7>:   movq   -0x11677e80(%rip), %rax   ; _NSDebugScrolling.cachedValue

0x7fff82d20570 <+14>:  cmpq   $-0x2, %rax

0x7fff82d20574 <+18>:  jne    0x7fff82d20615            ; <+179>

0x7fff82d2057a <+24>:  movq   -0x116a7ad9(%rip), %rdi   ; (void *)0x00007fff751a9b78: NSUserDefaults

0x7fff82d20581 <+31>:  movq   -0x116d5df8(%rip), %rsi   ; “standardUserDefaults”

0x7fff82d20588 <+38>:  movq   -0x1192263f(%rip), %rbx   ; (void *)0x00007fff882ed4c0: objc_msgSend

0x7fff82d2058f <+45>:  callq  *%rbx

0x7fff82d20591 <+47>:  movq   -0x116d5fa0(%rip), %rsi   ; “objectForKey:”

0x7fff82d20598 <+54>:  leaq   -0x118ab0cf(%rip), %rdx   ; @“NSDebugScrolling”

0x7fff82d2059f <+61>:  movq   %rax, %rdi

0x7fff82d205a2 <+64>:  callq  *%rbx


Aha! So all i have to do is set NSDebugScrolling to YES in my app’s preferences, and re-launch to get the benefit of this surely amazing mechanism. Open the Scheme Editor for the active scheme, and add the user defaults key to the arguments passed on launch:

Screenshot 3 29 16 3 50 PM

You can see a few other options in there that I sometimes run with. But unlike those, NSDebugScrolling appears to be undocumented. Googling for it yields only one result, where it’s mentioned offhand in a Macworld user forum as something “you could try.”

I re-launched my app, excited to see the plethora of debugging information that would stream across my console, undoubtedly providing the clues to solve whatever vexing little problem led me to stepping through AppKit assembly code in the first place. The results after running and scrolling the content in my app?

Exiting _immediateScrollToPoint: without attempting scroll copy ([self _isPixelAlignedInWindow]=1)

I was a little underwhelmed. To be fair, that might be interesting, if I had any idea what it meant. Given that I’m on a Retina-based Mac, it might indicate that a scrollToPoint: was attempted that would have amounted to a no-op because it was only scrolling, say, one pixel, on a display where scrolling must move by two pixels or more in order to be visible. I’m hoping it’s nothing to worry about.

But what else can I epect to be notified about by this flag? Judging from the assembly language at the top of this post, the way Apple imposes these messages in their code seems to be based on a compile-time macro that expands to always call that internal _NSDebugScrolling method, and then NSLog if it returns true. Based on the assumption that they use the same or similar macro everywhere these debugging logs are injected, I can resort to binary analysis from the Terminal:

cd /System/Library/Frameworks/AppKit.framework
otool -tvV AppKit | grep -C 20 _NSDebugScrolling

This dumps the disssembly of the AppKit framework binary, greps for _NSDebugScrolling, and asks that 20 lines of context before and after every match be provided. This gives me a pretty concise little summary of all the calls to _NSDebugScrolling in AppKit. It’s pretty darned concise. In all there are only 7 calls to _NSDebugScrolling, and given the context, you can see the types of NSLog strings would be printed in each case. None of it seems particularly suitable to the type of debugging I’m doing at the moment. It’s more like plumbing feedback from within the framework that would probably mainly be interesting from an internal implementor’s point of view. Which probably explain why this debugging key is not publicized, and is only available to folks who go sticking their nose in assembly code where it doesn’t belong.
Constraint Activation

I got started with Auto Layout a few years ago, and on the whole I’m very happy with the framework. It can be exceedingly frustrating at times, especially when some nuanced constraint priority or other is imposing a layout that just doesn’t make sense. But I measure its value by the degree to which I shudder in imagining going back to the old springs and struts approach.

Although some interfaces work perfectly with a fixed set of constraints, other interfaces require dynamic manipulation at runtime in order to achieve the desired result. For example, if a change in a preferences panel brings in some new element to the UI, it might make sense to adjust constraints at runtime to accommodate it.

Prior to OS X 10.10 and iOS 8.0, this could be achieved in a general case by removing and adding constraints as needed to the view in question:

  1. Remove constraints and save them somewhere, e.g. in an array, for later.
  2. Add or remove elements to the view.
  3. Add constraints, e.g. by fetching them from a saved array.

It is important to remove constraints and save them before removing an affected element, because removing the element will cause the constraint to be implicitly removed before you can save it.

Starting in OS X 10.10 and iOS 8.0, I was intrigued by the announcement that NSLayoutConstraint now supports a property called “active,” which can be used to, you guessed it, activate or deactivate a constraint. I assumed this would be an answer to my prayers: a constraint could now be left installed on a view for safe-keeping, but its impact on layout would be negated by setting it to be “inactive.” I envisioned setting up competing groups of constraints on a view and simply activating or deactiving them en masse when the need arose.

I assumed wrong.

Looking at the documentation more closely, I see the description of what the method actually does:

Activating or deactivating the constraint calls addConstraint: and removeConstraint: on the view that is the closest common ancestor of the items managed by this constraint. Use this property instead of calling addConstraint: or removeConstraint: directly.

The rub is that an NSLayoutConstraint whose “active” is set to false will be removed from view it is installed on. So if you have any hopes or dreams of reapplying that constraint later, you’ll need to save it somewhere, just as before. If you don’t keep a strong reference to the constraint, it may be deallocated. If you tried to go back and set “active” a constraint that you referenced as a weak IBOutlet, for example, it would be nil by the time you tried to do so.

The OS X 10.10 AppKit Release Notes makes a clearer emphasis on the intended utility of the “active” property:

Under Mac OS X 10.10, it is now possible to directly activate and deactivate NSLayoutConstraint objects, without having to worry about adding them to an appropriate ancestor view. This is accomplished by manipulating NSLayoutConstraint’s new boolean property ‘active’. Class methods are available for operating on multiple constraints simultaneously, which can be much faster. The legacy API on NSView for adding & removing constraints is now deprecated.

So “active” is not a convenience for easily toggling whether an installed layout constraint has an effect or not, but a convenience for the plumbing of installing and removing them. The emphasis on adding and removal API being deprecated especially underscores that.

Having written this all out, it suddenly occurs to me that the “active” flag I was dreaming of is actually sort of available, and has been all along. Because NSLayoutConstraint supports a mutable “priority” property, you can effectively disable it by setting its priority lower than any other constraints that affect the same view. One caveat though is you can’t change a constraint’s priority to or from “required” at runtime, so you have to choose a priority lower than 1000. Something like this should work:

NSLayoutPriority newPriority = activate ? 999 : 1;
[dynamicConstraint setPriority:newPriority];

So long as a set of counterpart constraints affecting similar views is always prioritize to the inverse when toggling state, something like this should workâ„¢. Of course, it requires knowing the “active” priority in code. If a given disabled constraint should actually have priority 501 or 250, or whatever, then you’d have to save that priority somewhere. In which case you may as well go back to saving the whole constraint.

Remote Codesign Trust

It’s common to use a remote, headless build server to perform iOS or Mac builds for which the “codesign” tool must be run to sign either the resulting binary, the installer package, or both.

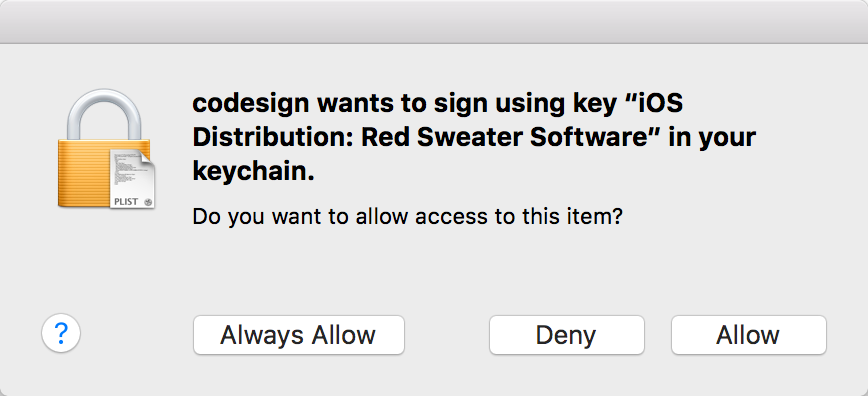
My friend Mitch Cohen raised a concern on our local CocoaHeads that, since 10.11.1 was released, there is a problem with such setups. The dialog that pops up when using a code signing identity for the first time ignores clicks to the “Allow” and “Always Allow” buttons:

Panel prompting to allow permission to use codesign tool with private key.

If you look in the system Console, you see a line along the lines of this, correlated to each attempted click of an “Allow” button:

3/15/16 8:51:55.303 AM SecurityAgent[65532]: Ignoring user action since the dialog has received events from an untrusted source

The changes are apparently rooted in a legitimate security update made by Apple, but the end result for us developers is pretty bleak. It’s seemingly impossible to authorize use of a code signing identity on a remote server. As my friend Mitch put it, he has to call IT and “get someone to go into the data closet” every time this happens. What a drag!

I’m also affected by this issue, since I use a headless Mac Mini as a build server. Lucky for me the server is in my house, but it’s still a drag to have to go log in and control the computer with an attached keyboard.

I poked around for a solution to this problem, and found it lurking in the answers and comments of a Stack Overflow question. The basic idea is you can convince OS X to trust codesign to use the tool, just as if you had clicked the “Allow” button in that UI prompt. Here is a recipe for doing just that, logged in as a remote user over say Screen Sharing:

  1. Open Keychain Access and locate the pertinent private key. You may have to click on the “Certificates” section and then type in part of the name of the identity in question, e.g. “iPhone Distribution”:

    Screenshot of Keychain Access showing the private key

  2. Click the private key and then select File -> Export Items from the menu bar. Save the item anywhere on your server, for example the Desktop. Give it a password e.g. “hardpassword”.
  3. Now stop. Think real hard before you continue. You should have a backup of that private key somewhere. If you don’t? Don’t continue. Did you just make a backup to the Desktop? Yes, in theory. But if these are the only two copies of this private key you need to think long and hard before you continue with the next step, which I absolutely do not advise you to do.
  4. Delete the private key from your keychain. This is the scary (see above), but necessary step to get the Keychain to respect the new permissions you’re going to grant the key in a minute.
  5. Switch to the Terminal and issue a command like the following:
    security import ~/Desktop/Certificates.p12 -k ~/Library/Keychains/login.keychain -P hardpassword -t priv -T /usr/bin/codesign -T /Applications/Utilities/Keychain\ Access.app
    

    It may be important to specify the path to the specific keychain, and to belabor the point you’re importing a private key with the “-t priv” parameter. It seemed like maybe things weren’t working for me until I deigned to include these. In any case, the goal here after running this command is that the private key shown in the screenshot above should now be back in your keychain, but if you double-click it to examine its permissions, you’ll find that codesign is listed among the approved apps. If you need to provide access to other tools than codesign, list them as shown above with multiple -T parameters to the “security import” command.

In my tests that seems to address the issue. After following the recipe above carefully, I can remotely “codesign” with the specified identity to my heart’s content, without a UI prompt of any kind.

It strikes me that this trick probably shouldn’t work, at least in light of Apple’s clamping down on the ability to change authorizations through the UI of Keychain Access. So I won’t be surprised if this series of tricks doesn’t stand the test of time. For now though? No need to call IT and have them go into the data closet.

Update: Erik Schwiebert reports that Apple has addressed this problem in 10.11.4 betas:

That’s great news!