Conditional Xcode Build Settings

In the previous post, I described a problematic warning introduced by the new linker in Xcode 15. In it, I shared that the warning can be effectively disabled by passing a suitable argument to the linker:

OTHER_LDFLAGS = -Wl,-no_warn_duplicate_libraries

This simple declaration will address the problem on Xcode 15, but on Xcode 14 and earlier it will cause a link error because the old linker doesn’t recognize the argument. What we want to do if the project will continue to be built by both older and newer versions of Xcode, is to effectively derive a different value for OTHER_LDFLAGS depending on the version of Xcode itself. (Maybe more correctly, depending on the version of the linker, but for this example we’ll focus on varying based on Xcode version).

There’s no straightforward way to avoid this problem, but Xcode build settings offer a sophisticated (albeit brain-bendingly obtuse) mechanism for varying the value of a build setting based on arbitrary conditions. Technically this technique could be used in Xcode’s build settings editor, but because of the complexity of variable definitions, it’s a lot easier (not to mention easier to manage with source control) if you declare such settings in an Xcode configuration file. The examples below will use the declarative format used by these files.

The key to applying this technique is understanding that build settings can themselves be defined in terms of other build settings. For example:

OTHER_LDFLAGS = $(SUPPRESS_WARNING_FLAGS)
SUPPRESS_WARNING_FLAGS = -Wl,-no_warn_duplicate_libraries

These configuration directives have the same effect as the single-line definition above, because Xcode expands the SUPPRESS_WARNING_FLAGS setting and uses the result when setting the value of OTHER_LDFLAGS. Even more powerfully, you can nest build settings so that the value of one build setting is used to construct the name of another:

SHOULD_SUPPRESS = YES
OTHER_LDFLAGS = \((SUPPRESS_WARNING_FLAGS_\)(SHOULD_SUPPRESS))
SUPPRESS_WARNING_FLAGS_YES = -Wl,-no_warn_duplicate_libraries

Here, the final value for OTHER_LD_FLAGS will only include the specified flags if the SHOULD_SUPPRESS build setting is YES, because expanding SHOULD_SUPPRESS yields the build setting SUPPRESS_WARNING_FLAGS_YES. If SHOULD_SUPPRESS is NO, or any other value, then the expansion will lead to an undefined build setting, and thus will substitute an empty value.

Side note: when editing Xcode configuration files, keep one editor pane open to the configuration file, and one pane open to the Xcode build settings interface, focused on a project or target that depends on the configuration file. As you edit and save the file, Xcode updates the derived build settings in real time so you can check your work. For example, if you were to change the value of SHOULD_SUPPRESS to NO, you would see the “Other Linker Flags” value change to empty in Xcode.

Obviously, hard-coding SHOULD_SUPPRESS to YES as we did above isn’t going to solve the problem, because these configuration settings will cause the incompatible linker parameter to be passed on Xcode 14 and earlier.

The simple ability to nest build settings leads to a huge variety of clever tricks that allow you to impose a kind of declarative logic to settings. For example, here’s a cool technique I learned from the WebKit project:

NOT_ = YES
NOT_NO = YES
NOT_YES = NO

NOT_ equals YES? What does it meeeeaaan? It only makes since when you consider what happens when you combine NOT_ with another build setting that is defined as a boolean value:

SHOULDNT_SUPPRESS = \((NOT_\)(SHOULD_SUPPRESS))

This expands to $(NOT_YES) which in turn expands to NO. You can make sense of these exotic uses of nested build settings by slowly walking through the expansion, from the inside out. Each time you expand the contents of a $() construct, you end up with text that combines with the adjacent text to yield either a new build setting name, or the final value for a setting.

Finally, let’s apply a similar trick to the question of whether we’re running Xcode 15 or later. For this I am also leaning on an example I found in the WebKit sources. By declaring boolean values for several Xcode version tests:

XCODE_BEFORE_15_1300 = YES
XCODE_BEFORE_15_1400 = YES
XCODE_BEFORE_15_1500 = NO

We lay the groundwork for expanding a build setting based on the XCODE_VERSION_MAJOR build setting, which is built in:

XCODE_BEFORE_15 = \((XCODE_BEFORE_15_\)(XCODE_VERSION_MAJOR))
XCODE_AT_LEAST_15 = \((NOT_\)(XCODE_BEFORE_15))

In this case, on my Mac running Xcode 15.1, XCODE_BEFORE_15 expands to XCODE_BEFORE_15_1500, which expands to NO. XCODE_AT_LEAST_15 uses the aforementioned NOT_ setting, expanding to NOT_NO, which expands to YES.

Easy, right?

Putting it all together, we can return to the original example with SHOULD_SUPPRESS, and replace it with the more dynamic XCODE_AT_LEAST_15:

OTHER_LDFLAGS = \((SUPPRESS_WARNING_FLAGS_\)(XCODE_AT_LEAST_15))
SUPPRESS_WARNING_FLAGS_YES = -Wl,-no_warn_duplicate_libraries

OTHER_LDFLAGS expands to SUPPRESS_WARNING_FLAGS_YES on my Mac running Xcode 15.1, but on any version of Xcode 14 or earlier, it will expand to SUPPRESS_WARNING_FLAGS_NO, which expands to an empty value. No harm done.

I hope you have enjoyed this somewhat elaborate journey through the powerful but difficult to grok world of nested build settings, and how they can be used to impose rudimentary logic to whichever settings require such finessing in your projects.

Xcode 15 Duplicate Library Linker Warnings

Apple released Xcode 15 a couple weeks ago, after debuting the beta at WWDC in June, and shipping several beta updates over the summer.

I’ve been using the betas on my main work machine, and for months I’ve been mildly annoyed by warnings such as these:

ld: warning: ignoring duplicate libraries: '-lc++'
ld: warning: ignoring duplicate libraries: '-lz'
ld: warning: ignoring duplicate libraries: '-lxml2'
ld: warning: ignoring duplicate libraries: '-lsqlite3'

You may have run into similar warnings with other libraries, but warnings about these libraries in particular seem to be very widespread among developers. Even though I’ve been seeing them all summer, and have been annoyed by them, I made the same mistake I often make: assuming that the problem was too obvious not to be fixed before Xcode 15 went public. Alas.

So what happened in Xcode 15 to make these suddenly appear, and why haven’t they gone away? The root of the problem is not new. Something about the way Xcode infers library linkage dependencies has, for several years at least, led it to count dependencies from Swift packages separately from each package, and to subsequently pass the pertinent “-l” parameter to the linker redundantly for each such dependency. In other words, if you have three Swift packages that each require “-lc++”, Xcode generates a linker line that literally passes “-lc++ -lc++ -lc++” to the linker.

So why have the warnings only appeared now? One of the major changes in Xcode 15 was the introduction of a “completely rewritten linker”, which has been mostly transparent to me, but which was also to blame for an issue with Xcode 15 that prevented some apps from launching on older macOS (10.12) and iOS (14) systems. That bug has been addressed in the Xcode 15.1 beta 1 release, which was released this week.

Another change in the new linker was the introduction of a new warning flag, on by default: “-warn_duplicate_libraries”. Kinda obvious, isn’t it? It’s the new warning flag on the linker that is leading this old Xcode behavior to suddenly start spewing unwanted warnings.

Suppressing the Warnings

Luckily, in conjunction with the new warning flag, the linker also introduced a negating flag: “-no_warn_duplicate_libraries”. If you pass this flag to the linker, the warnings go away. When Xcode links your target, it actually invokes “clang”, which in turn invokes the linker (“ld”). So to see that the flag gets passed down to the lower lever linker, you need to specify it as a parameter to clang that instructs it to propagate the parameter to ld:

OTHER_LDFLAGS = -Wl,-no_warn_duplicate_libraries

OTHER_LDFLAGS is the raw name for the build setting that appears in Xcode as “Other Linker Flags”. The excerpt above is in the text-based Xcode configuration file (.xcconfig) format. You could also just paste the “-Wl,-no_warn_duplicate_libraries” argument into the Xcode build settings for your target, but generally speaking, using Xcode configuration files is better.

Supporting Multiple Xcode Versions

One problem with pasting the OTHER_LDFLAGS value in to Xcode’s build settings, is you won’t be able to build the project on Xcode 14 or earlier. Maybe that is OK, but if like me, you use an older version of Xcode on your build machine (or your dedicated continuous integration service does), you’ll run into a build error when the older linker fails to recognize the new option:

ld: unknown option: -no_warn_duplicate_libraries

So how can we suppress the warnings while using Xcode 15, while continuing to build without errors on older versions of Xcode? Xcode configuration files to the rescue! Because of the general utility of the method used to conditionalize build settings based on Xcode version, I have written a separate blog post describing this technique. Read Conditional Xcode Build Settings to learn more.

Addressing the Underlying Issue

I’m not going to fret too much about disabling the “warn_duplicate_libraries” option on the linker, because I don’t foresee it protecting me from many real-world pitfalls. However, all else being equal I would leave the warning on, because you never know.

I filed FB13229994 with a sample project demonstrating the problem. Hopefully at some point in the future Apple will update Xcode so that it effectively removes duplicated library names from its list of derived dependencies, alleviating the problem and allowing the warning to be enabled again.

View Clipping Changes in macOS 14 Sonoma

One of the most impactful changes to AppKit in the forthcoming macOS 14 Sonoma update is a change to the default clipping behavior for views. Apple announced that a long-present internal property, “clipsToBounds”, is now public. In tandem with this change, they are changing the default value for this property to false for apps that link against the macOS 14 SDK.

What does it mean for a view to “clip to bounds”? It simply means that no matter what the view does, it will not succeed in drawing outside its own bounds. This sounds like a reasonable thing, but it has historically been a headache for views with shadowed borders, for example, or views that render text that might extend slightly outside the bounds of the view.

Apple acknowledges in the AppKit Release Notes that this change will pose problems for some custom views. One example has to do with the “drawRect:” method and the value of the “dirtyRect” parameter:

Filling the dirty rect of a view inside of -drawRect. A fairly common pattern is to simply rect fill the dirty rect passed into an override of NSView.draw(). The dirty rect can now extend outside of your view’s bounds.

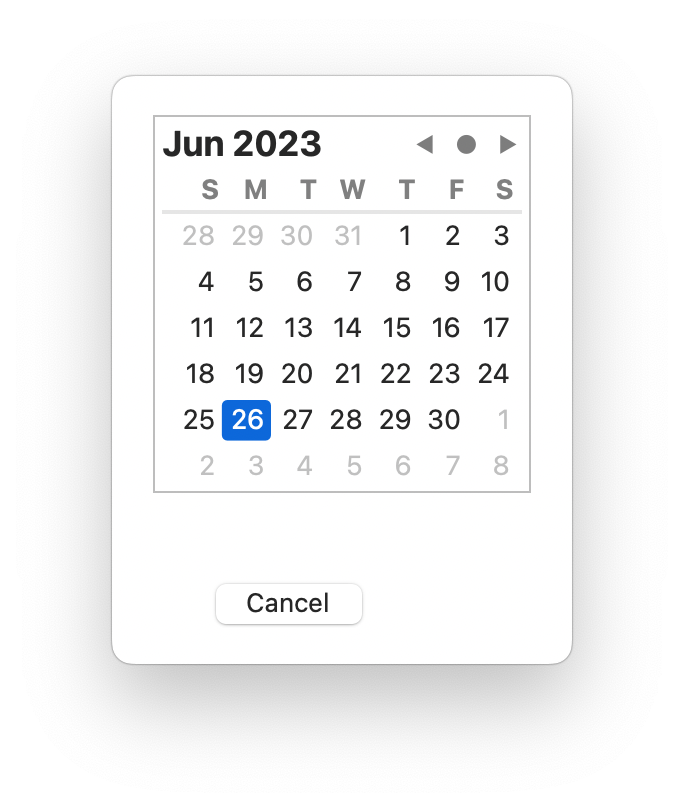
I ran up against this with my own app, MarsEdit, where I noticed the date editor panel was missing the “OK” button:

CalendarClipping

What’s happening here is my custom calendar view is filling the “dirtyRect” with its background color before continuing to draw the rest of its content. Unfortunately, what Apple promised in the excerpt above has come to pass: the dirtyRect encompasses nearly the entire window! So when my calendar view redraws, it is evidently overwriting the “OK” button, as well as a date picker that is supposed to appear below the calendar.

The fix is relatively simple in this case: because I don’t anticipate the view being very large, and filling a rect is a pretty cheap operation, I simply changed it to fill “self.bounds” instead of “dirtyRect”.

Filling the dirty rect is such a pervasive pattern that I expect many apps will see problems like this. It also seems odd that views such as mine are being passed such a large dirtyRect. It makes me wonder if, during the beta testing phase, Apple is intentionally passing extra-large dirty rects to views, to expose issues like this.

The takeaway is you probably want to do a global search in your projects for “dirtyRect” and evaluate whether the pertinent code in each case assumes the rect is constrained to your view’s bounds. As soon as you start compiling and linking against the macOS 14 SDK, it won’t be.

Xcode Build Script Sandboxing

Apple added a new build setting to Xcode last year, ENABLE_USER_SCRIPT_SANDBOXING, which controls whether any “Run Script” build phases will be run in a sandbox or not. From the Xcode 14 Release Notes:

You can now enable sandboxing for shell script build phases using the ENABLE_USER_SCRIPT_SANDBOXING build setting. Sandboxing blocks access to files inside the source root of the project as well as the Derived Data directory unless you list those files as inputs or outputs. When enabled, the build fails with a sandbox violation if a script phase attempts to read from or write to an undeclared dependency, preventing incorrect builds.

If I noticed it last year I had already forgotten about it, but I was reminded today while putting together a sample app to demonstrate a bug I was reporting. How was I reminded? Because evidently, starting in Xcode 15, the build setting now defaults to YES. I had added a custom Run Script phase to my project in order to finesse the contents of the built product, but when the script ran I was greeted with this error:

error: Sandbox: cp(25322) deny(1) file-read-data /Users/daniel/Project/File.txt

Luckily when I searched the build settings for the word “sandbox” it turned up the setting, and I was able to turn it off. If you run into this with your projects, it sounds like a better fix is to specify the specific input and output files so that the script phase is allowed access only to the files you think it should be working with.

Magic Loading Property Wrappers

tldr: MagicLoading is a reference implementation of a @ViewLoading-style property wrapper.

I hadn’t really paid too close attention to Swift’s property wrapper features until my curiosity was piqued earlier this year by Apple’s introduction of some very interesting wrappers designed to work with UIViewController, NSViewController, and NSWindowController. The aim in each case is to address this vexing situation:

// Will be non-nil after loadView
var important: Thingy! = nil

By wrapping in such a way that guarantees the view will get loaded if you access the property:

@ViewLoading var important: Thingy

Anybody who has done substantial work on iOS or Mac platforms can appreciate how helpful this is, to convert an otherwise fragile implicitly unwrapped optional into a totally predictable non-optional property. Apple’s new property wrappers make this possible by essentially rewriting the “important” property with boiler-plate code that first loads the view if needed, and then returns the underlying wrapped value. As Apple says in their documentation, this stands to prove particularly useful for @IBOutlet properties, which can all be converted to using this mechanism.

Unfortunately, Apple’s new property wrappers are only available for pretty recent deployment targets: iOS 16.4 and macOS 13.3. I am excited to start using these, but I still need to deploy to earlier targets. So I set out to re-implement something similar on my own.

The magic in Apple’s wrappers is an under-documented but widely used alternative mechanism for property wrappers: the ability to define getters and setters with knowledge of the containing object’s type, and access to the specific instance. The “subscript” variant of property wrappers is described in the original proposal, but has never been publicly endorsed, as far as I know, by Apple or the Swift team.

Usually I would shy away from undocumented features, but in this situation I believe it’s safe to use the undocumented subscript functionality because doing so only instructs the compiler to generate wrapper code that is compiled into the resulting binary. In other words: there are no private runtime dependencies that are being assumed by opting into this more sophisticated form of property wrapper. It’s just a way of getting the Swift compiler to write the pertinent code for us.

There are plenty of tutorials about how to use these subscript-based property wrappers, but I thought it would be useful to share a reference implementation that boils it down to how you might write one of these @ViewLoading style property wrappers yourself. MagicLoading is a GitHub repository that aims to do that. It implements only one such wrapper: MagicViewLoading, which is intended to replicate UIViewController.ViewLoading.

For my own purposes, I’d like to add other wrappers to handle the NSWindowController and NSViewController cases, but I’m also a little annoyed by the prospect of having to replicate that ugly “subscript” code everywhere. I was curious about whether I could somehow factor out the subscript wrapper and allow other wrappers to be declared by just providing the “getter logic” and “setter logic”.

I made a few attempts at declaring a more generic property wrapper that exposed var properties for getting and setting, but I ran into issues figuring out how to declare concrete types that could take advantage of the more general wrapper without introducing complexity at the property declaration site. If anybody has clever ideas about how to approach that, I’d love to be able to have @MagicLoading be a property wrapper type that other wrappers could inherit from or compose in some way.

Inline AppleScript Documentation

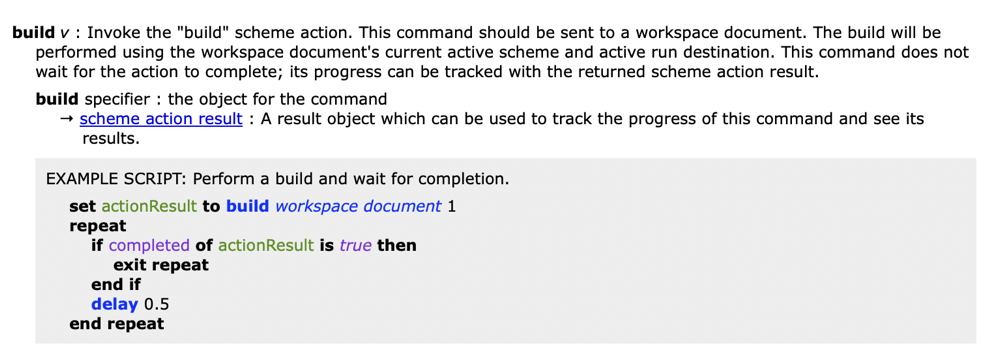
While perusing Xcode’s AppleScript scripting dictionary, I was surprised to discover a rather robust “example code” section included right there among the usually spartan reference of the app’s scriptable entities:

Screenshot of Xcode's scripting dictionary, including a section with example script code for the 'build' command

Curious to learn more, I used a relatively little-known trick for examining the raw source code of a scripting dictionary. Simply click and drag from Script Editor’s document proxy icon, into a text editor such as TextEdit, Xcode, or BBEdit:

Screenshot of Script Editor window for a scripting dictionary, with annotations to show where the document proxy icon is

This trick is especially handy because even if the app in question doesn’t have a standard scripting definition (.sdef) file representing its interface, Script Editor will generate one dynamically for you. It’s a quick-and-dirty way to learn how specific outcomes are achieved, and how you might incorporate similar features in your own app’s scripting definition file. In this case, I discovered a new (to me) “documentation” element in the file:

Screenshot of source code reflecting the example script inline documentation pictured above

I was not aware of the feature until a few weeks ago, but apparently it’s been there since at least Mac OS 10.5. Script Debugger supports it, too! You can read more about the “documentation” element by invoking “man 5 sdef” from the Terminal:

When an element needs more exposition than a simple ‘description’ attribute can provide, use a documentation element. A documentation element may contain any number of html elements, which contain text that will be displayed at that point in the dictionary.

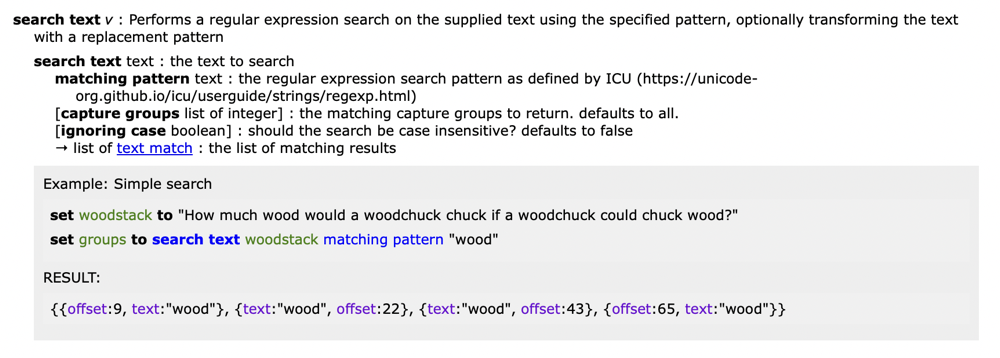
Given the sad state of support for AppleScript by Apple, and the continued low level of adoption by 3rd-party developers, a feature like this will probably never be widely used or celebrated. But at least in FastScripts 3.2.4, which I just released this morning, I’m now taking advantage of it:

Screenshot showing FastScripts 'search text' command with an inline documentation block

If you’re among the few remaining Mac developers who is investing time and effort into your AppleScript scripting definitions, hopefully you’ll find this feature useful!

Opting Out of TextKit 2 in NSTextView

Starting in macOS 13 Ventura, Apple is automatically opting-in most NSTextView instances to use TextKit 2, a modern replacement for the traditional NSLayoutManager based text system that has been part of Mac OS X since its debut.

This change may bring a variety of surprises, so it’s important to test carefully if you use NSTextView. Somewhat unintuitively, you are more likely to be affected by the changes if you do little customization of the default NSTextView behavior.

Apple explained the new opt-in behavior and some of the consequences in the 2022 WWDC session titled “What’s New in TextKit and text views”. They also explain that the decision to use TextKit 2 can be explicitly opted out of:

When you explicitly call an NSLayoutManager API, the text view replaces its NSTextLayoutManager with an NSLayoutManager and reconfigures itself to use TextKit 1.

Perhaps the biggest risk for malfunction lies in scenarios where some significant customization is expected to work, but not in a way that affects the text view’s decision to carry on using TextKit 2. One such example is when it comes to customizing the drawing of the insertion point cursor. Since “the dawn of time” Apple has offered an overridable method on NSTextView:

open func drawInsertionPoint(in rect: NSRect, color: NSColor, turnedOn flag: Bool)

A custom NSTextView subclass that thinks it can do better than Apple’s default text-colored vertical bar can override the method to impose its own dubious design choices:

Screenshot of text editor text with an insertion point colored red and green

By default, starting in macOS 13 Ventura, the above customization will fail, because it is evidently not supported by TextKit 2. The simple workaround, for the time being anyway, is to force your text view to use TextKit 1. As explained in the WWDC excerpt above, this is as simple as asking it once for its layout manager, which will cause it to rebuild its entire text architecture to suit the TextKit 1 way of functioning:

let _ = myTextView.layoutManager

I’ve filed FB11771261 with Apple, requesting that the functionality either be restored, or the method in question be overtly documented as non-functioning.

Update: The insertion point behavior described here is among many other bugs documented on Marcin Krzyzanowski’s STTextView project on GitHub. Looks like a good resource for folks who are curious about possible issues, and possibly a good alternative to NSTextView until/unless Apple fixes NSTextView to be more functional in TextKit 2 mode. Thanks to Greg Pierce for the link.

Designing macOS Menu Bar Extras

A great article by Marc Edwards, essentially the “missing manual” for macOS menu bar extras:

Apple’s HIG is great, but it doesn‘t contain much information related to designing menu bar extras. This article aims to provide additional details and context needed to create icons for macOS menu bar extras.

There are a lot of subtleties to get right, and this will help you if you are unfamiliar with the conventions!

Quieting CVDisplayLink Logging

In recent months I’ve noticed an accumulation of garbage log messages when I’m debugging an app in Xcode. Line after line along the lines of:

[] [0x124858a00] CVDisplayLinkStart
[] [0x124858a20] CVDisplayLink::start
[] [0x600003c3cee0] CVXTime::reset

Today I went digging to find the source of these log messages, and in the process I discovered a workaround that disables them. Just pass “-cv_note 0” as a parameter to the Run task in the Xcode scheme. Alternatively, you could disable them across all of your apps by setting this global default:

defaults write com.apple.corevideo cv_note 0

The only downside to disabling the messages globally is that you will have to remember you disabled it if you ever decide you want to see massive quantities of Core Video debugging logs!

I discovered this user default by spelunking the system frameworks code from which they originate. After setting a breakpoint early in my app’s launch, I set a breakpoint on a variety of logging related methods until I discovered that these messages are all originating from a function called cv_note() in the CoreVideo framework. Within that function, there is a call to another function called “cv_note_init_logging_once”, and within that is a check for a user default value along with this tasty morsel:

Screenshot of Xcode disassembly showing a log message: Thanks for setting defaults write com.apple.corevideo cv_note -int %d

And thank you, Apple, for providing such a mechanism, even if it’s unfortunately configured to log by default. I filed FB9960090: “CoreVideo logging should default to 0”, requesting that Apple change the behavior of this initialization function so that if a user has not set the cv_note value to anything particular, it defaults to 0.

Hacking NSAlert Button Appearance

This morning my attention was grabbed by an old post in the Apple Developer Forums, bemoaning the appearance of NSAlert in Big Sur. No, not the usual complaints about alerts on Big Sur and later, but specifically about the way buttons appear when there are more than three:

screenshot of macOS alert panel with three primary buttons, two of which are drawn without a border or background

Notice how the “Bar” and “Baz” buttons do not have a border or background color, making it difficult to know whether they are even buttons at all. The line between Bar and Baz clunks up the interface even more.

At first I thought this situation was the result of more buttons than were expected being squeezed into too small a space, but after some experimentation I discovered that even forcing the alert to give the buttons more room did not alleviate the problem. This exploded view from the Xcode view debugger shows that the top, default button, is showing the background for the button, while the other buttons don’t have one at all:

screenshot of view debugger from Xcode with 3-dimensional layout of UI components

After a good amount of hacking about in the debugger, I discovered the cause was rooted in the buttons simply having their showsBorderOnlyWhileMouseInside property set to true. This suggests it’s a stylistic decision on Apple’s part, but I have to think it wasn’t completely thought through because this simply does not look good! Furthermore, that clunky line after the second button seems to be placed there as an alternative to the buttons being distinguished by their own backgrounds. It looks particularly weird to my eye, so much that it looks more like an unintended drawing glitch than an intentional interface element.

So how would you work around such a problem? As I shared in the thread on the forums, one approach that seems both safe and effective is to patch up the appearance of the buttons, and hide the unwanted line. Because NSAlert performs a great number of modifications as it’s displaying the alert, you have to subclass and override its “layout()” method to catch it after it’s done tweaking the UI:

class HackAlert: NSAlert {
  @objc override func layout() {
    super.layout()

    for button in self.buttons {
      button.showsBorderOnlyWhileMouseInside = false
    }

    if let container = self.buttons.first?.superview {
      let boxes = container.subviews.compactMap { $0 as? NSBox }
      boxes.forEach { $0.isHidden = true }
    }
  }
}

With the hack in effect, the alert looks much nicer:

screenshot of macOS alert with all buttons showing visible background bezel

The key to hacking framework shortcomings is to identify a way to make the tweak such that the desired outcome is achieved, with little risk of unwanted outcomes. The changes I made here are only likely to cause problems if, in the future, Apple redesigns the UI so that it really does make sense for these buttons to “hide their borders”, or if Apple adds additional NSBox elements to the container view that holds these buttons. These seem unlikely enough to proceed with caution, but as always you should weigh the risks yourself, and only ship what you’re comfortable with!