Hold It Right There

In Apple’s latest round of pro laptops, the much-maligned Touch Bar is notably absent from the lineup. Like many people, I never found the Touch Bar to be super useful, but there was one convenience I consistently found indispensible: its support for invoking Xcode commands while debugging an app.

Any Mac or iOS developer will be familiar with the strip of buttons that facilitate various debugging tasks in Xcode:

screen capture of Xcode's debugger buttons

Being able to enable and disable breakpoints, pause and resume the app, and break into Xcode’s View Debugger are crucial to testing and debugging app functionality, and most of the time just clicking the button right in Xcode is all you need. But in some circumstances, to achieve the desired outcome, one of these buttons would have to be effectively clicked without interrupting an action in the target app such as tracking a button or menu item. In those situations, it was particularly useful to be able to set up the debug scenario in the host app, and then to simply tap a corresponding button on the Touch Bar to invoke the desired debugging utility.

For example if I am debugging FastScripts, my menu-bar based scripting utility, I might want to break into the view debugger while the menu bar icon is highlighted and the mouse is tracking menu items:
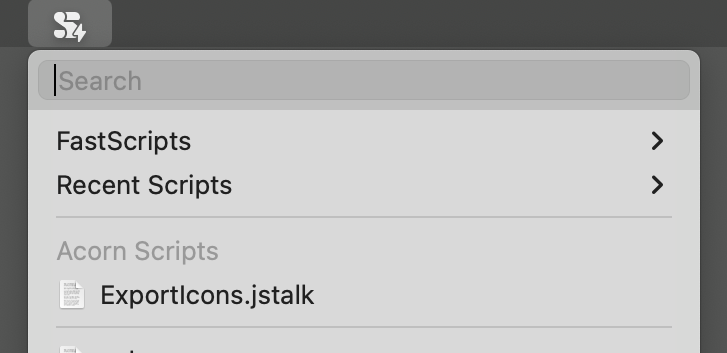
screenshot of FastScripts menu bar icon invoked with the script menu displayed

Since I gave up the Touch Bar, I’ve been at a loss for how to deal with this kind of situation, so I’ve worked around the problem as best as I can. Still, it’s frustrating after all that time enjoying the advantages of the Touch Bar, to have to give it up.

Today I finally devised a permanent solution that works independently of the Touch Bar, facilitated by none other than FastScripts itself: custom scripts to trigger the pertinent buttons by way of AppleScript GUI Scripting.

screen capture of FastScripts menu items for View Debugger, Pause or Continue, and Toggle Breakpoints

I chose the keyboard shortcuts to be convenient enough for me to invoke with my left hand while tracking the mouse with my right. Now when I am midway through a menu selection and want to instantly capture the view hierarchy for debugging, I just press Cmd-Shift-Ctrl-` and I’m off to the races.

If you think you might find this useful, download all three scripts and configure them with your favorite keyboard shortcut utility. As I’ve mentioned, FastScripts will do a great job, but the scripts should work just as well with a variety of other utilities.

I want to acknowledge Daniel Kennett, who accomplished the same type of functionality by programming his Stream Deck to simulate the behavior of the Touch Bar’s Xcode interface. His solution inspired me to finally follow through on my longstanding plan to develop these scripts. For those of you who prefer a physical interface, and have access to a Stream Deck, his project might be just the ticket!

Xcode’s Environmental Pollution

For a while now my build server has been issuing a large number of mysterious but important sounding warnings along these lines:

warning: include location '/usr/local/include' is unsafe for cross-compilation [-Wpoison-system-directories]

I’m allergic to warnings, and tend to abide by a 100% no-warnings-allowed policy, at least when it comes to release builds. So it was important to me to track this down and finally silence it.

I was really scratching my head because I don’t specify this include location anywhere in my build commands. Normally when an issue like this comes up, it’s easy enough to debug the problem by copying the build command out of the build log and pasting it into the Terminal. Invoking it independently of the xcodebuild process usually reproduces the same warning, and gives you the specific combination of command line options that is leading to the warning being generated.

In this case however, copying and pasting the command line to the Terminal did not yield the warning. What’s going on?

I figured I would take a step back and just try to reproduce the problem independently from my build scripts. Instead of copying and pasting the specific “clang” invocation that yields the warning, I’ll copy and paste the “xcodebuild” line instead. Bzzt! Still no warning.

After a lot of trial and error, I came across the strangest observation: if I invoke “xcodebuild” from within my Python-based build script, the warning is emitted. If I invoke it directly from the Terminal, it isn’t. In fact, if I simplify my build script to simply invoking “xcodebuild”, the warning happens. Stranger still? If I change the script from “python3” to just “python”, the warning goes away again.

I strongly suspected that the difference in behavior must be based in environment variables, so I decided to add a line to the top of the python script:

import os; print(os.environ)

Sure enough, the environment variables differed when I ran the script with “python” vs. “python3”. To get a feel on your own Mac for how the two commands differ, you could run this as a one-liner with python and with python3:

python3 -c "import os; print(os.environ)"

If your configuration is like mine, the output will include a “CPATH” value something like this:

{... 'CPATH': '/usr/local/include', 'LIBRARY_PATH': '/usr/local/lib'}

That “CPATH” entry for example only exists when invoking the script with python3, and it’s this very environment variable that is creating the unexpected Xcode warnings!

I was perplexed about how or why the version of Python could impact these environment variables, but then I remembered that python3 is bundled in Xcode itself, and the version at /usr/bin/python3 is a special kind of shim binary that directs Apple to locate and run the Xcode-bundled version of the tool. Apparently, a side-effect of this mechanism causes the problematic environment variable to be set! Running the python3 implementation directly where it lives in the Xcode installation:

`xcrun -f python3` -c "import os; print(os.environ);"

Does not exhibit the problematic environment variable!

So the issue is not about running python vs. python3 per se, but about invoking an Xcode build via any mechanism that leads to Apple’s “relocation” shim being executed and inadvertently mucking with environment variables that will impact the build process. I’ve filed FB9776086 requesting that the unwanted environment variables not be set when invoking commands, but in lieu of a system-wide fix, I’ll be adding this to the top of my Python build scripts:

import os
if "CPATH" in os.environ: os.environ.pop("CPATH")

Now my automated builds are beautifully warning-free again!

Dangerous Logging in Swift

I recently came across a perplexing crash in my unit tests that led me down a path of discovery, culminating in an awareness that “I was holding it wrong” when it comes to using NSLog in Swift.

Here is the source code to an extension on FileManager intended to make it easy to read the last modification date of a file:

@objc(rsLastModificationDateAtURL:)
func lastModifedDate(at url: URL) -> Date? {
    do {
        let resourceValues = try url.resourceValues(forKeys: [.contentModificationDateKey])
        return resourceValues.contentModificationDate
    } catch {
        NSLog("Failed to get modification date at URL: \(url) - \(error)")
        return nil
    }
}

I’ve highlighted the line of interest, an invocation of NSLog in the case where a modification date could not be read because of some exception. For example, if the file were not found this line of code would be reached. Looks innocent enough, right? Here’s what I came up against while running the unit tests for one of my apps:

highlighted source code line showing NSLog invocation crashing with EXC_BAD_ACCESS

At first I thought that one of the url or the error variables must be bad. After all, Swift string interpolation and NSLog are both battle-tested. Surely if there were a way to easily crash by logging good variables, it would be fixed a long time ago. But no, both of the variables in this instance were perfectly valid references. So what gives?

The Problem

The problem is rooted in the fact that NSLog from Swift calls through to the underlying C-based interface which supports template strings and variadic arguments. This is why, for example, you can invoke NSLog(@"Hi %@", name) in Objective-C and, if name represents the string “Daniel”, you get “Hi Daniel” printed to the console.

In the scenario of my crash, the interpolation of “url” and “error” results in surprise template placeholders, because of the presence of spaces in the path that the URL represents. In my tests, a file called “Open Program Ideas File” exists and is used to test some file manipulations. When the path to this file is encoded as a URL, the name of the file becomes “Open%20Program%20Ideas%20File”. Since the error’s failure message reiterates the name of the file it couldn’t find, we end up with another copy of the percent-escaped string in the parameter to NSLog. Each instance of “%20” followed by a letter is liable to be interpreted by NSLog as a printf-style format specifier. So as far as our filename’s string is concerned, we have “%20P”, “%20I”, and “%20F” threatening to cause trouble. Capital letters in printf formats are pretty uncommon, but the %F format specifier is documented as:

64-bit floating-point number (double), printed in decimal notation

In short, we have a situation where logging the URL and the error inadvertently asks NSLog to look for a 64-bit floating point number in the arguments list. A 64-bit floating point number of size 20, whatever that means in this case. So, whether the unit test, or app, crashes or not in a situation like this depends entirely on what data happen to be in the places where the variadic arguments would be, and whether that data causes a crash when attempting to interpret it as a type of the specified print format.

How to Fix It

So how do we fix it? Well, we need to make sure that the string that ultimately gets passed to NSLog doesn’t contain these surprise placeholder values. If this were Objective-C, we wouldn’t run into the problem because the parameters would need to be passed as variadic arguments:

NSLog(@"Failed to get modification date: %@ - %@", url, error);

But if we try that in Swift, we run into trouble. NSLog in Swift doesn’t support variadic arguments:

screenshot of build error indicating that variadic arguments are not allowed with NSLog in Swift

I’m pretty sure this is how I ended up in this situation in the first place: I probably tried to adapt my old Objective-C code to Swift, ran into this error, and obediently changed to using inline variable substitution instead. It just seemed like “the Swift thing to do.” But if we can’t use NSLog with inline substitution, and we can’t use variadic arguments, what are we supposed to do? Update: Thanks to Sebastian Celis for pointing out on Twitter that variadic arguments do work with NSLog. I think the failure above is specifically because I’m passing non-NSObjects to NSLog, which isn’t supported.

A few years ago Apple introduced a new logging framework called the Unified Logging System, which supports logging with variadic arguments from both Swift and Objective-C. It also supports a host of other features that allow you to categorize and prioritize your log message and, well, it sounds great, but it’s also quite a bit more complicated than just invoking NSLog. It’s complicated enough that I can’t offer a one-line fix for the situation I’ve described here, but I encourage you to investigate your options.

Audit Your Code

I also encourage you to audit your own code, and I’ll describe a method for searching your own code base to see if you might be vulnerable to the kind of unpredictable crash that inline interpolation can cause with NSLog. In Xcode, create a custom search scope that allows you to easily search just the Swift files in your code base, then search for instances of the problematic pattern. Obviously if you’ve got a 100%-Swift code base, creating the custom search scope is not necessary:

  1. Show the Find Navigator by selecting View -> Navigator -> Find from the menu bar.
  2. Click the “In Project” (by default) search scope label beneath the search field. This reveals the list of search scopes currently configured in your workspace.
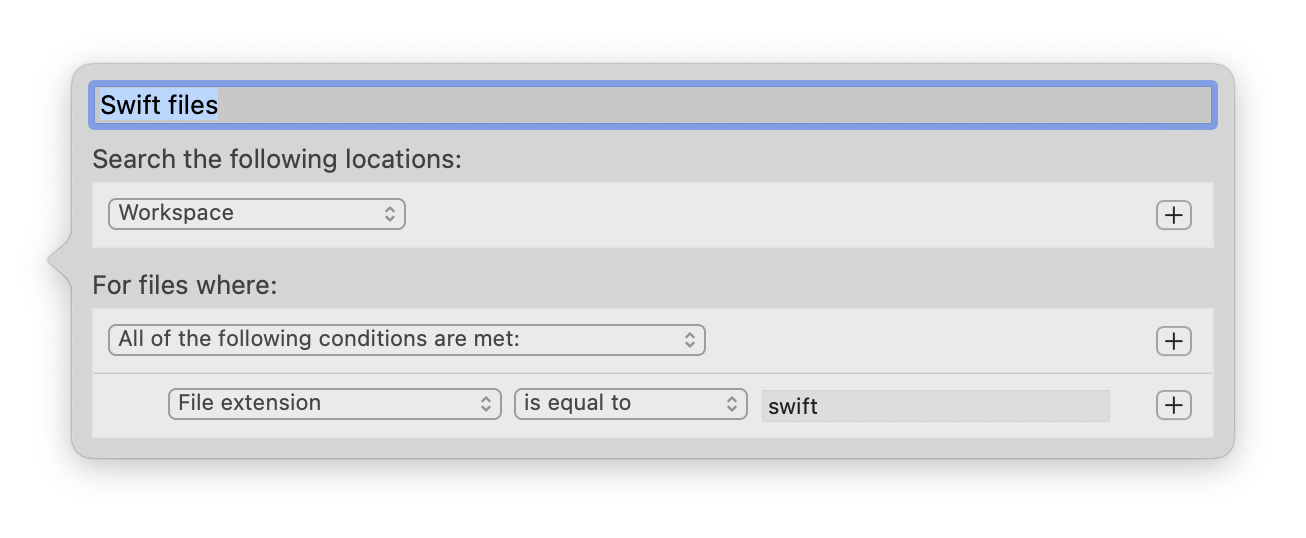
  3. Click the “New Scope” button and configure a scope designed to match all files with the “swift” file extension”:

    screenshot of custom search scope popover showing title

  4. Click the Find type (“Text” by default) in the search parameters above the search field, and change it to “Regular Expression”.
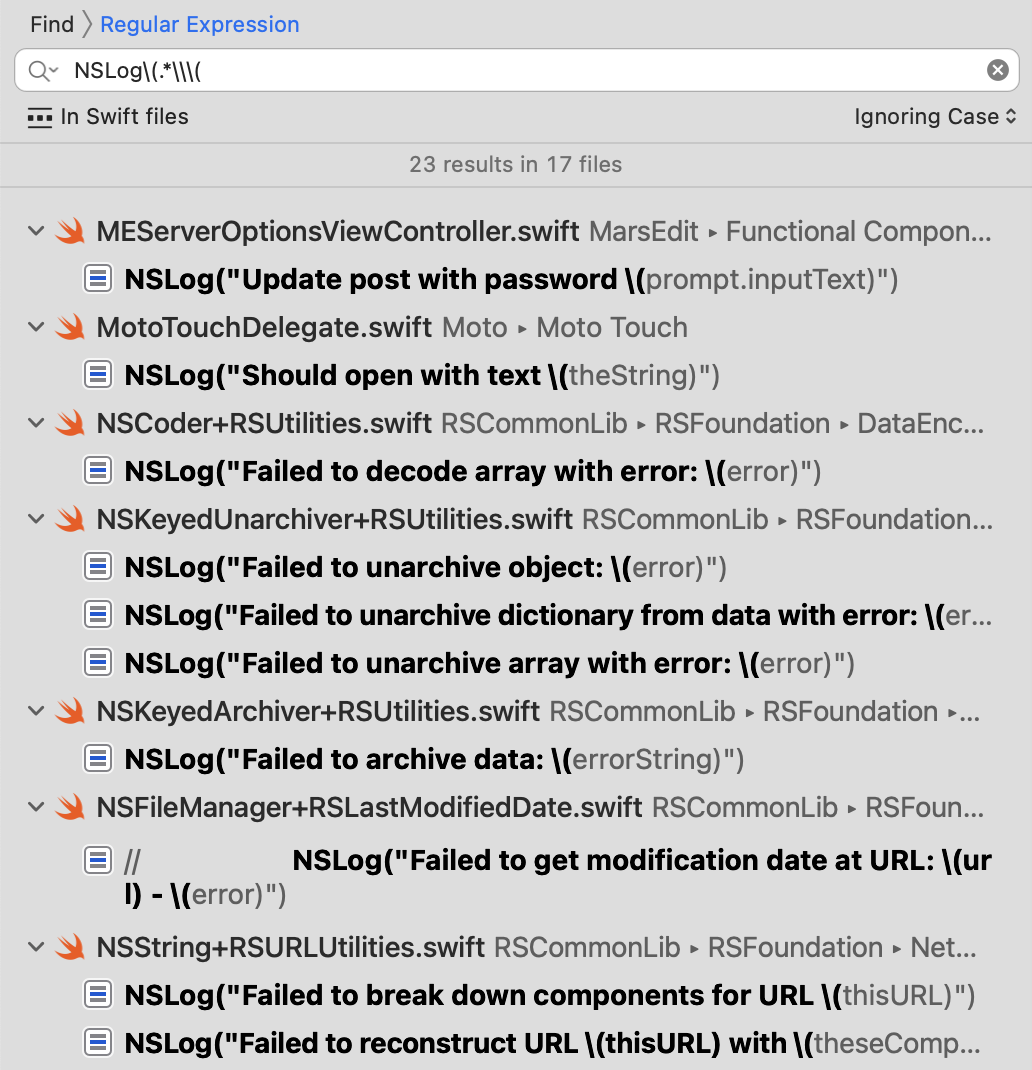
  5. Type or paste in the search string NSLog\(.*\\\( — this is a regular expression that will find intances of the string “NSLog(” followed by any number of characters that includes the substring \(, the tell-tale sign of Swift string interpolation:

    screenshot of search results showing multiple files with

In my own code base, this audit results in an alarming 23 instances in 17 files, all of which I will soon be converting to a safer logging method. I encourage you to do the same in your code base. Hopefully you’ll have been followingn a safer pattern all along and won’t have any work to do, but if you’re anything like me, you might find you’re more vulnerable to the problem than you thought!

Discoverable Key Commands

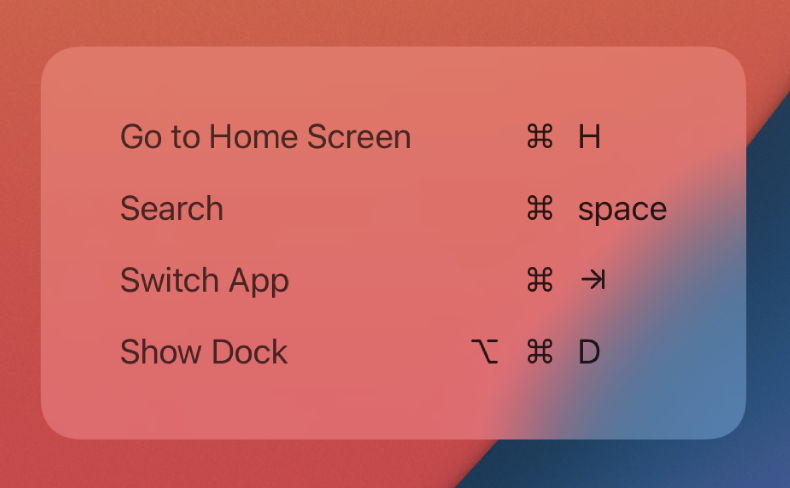
As I make progress on Black Ink for iOS, I have taken care to add keyboard shortcuts to make the app more usable on an iPad with external keyboard. One standard behavior of iPadOS is that when an app supports keyboard shortcuts, simply holding down the command key presents a nice heads-up display (HUD) with the list of shortcuts. For example, if you press the command key on the iPad home screen, you’ll see something like this:

Screenshot of prompt showing list of keyboard shortcuts on iPad.

This panel is supposed to appear automatically for any app that declares keyboard shortcuts using the UIKeyCommand interface of UIKit, which Black Ink does. I couldn’t figure out why the panel never appeared in the app. When the Command key is pressed, I confirmed that my puzzle view was the “first responder”, meaning it is the view that iOS should consult when building the list of key commands to show. What could possibly be going wrong?

Never being one to take the easy route when solving a problem, I found myself tracing the UIKit system code deep into the infrastructure that determines whether or not to show a panel or not. When the command key is held for a sufficiently long time, an internal timer expires and “-[UIKeyCommandDiscoverabilityHUD _HUDPopTimerFired:]” is reached. This method ends up calling a private “_performableKeyCommandsWithResponder:” method, which finally leads to some code that … asks each UIKeyCommand for its discoverabilityTitle, or as a backup, its title. Hmm, what is the discoverability title? Let’s look at the header for UIKeyCommmand:

// Creates an key command that will _not_ be discoverable in the UI.
+ (instancetype)keyCommandWithInput:(NSString *)input modifierFlags:(UIKeyModifierFlags)modifierFlags action:(SEL)action;

// Key Commands with a discoverabilityTitle _will_ be discoverable in the UI.
+ (instancetype)keyCommandWithInput:(NSString *)input modifierFlags:(UIKeyModifierFlags)modifierFlags action:(SEL)action discoverabilityTitle:(NSString *)discoverabilityTitle;

Face, meet palm.

When implementing support for keyboard shortcuts, I had leaned on code completion and went with the easiest option. The shortcuts worked, so what could go wrong? It turns out you have to declare a title for UIKeyCommand or the system won’t present a prompt to users about it. It makes sense, because what would it list as the explanation for what it does, if nothing is set on it?

After I added discoverability titles, everything looks as it should:

Screenshot of Black Ink for iOS showing a full list of keyboard shortcuts for puzzle navigation, etc.

Hopefully this will help others who are stuck trying to figure out why their app’s keyboard shortcuts aren’t showing up.

Not Applicable

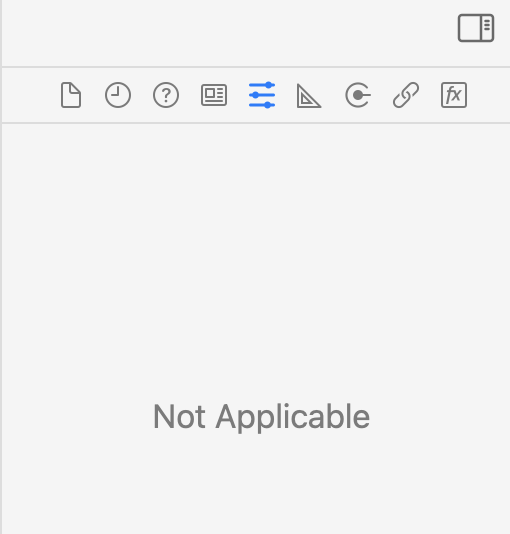
From time to time, particularly when I’m working with xib files of a certain vintage, Xcode simply refuses to offer any inspector tools for the contents of a particular Interface Builder document. Instead of the typical controls for setting an object’s properties, I get this:

UntitledImage

Look familiar? It’s super-frustrating when you simply can’t get at the settings for something you desperately need to change. I’ve sometimes gotten Xcode to relent through some combination of closing the file in question, closing assistant editors, etc. But sometimes I just can’t get it to show the properties for an object no matter what I try.

The one thing that always works is to simply make a copy of the xib file in question, which Xcode will happily edit, and then copy it back over the original. It’s really that simple:

  1. Copy MyInterface.xib to MyInterface Copy.xib
  2. Double-click the copy to edit it.
  3. Save changes.
  4. Replace MyInterface.xib with MyInterface Copy.xib

This has vexed me long and hard enough that I thought some others will not have recognized there is such an easy workaround. It would be great if Apple fixes whatever bug is causing this, but in the meantime at least there’s a solution.

Similar Detritus Not Allowed

Over the past few weeks, I’ve noticed a spike in the number of Mac and iOS developers who are running into a specific code signing error while building their apps. I myself ran into it last week after saving a new version of an image file from Preview into my app’s bundled resources.

I’ve noticed folks on Twitter and in developer Slack’s coming up with the same problem. I don’t know if something has changed in the code signing toolchain, or we’re just having an unlucky break, but I thought I’d blog about it because it seems many people may need this advice now.

The error in question is always along these lines:

resource fork, Finder information, or similar detritus not allowed

It comes up when the code signing process comes across traces of metadata in one of the files that is bundled with your app, or in some instances in the binary executable itself. This problem is common enough that Apple even posted a technical note several years ago that explains:

Code signing no longer allows any file in an app bundle to have an extended attribute containing a resource fork or Finder info.

This technical note gives advice for how to use the xattr tool to both examine and remove the unwanted extended attributes on the file. At least one colleague has reported that whatever was wrong with the file in their case was not detectable by xattr and therefore also not reparable with that tool.

Here’s a foolproof trick that is likely to address the problem, whether it’s unwanted extended attributes, resource forks, or whatever. Simply cat the affected file into another file, and then replace the original. For example, if you’ve got an image file called Whatever.png in your app, and it’s triggering the error above, try this in the Terminal:

cat Whatever.png > Whatever2.png
mv Whatever2.png Whatever.png

Et voilà! It’s as simple as that. The cat command cares not about whatever special attributes or resource forks are causing the code signing process grief. It only cares about the binary bits that comprise “the main file”.

Excluded Embedded Binaries

After updating to Xcode 11.5 my release builds started failing because a failure in the “embedded binary validation” build step, which occurs after the last explicit build phase over which we as developers have the ability to affect how products are built.

I was able to trace the problem to an attempt to validate an app extension that is embedded into my app but then removed by a later build phase. The rationale here is that the app extension in question is used internally, and shouldn’t be shipped to customers. But you can’t have dependencies and binary embedding vary based on the build configuration, so I always build the app extension, embed it, and remove it only when building a “Release” build.

This strategy has worked well for years, but in the latest Xcode, it attempts to validate the embedded binary even if it no longer exists. I guess there’s some wisdom to this. After all, a missing binary certainly isn’t valid! But historically Xcode has allowed custom build phases to substantially change the layout and contents of the built product without causing the post-build steps to fail.

I created and submitted to Apple a simple test app that exhibits the problem. In this case, an app named InvalidApp.app embeds an app extension Whatever.appex, and then removes it in a build phase. It results in this errr:

error: Couldn't load Info dictionary for <DVTFilePath:0x7f86ef4be800:'/Users/daniel/Library/Developer/Xcode/DerivedData/InvalidApp-bqvdubwezowsaccymccleomclddp/Build/Products/Debug/InvalidApp.app/Contents/PlugIns/Whatever.appex'> (in target 'InvalidApp' from project 'InvalidApp')

Yes, there is no Info.plist for this app extension because the whole thing is gone! I worried that I would have to rejigger my whole build process and figure out another way to ensure this app extension is avialable only in internal builds, but luckily Apple got back to me with a suggestion to use the EXCLUDED_SOURCE_FILE_NAMES build setting to exclude the app extension.

I am familiar with this build setting, which can be used to impose powerful variations on which source files contribute to a particular built product. For example, it can be used to cause different source files to be compiled for the iOS version of an app than the Mac version. See Dave Delong’s excellent post series on conditional compilation to learn more about this powerful technique.

But I hadn’t considered that the build setting might apply to embedded binaries. After all, Whatever.appex isn’t a “source file.” But lo and behold, adding the app extension name to the excluded source file names for my target, only in the Release build configuration, completely solves the problem. Not only does it avoid the erroneous validation error, it achieves my original goal of excluding the app extension by never copying it to the bundle in the first place. I can remove the custom build phase that selectively removed the app extension, in favor of a build setting that effectively communicates to the Xcode build system exactly what I want it to do.

Xcode 11.4 Beta 1: Couldn’t Load Spec With Identifier

When Apple updates Xcode, they usually add a slew of deprecations and warnings that might turn your otherwise warning-free project into a virtual hailstorm of yellow warning triangles.

One of the warnings that popped up for me with the recent Xcode 11.4 Beta 1 release, is this inscrutable little gem:

Screenshot of a warning from Xcode. Text in post content below.

Hmm, “Couldn’t load spec with identifier ‘com.apple.compilers.gcc.4_0’ in domain ‘macosx'”, what does it mean? I know this is an old project, and has a lot of history. Maybe I have some old GCC setting that needs to be zapped? I searched the build settings for “gcc” but nothing came up at all, and certainly nothing with the specificity of “gcc.4_0”.

I was perplexed. Rather than fish around any longer in Xcode, I headed to Terminal for some brute force searching:

% cd /path/to/My.xcodeproj
% grep -r gcc *
project.pbxproj:			compilerSpec = com.apple.compilers.gcc.4_0;
...

Aha! Let’s open that file up and see what the context is for these:

65F44C4917D681F3002A02AA /* PBXBuildRule */ = {
	isa = PBXBuildRule;
	compilerSpec = com.apple.compilers.gcc.4_0;
	fileType = sourcecode.c;
	inputFiles = (
	);
	isEditable = 1;
	outputFiles = (
	);
};

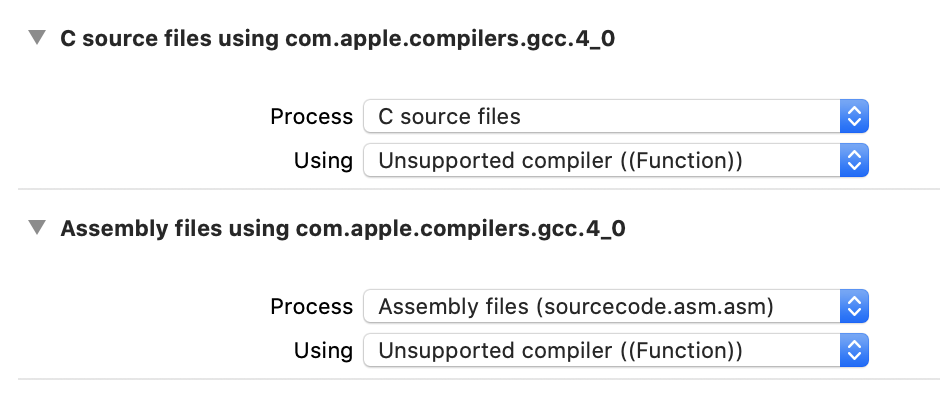
Build rules? We don’t need no steekin’ build rules! I have rarely used a custom build rule, so never think to search in that tab when examining a target’s properites. Particularly not when I’m coping with new Xcode warnings. Sure enough, I took a look in the Build Rules tab and found these:

Screenshot of Xcode's build rules editor, listing two custom rules, one for C file and one for Assembly files, specifying an

These custom build rules must have come from a time when the target included C and Assembly files. These days, it only contains Objective-C files, so I feel extra safe in deleting these. After doing so, the new warnings are gone.

Bitwise Manipulation

Since as long as I have been a programmer, bitwise operators have been an important but sometimes daunting part of my work. These are the programming tools with which you take a numerical value, let’s say seven, and manipulate it at the level of the bits that make up its binary representation. You can display the binary representation of any value in lldb, the standard Apple debugger, using “p/t”:

(lldb) p/t 7
(int) $0 = 0b00000000000000000000000000000111

One of the most common use cases for bitbwise manipulation is to squeeze lots of information into a small amount of computer memory. For example, a 32-bit integer can hold 32 distinct boolean values:

(lldb) p/t -1
(int) $1 = 0b11111111111111111111111111111111

Yep! The signed, 32-bit value for -1 is often represented as “all the bits are on!” But we could also consider this bit field to be a representation of the enabled/disabled states for 32 distinct preferences in our app. In which case, it’s common to declare numerical constants in code that make it easy to know which bit stands for what.

In C, this is often done by declaring an enumeration where each element is a different power of two, which is by definition the numeric value of each of the bits in any binary number. Apple’s own Objective-C headers use this all over the place. For example, CALayer declares a mask type that allows the four corners of a rectangle to be identified as 1, 2, 4, or 8:

typedef NS_OPTIONS (NSUInteger, CACornerMask)
{
  kCALayerMinXMinYCorner = 1U << 0,
  kCALayerMaxXMinYCorner = 1U << 1,
  kCALayerMinXMaxYCorner = 1U << 2,
  kCALayerMaxXMaxYCorner = 1U << 3,
};

To work with these types of values, you often need to use bitwise operators to set, test, unset, or toggle particular elements in a value. Working with bitwise values can be pretty brain-bending, but I recommend that everybody learn about and understand why and how each of the most common bitwise operators work. I won’t delve too deep here, but for example if you wanted to “add” the value 8, for kCALayerMaxXMaxYCorner, to an existing mask of value 7, representing all three other corners, this is what it would look like at a bitwise level:

(lldb) p/t 7
(int) $2 = 0b00000000000000000000000000000111
(lldb) p/t 8
(int) $3 = 0b00000000000000000000000000001000
(lldb) p/t 7 | 8
(int) $4 = 0b00000000000000000000000000001111

A bitwise operator acts on each bit of a value independently, potentially transforming it into a new value. The bitwise OR operator, which is “|” in C, did this above by looking at every bit in the value for 7, and every bit in the value for 8, and if either one had a value of 1, the bit in the resulting value is also set to 1. You can see this visually by playing with the operators in lldb as I’ve demonstrated above.

Even once you fully understand bitwise operators, they’re pretty annoying to work with on a day-to-day basis. That’s why in C, I’ve used these macros for years that simplify the task of performing these common tasks. I’ll leave it as an exercise to figure out why these all work the way they do:

// Basic bitwise operators for our convenience
#define RS_SET_BIT(mask, addedBit) (mask |= addedBit)
#define RS_TEST_BIT(mask, testBit) ((mask & testBit) != 0)
#define RS_CLEAR_BIT(mask, removedBit) (mask &= ~(removedBit))
#define RS_TOGGLE_BIT(mask, toggledBit) (mask ^= toggledBit)

For example, if you were maintaining a list of corner masks, and wanted to remove the kCALayerMinXMaxYCorner value, you just:

CACornerMask existingCornerMask = ... whatever ...
RS_CLEAR_BIT(existingCornerMask, kCALayerMinXMaxYCorner);

It’s more readable, easier to remember, and most importantly easier to get right than always coming up with the exact combination of bitwise operations to remove a value from a binary bitmask.

What about Swift? These macros are based on C’s macro preprocessor, and Swift doesn’t support such a thing. The good news is Swift handles bitmasks in a fundamentally better way, by promoting them to a first-class type called OptionSet. If you’re lucky enough to be working in Swift, you can achieve the same thing as above with:

var existingCornerMask: CACornerMask = ... whatever ... 
existingCornerMask.remove(.layerMinXMaxYCorner)

Bitwise manipulation is important in most every field of computer programming, and as I said, you should really understand it. But as I also said, once you’ve understood it, you should probably strive to never use bitwise operators again. At least not directly.

Casting Objective-C Message Sends

Mike Ash shares interesting news that the latest Xcode SDKs include a change to the function prototype of Objective-C’s msgSend family of functions. Where objc_msgSend was previously defined in terms of the couple of parameters it usually takes, and with the return type that it sometimes has, it is now declared as taking no parameters and returning no value:

OBJC_EXPORT void
objc_msgSend(void /* id self, SEL op, ... */ )

In practial terms, this will have an impact if you are still using direct objc_msgSend calls anywhere in your code. For example, imagine you have a “transformer” class that is capable of performing a variety of text manipulations on strings. You might have some code that derives a “SEL” programmatically and then messages the transformer to perform the action. Here’s a contrived example:

SEL tSEL = @selector(uppercaseString:);
NSString* upString = objc_msgSend(transformer, tSEL, lowString);

While that would have worked previously (apart from some ARC warnings), on the latest SDKs you’ll get a compile-time error on the objc_msgSend call:

Too many arguments to function call, expected 0, have 3

Obviously, you need to pass the arguments or the invocation will be useless, but how do you do it? Mike’s post has the advice:

Because it still has a function type, you can still cast it to a function pointer of the appropriate type and invoke it that way. This will work correctly as long as you get the types right.

As long as you get the types right … so, how does one do that? Mike includes an example of inline-casting objc_msgSend, but if you need to do this more than once in your code, I think a more elegant way of casting objc_msgSend is by declaring a global variable as a function pointer with the desired types:

#import "objc/message.h"

NSString* (*PerformWithStringReturningString)(id, SEL, NSString*) = (NSString* (*)(id, SEL, NSString*)) objc_msgSend;

Now when you want to invoke “objc_msgSend” on an object that you know accepts and returns a string type, you can do so like this:

NSString* upString = PerformWithStringReturningString(transformer, tSEL, lowString);

No compiler warnings, ARC knows just what to do with all the types, and you have a very clear understanding of what objc_msgSend is expected to do with this particular invocation.