Mike Ash shares interesting news that the latest Xcode SDKs include a change to the function prototype of Objective-C’s msgSend family of functions. Where objc_msgSend was previously defined in terms of the couple of parameters it usually takes, and with the return type that it sometimes has, it is now declared as taking no parameters and returning no value:
OBJC_EXPORT void
objc_msgSend(void /* id self, SEL op, ... */ )
In practial terms, this will have an impact if you are still using direct objc_msgSend calls anywhere in your code. For example, imagine you have a “transformer” class that is capable of performing a variety of text manipulations on strings. You might have some code that derives a “SEL” programmatically and then messages the transformer to perform the action. Here’s a contrived example:
SEL tSEL = @selector(uppercaseString:);
NSString* upString = objc_msgSend(transformer, tSEL, lowString);
While that would have worked previously (apart from some ARC warnings), on the latest SDKs you’ll get a compile-time error on the objc_msgSend call:
Too many arguments to function call, expected 0, have 3
Obviously, you need to pass the arguments or the invocation will be useless, but how do you do it? Mike’s post has the advice:
Because it still has a function type, you can still cast it to a function pointer of the appropriate type and invoke it that way. This will work correctly as long as you get the types right.
As long as you get the types right … so, how does one do that? Mike includes an example of inline-casting objc_msgSend, but if you need to do this more than once in your code, I think a more elegant way of casting objc_msgSend is by declaring a global variable as a function pointer with the desired types:
No compiler warnings, ARC knows just what to do with all the types, and you have a very clear understanding of what objc_msgSend is expected to do with this particular invocation.
Update: 3 November, 2019: As of Xcode 11 the altool command features a new parameter, “–list-providers” which makes it much easier to obtain the provider ID described below. See the updated documentation for more information.
With the release of macOS 10.15 fast-approaching, more and more Mac developers will be scurrying to ensure their apps are notarized. This is the process by which binary applications are submitted to Apple for cryptographic seal-of-approval indicating that the app meets minimum requirements for safety, and shows no obvious signs of being malware.
Apple offers substantial documentation about notarizing your apps. Many developers will find that Xcode automatically notarizes the app as part of the built-in process for archiving an app for release. For those of us with existing, automated command-line build & release processes, there is a separate guide just for us:
The steps for automating notarization involve running the “altool” command from Terminal. Everything in the guide linked above should work perfectly unless you’re a member of more than one development team. If you have more than one team associated with your Apple ID, the back-end at Apple doesn’t know which one it should notarize on behalf of. You’ll see an error message like this:
Error: Your Apple ID account is attached to other iTunes providers. You will need to specify which provider you intend to submit content to by using the -itc_provider command. Please contact us if you have questions or need help. (1627)
Here’s where things get fun: what the heck is your ITC provider ID? It’s not listed anywhere obvious on the Apple developer site or in Xcode, and can’t be obtained from the very tool that is asking for it. I came across a message from the ever-helpful Quinn in the Apple Developer Forums. It details a method for locating the provider ID by running a command-line tool, iTMSTransporter, from deep within Apple’s Application Loader app.
Application Loader has since been eliminated from Xcode 11, so if you’re running with modern tools, you’ll be hard pressed to find it. Fear not, the binary is preserved deep within the Xcode app bundle itself:
All that said, here is a surefire list of steps for obtaining your ITC Provider ID, or as it’s described in the altool man page, your ASC Provider Shortcode.
At your discretion, revoke the App-Specific Password you created for this process.
NOTE: These instructions apply if you are using Xcode 11. If you’re still using Xcode 10, you’ll need to dig up the iTMSTransporter binary from within Application Loader.app. Instead of “xcrun iTMSTransporter” above, it will be something like /path/to/Application Loader.app/Contents/itms/bin/iTMSTransporter.
If all goes well, you should see a list of your Apple development teams, including the Long Name and Short Name. The Short Name is what you need to pass whenever altool requires an ITC or ASC Provider ID.
I recently had cause to take another look at Swish, my iOS app for generating white noise and static visuals. OK, the reason was Apple sending me an email notification that, because it has been over three years since I last updated the app, they were going to remove it from the App Store in 30 days.
I had previously had it in mind to ship an update that supports the newest screen sizes for devices such as iPhone X, but I sort of lost track of that. This was a good motivation to get an other update out so I made a few quick improvements and set about uploading a build to Apple to “blow out the cobwebs” and see if I was missing anything else.
Upon uploading the app, I was met with this surprising error:
The Info.plist indicates an iOS app, but submitting a pkg or mpkg.
Hmm. That’s weird. I’m not submitting a pkg or mpkg. At least, I don’t think I am. My Info.plist should indicate an iOS app, because Swish is an iOS app.
I racked my brain trying to figure out what was going on here, and finally ended up filing a bug to Apple. Luckily, they got back to me within a day or two with this unexpected advice:
Please remove the LSMinimumSystemVersion from the Info.plist.
I had added the “minimum system version” to the Info.plist because I decided this update would support only iOS 11 and higher. I didn’t understand why that value would have anything to do with my issue, but I dutifully followed their advice, submitted the app, and … it worked perfectly!
Doing a little research, I discovered that LSMinimumSystemVersion is for macOS only, and that the iOS counterpart is simply called MinimumOSVersion. But, here’s the catch: the Xcode build process generates and inserts that MinimumOSVersion plist entry automatically, based on the deployment target for your app.
I hope this helps some frustrated Mac developer who is simply following old habits, and makes the mistake of adding LSMinimumSystemVersion to their iOS app’s Info.plist. Remove it, and your App Store uploads should work again!
A colleague recently asked whether it was possible to connect a custom keyboard shortcut to the system-wide “Use grayscale” setting in the macOS Voiceover system preferences:
I could not find any easy way to do this, and searching the web for solutions revealed that most people are addressing this want by using GUI scripting to automate literally opening System Preferences and clicking the pertinent checkbox.
I thought there must be a way to do this in a more streamlined fashion. Couldn’t the option be automated via AppleScript or something? After some brief research, my conclusion was “no.”
At this point I put on my “hacker hat” and proceeded to analyze the System Preferences code that handles the configuration. It’s a binary in /System/Library/PreferencePanes, and the following Terminal command got me on the right path:
cd /System/Library/PreferencePanes/UniversalAccessPref.prefPane/Contents/MacOS/
nm UniversalAccessPref | grep gray
In short, that means “dump all the symbols (nm) from the VoiceOver preference pane, and search them (grep) for the word ‘gray'”. Here’s what it spits out:
0000000000057210 S _OBJC_IVAR_$_UAPDisplayViewController._grayscaleCheckbox
                 U _UAGrayscaleIsEnabled
                 U _UAGrayscaleKey
                 U _UAGrayscaleSetEnabled
These look to me like exactly the names of functions that the preference pane is calling in order to check the current state, and to set the updated state, of the “Use grayscale” checkbox. The capital “U” stands for “Unimplemented.” I.e. it expects to find these symbols, function names in this case, in another library. But which library?
otool -L UniversalAccessPref
The “otool -L” command will dump all the libraries that the preference pane “links to,” meaning the libraries it expects to load functions or data from. There’s a huge list of frameworks in the output, but the most interesting one to me is:
The framework name “UniversalAccess” correlates strongly with the “UA” prefix on the pertinent function names we dug up above. Great, so how do we call these? They’re private system functions which means you should not rely on them for production code, but for a quick hack to make toggling grayscale easier? It’s a reasonable risk in my opinion. Here’s a simple C program that takes advantage of the private methods to simply toggle grayscale mode on or off, depending on the current setting.
If you wanted to assign this functionality to a keystroke, as originally suggested, the easiest way in my opinion is to use an app like my own FastScripts. You could drop the compiled binary above into your ~/Library/Scripts folder, and run it directly from FastScripts. Or, if you don’t want to fuss around with compiling a C program, just copy and paste this AppleScript:
-- Line up a Python script for dynamically loading
-- the private framework  and invoking the required
-- private methods to get current grayscale mode
-- and set it to the opposite value.
set toggleGrayScript to "python -c 'from ctypes import cdll
lib = cdll.LoadLibrary(\"/System/Library/PrivateFrameworks/UniversalAccess.framework/UniversalAccess\")
lib.UAGrayscaleSetEnabled(lib.UAGrayscaleIsEnabled() == 0)
'"
do shell script toggleGrayScript
This script takes advantage of Python’s ability to dynamically load an arbitrary shared library and invoke its exported functions. I wondered if I might be able to use AppleScript’s own “use framework” functionality but I couldn’t quite figure it out.
Hopefully this has been instructive generally for folks who are interested in hacking at system frameworks, and specifically for folks who were looking for an AppleScript for quickly toggling macOS grayscale mode on and off.
I’ve been experimenting in Xcode with the idea of using one workspace that contains ALL of my projects. The idea is to give me the ability to quickly jump between building/testing different apps, and to make it easier to do global refactoring of common code that is shared among all my apps.
The challenge here is rooted in Xcode’s inability to maintain more than one open reference to a project at a time. If you have a common library “CoreFunctions.framework” and several apps with “CoreFunctions.xcodeproj” embedded in them, then the first app you open in Xcode that references it “wins,” and all the subsequent apps end up with un-expandable proxy icons for the project reference.
The monolithic workspace is a bit unwieldy but great to not have to do the close and reopen dance every time I want to check whether a change to a common framework has an impact on another app.
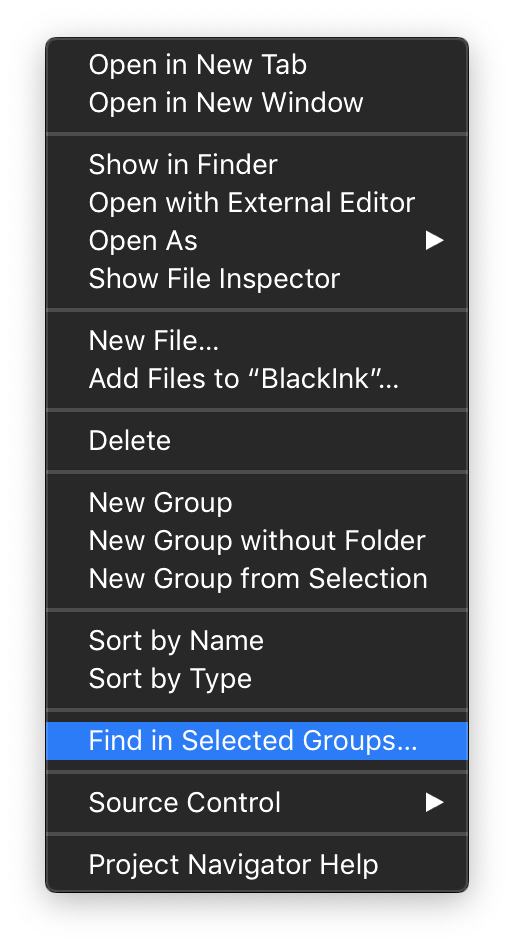
The main nuisance I find in working in the workspace is navigating the massive number of projects and file hierarchies that may be expanded at any time. What I’d like to be able to do is to borrow a trick from OmniFocus, and “focus” on just one project in my workspace at a time. Apple already offers the ability to focus search on a subset of files. Just right-click on a project or folder in the source list, and “Find in Selected Groups”:
If I could “Focus on Selected Groups” then I imagine being able to work primarily within a project, say BlackInk.xcodeproj, while maintaining all the open references in the workspace for the benefits of global searching and streamlining switches between active schemes. This functionality could be paired with Xcode’s tabbed window support to effectively provide separate workspaces that work in conjunction with one another. Radar #45908260.
Today, Craig Hockenberry of The Iconfactory writes about the challenge of adapting browser-based web content. That is to say, web page content that you view in an app like Safari. Dark Mode and CSS he talks about changes in the latest Safari Technology Preview:
Luckily the standards groups have been debating this issue for the past several months and have settled on a new media query called prefers-color-scheme. It’s not available in any shipping browser yet, but thanks to the WebKit team, it’s available in the new Safari Technology Preview.
Obviously Dark Mode has a long way to go before it becomes an expected standard around the web, but Apple supporting in on Mac and Safari is a good start. I bet we’ll hear more about Dark Mode on iOS soon, and I’m curious to see if non-Apple platforms also rise to the occasion.
If you’re using a web view the way a browser does, to show arbitrary content from the web, then you probably don’t need to do anything special to accommodate Dark Mode. If Dark Mode takes off then maybe we’ll see some kind of CSS standard around presenting web sites for dark presentations, but for the time being users expect web pages to look … like web pages.
On the other hand if you’re using web views to support an otherwise native Mac user interface, you’ll want to do something to adapt the default styling of your web content to look appropriate in Dark Mode. For example, I use a web view in my standard about box window. Here’s how it looked in MarsEdit before I adapted any web content to Dark Mode:
The two-tone look is kind of cool, but too much of an assault on the eyes for anybody who has really settled into Dark Mode. This content is not like a web page. It’s implemented in HTML to make features such as styling, layout, and links easier to manage, but as far as users are concerned it’s an innate part of this native About Box window.
I’ve seen a few approaches to adapting web content to Dark Mode, but most of them relied too heavily on modifying the actual HTML content that was being shown. In my apps, I use web views in several places and, rather than have to jump through hoops in each place to finesse the content for Dark Mode, I thought it would be better if I could come up with a common infrastructure that all web content presenters could use without typically being concerned about appearance.
Because my app is using both legacy WebView and modern WKWebView, I had to duplicate my efforts to some extent, but for the purposes of this article I’m going to focus on the approach I took for WKWebView.
My solution is rooted in arranging for a web view to call a pertinent JavaScript function when the effective appearance changes. Because WKWebView instances are notified via the viewDidChangeEffectiveAppearance method, I decided to subclass WKWebView to fulfill this contract on behalf of clients:
class RSAppearanceSensitiveWKWebView: WKWebView {

   var didInitialize = false

   // Override designated initializers to record when we're
   // done initializing, and avoid evaluating JS until we're done.

   override init(frame: CGRect, configuration: WKWebViewConfiguration) {
      super.init(frame: frame, configuration: configuration)
      didInitialize = true
   }

   required init?(coder: NSCoder) {
      super.init(coder: coder)
      didInitialize = true
   }

   public func updateContentForEffectiveAppearance() {
      // Don't try updating anything until we're done loading
      if didInitialize && self.isLoading == false {
         let funcName: String
         if self.effectiveAppearance.isDarkMode {
            funcName = "switchToDarkMode"
         }
         else {
            funcName = "switchToLightMode"
         }

         // Call the named function only if it is implemented
         let switchScript = "if (typeof(\(funcName)) == 'function') { \(funcName)(); }"
         self.evaluateJavaScript(switchScript)
      }
   }

   override func viewDidChangeEffectiveAppearance() {
      self.updateContentForEffectiveAppearance()
      if #available(macOS 10.14, *) {
         super.viewDidChangeEffectiveAppearance()
      }
   }
}
Instances of this subclass enjoy the benefit of two JavaScript functions, switchToDarkMode() and switchToLightMode(), being called whenever the view’s effective appearance changes. In case a client doesn’t wish the content to be adapted to Dark Mode, they can simply omit the functions from the content they load into the view.
Because I don’t want to duplicate efforts to handle appearance switching throughout my apps, I implemented basic support for mode switching in my centralized “web content display” class, RSWebContentViewController. This controller takes advantage of WKWebView’s support for injecting JavaScript, to add support for switching modes to whatever content the client provided:
let appearanceModeScriptSource = """
   var darkModeStylesNodeID = "darkModeStyles";

   function addStyleString(str, nodeID) {
      var node = document.createElement('style');
      node.id = nodeID;
      node.innerHTML = str;

      // Insert to HEAD before all others, so it will serve as a default, all other
      // specificity rules being equal. This allows clients to provide their own
      // high level body {} rules for example, and supersede ours.
      document.head.insertBefore(node, document.head.firstElementChild);
   }

   // For dark mode we impose CSS rules to fine-tune our styles for dark
   function switchToDarkMode() {
      var darkModeStyleElement = document.getElementById(darkModeStylesNodeID);
      if (darkModeStyleElement == null) {
         var darkModeStyles = "body { color: #d2d2d2; background-color: #2d2d2d; } body a:link { color: #4490e2; }";
         addStyleString(darkModeStyles, darkModeStylesNodeID);
      }
   }

   // For light mode we simply remove the dark mode styles to revert to default colors
   function switchToLightMode() {
      var darkModeStyleElement = document.getElementById(darkModeStylesNodeID);
      if (darkModeStyleElement != null) {
         darkModeStyleElement.parentElement.removeChild(darkModeStyleElement);
      }
   }
"""

let appearanceModeScript = WKUserScript(source: appearanceModeScriptSource, injectionTime: .atDocumentEnd, forMainFrameOnly: true)
self.webView.configuration.userContentController.addUserScript(appearanceModeScript)
Copy this into Xcode for easier reading, but the gist of it is to implement switchToDarkMode() by injecting CSS rules that alter the baseline defaults for the web content, and implement switchToLightMode() by removing those CSS rules. This is what my about box looks like after adopting the changes above:
This approach requires clients of RSWebContentViewController to trust that the default appearance switching will be sufficient for whatever content it wants to display. So far this simple approach has been sufficient for my needs, but I’m also in a good position to expand upon the solution should the need arise.
When Apple announced Dark Mode at WWDC 2018, one of my first thoughts was: “Aha! So that’s why Apple has us all switching our icons to template (monochrome) style images.” These images do tend to adapt pretty well to Dark Mode because the system can simply invert them and obtain a fairly usable icon, but the crude inversion doesn’t work well in all cases.
There are a lot of details to really getting Dark Mode icons perfect, and Apple talks a lot about this in the Introducing Dark Mode WWDC session. Given my limited time and resources, I took a pragmatic approach to get things looking “good enough” so I could ship a cohesive project while I hope to continue working on refinements in the future.
As with colors, asset catalogs can be a great aid in managing image variations for different appearances. Use them if you can, but bear in mind the caveats mentioned in the Adapting Colors section of this series.
Most apps will probably require some refinement of toolbar icons, the row of images typically displayed at the top of some windows. In MarsEdit, I was in pretty good shape thanks to a recent overhaul for MarsEdit 4, in which Brad Ellis revised my toolbar icons. Many, but not all, of the images have a templated style aesthetic. Here’s MarsEdit’s main window in Light Mode:
Let’s see what happens when just switch to Dark Mode without any special care for the icons:
That’s … not so good! Even my vaguely template-style icons are not being treated as templates, so they render with their literal gray colors and look pretty bad in Dark Mode. I realized I could probably do some quick Acorn work and get the template-style icons into shape, but what about the ones with splashes of color? The pencil? Should it still be yellow in Dark Mode?
I opted for a pragmatic, stop-gap solution. Without making any changes whatsoever to the graphics files, I worked some magic in code and came up with this:
That’s … actually pretty good! So what’s the magic in code I alluded to? I created a custom subclass of NSButton that will optionally set template status on the button’s image only if we’re in Dark Mode. You can see that some of the icons I’ve left untouched, because I felt their colors fit well enough in both dark and light modes. Here’s my custom RSDarkModeAdaptingToolbarButton:
class RSDarkModeAdaptingToolbarButton: NSButton {
   public var useTemplateInDarkMode: Bool = false
   var originalTemplateFlag: Bool = false

   public convenience init(image: NSImage,
                           target: Any?,
                           action: Selector?,
                           useTemplateInDarkMode: Bool = false) {
      self.init(image: image, target: target, action: action)
      self.useTemplateInDarkMode = useTemplateInDarkMode
   }

   override func layout() {
      // Always re-set the NSImage template state based
      // on the current dark mode setting
      if #available(macOS 10.14, *) {
         if self.useTemplateInDarkMode,
            let targetImage = self.image
         {
            var newTemplateState = self.originalTemplateFlag

            if self.effectiveAppearance.isDarkMode {
               newTemplateState = true
            }

            targetImage.isTemplate = newTemplateState
         }
      }

      super.layout()
   }
}
The key to this button’s functionality is the guarantee that layout will always be called on a button after an appearance change has occurred. This gives the button the opportunity to configure properties on itself that will affect how it is drawn. Sneaking in to set the template state on the image guarantees the NSButton superclass drawing code will treat it as a template in Dark Mode, but as a bitmap image in Light Mode.
One of the challenges I dealt with in MarsEdit was how to adapt my existing user-facing color preferences to Dark Mode:
The default values and any previously saved user customizations would be pertinent only to Light Mode. I knew I wanted to save separate values for Dark Mode, but I worried about junking up my preferences panel with separate labels and controls for each mode. After playing around with some more complicated ideas, I settled on simplicity itself: I would register and save separate values for each user-facing preference, depending on whether the app is in Dark Mode right now.
When a user switches modes, the visible color preferences in this panel change to the corresponding values for that mode. I reasoned that users are most likely to use these settings to fine-tune the appearance of the app as it appears now, and it would be intuitive to figure out if they wanted to customize the colors separately for each mode.
How did I achieve this? I decided to bottleneck access to these preferences so that as far as any consumer of the preference is concerned, there is only one value. For example, any component of my app that needs to know the “text editing color” consults a single property “bodyTextColor” on my centralized preferences controller. This is what the supporting methods, along with the property accessor, look like:
func color(forKey key: String, defaultColor: NSColor) -> NSColor {
   let defaults = UserDefaults.standard
   guard let color = defaults.rsColor(forKey: key) else {
      return defaultColor
   }
   return color
}

func setColor(color: NSColor, forKey key: String) {
   let defaults = UserDefaults.standard
   defaults.rsSetColor(color, forKey: key)
}

var bodyTextPreferenceKey: String {
   if NSApp.isDarkMode {
      return bodyTextColorForDarkModeKey
   } else {
      return bodyTextColorForLightModeKey
   }
}

@objc var bodyTextColor: NSColor {
   get {
      let key = self.bodyTextPreferenceKey
      return self.color(forKey: key, defaultColor: .textColor)
   }
   set {
      let key = self.bodyTextPreferenceKey
      self.setColor(color: newValue, forKey: key)
      self.sendNotification(.textColorPreferenceChanged)
   }
}
Because the getter and setter always consult internal properties to determine the current underlying defaults key, we always write to and read from the semantic value that the user expects. The only thing the user interface for my Preferences window needs to do is load up the color pane with the value from the getter, and respond to changes by writing with the setter.
You might be wondering what happens to the Preferences interface when the application’s appearance changes. I thought at first I would make the UI controller subscribe to appAppearanceChanged notifications, and reload the contents of the UI to match the current values of pertinent color preferences. It turned out that I didn’t even need to do that. Why?
In my centralized preferences controller, where the bottleneck methods shown above are implemented, each of the pertinent setters sends a notification that the color preference has changed. This allows observers throughout the app to update the color as needed when, for example, the user chooses a new value. If you’re using KVO or another technique for notifying clients of changes, this same approach can be adapted to that style.
After ensuring that all clients are notified when a color preference “changes,” we can reuse that same mechanism to proliferate changes in color preferences that happen to correlate with a change in appearance mode. I simply added an observer to “appAppearanceChanged” within the preference controller, where such notifications are translated into “color preference changed” notifications. The Preferences window observes these, and updates the UI. My text editors notice them, and reconfigure their appearance. Every concerned component of my app is guaranteed to know current colors regardless of how or why they have changed.
It’s worth noting that this is a scenario where using a solution like appearance-sensitive colors might also make sense. Instead of taking responsibility for notifying clients whenever these preferences change, a single color instance that adapts to current appearance would get the job done. This is a situation where even using an asset catalog doesn’t help. Because the colors in this situation are user-generated at run-time, they can’t be stored in a catalog, but a custom subclass of NSColor could achieve the same effect.
Given the dramatic visual differences between appearances, virtually every color in your app will need to be varied at drawing time to work well with the current appearance.
Use Semantic Colors
The good news is all of Apple’s built-in, semantically named colors are automatically adapted to draw with a suitable color for the current appearance. For example, if you call “NSColor.textColor.set()” in light mode, and draw a string, it will render dark text, whereas in dark mode it will render light text.
Seek out areas in your app where you use hard-coded colors and determine whether a system-provided semantic color would work just as well as, or better than, the hard-coded value. Among the most common fixes in this area will be locating examples where NSColor.white is used to clear a background before drawing text, when NSColor.textBackgroundColor will do the job better, and automatically adapt itself to Dark Mode.
Vary the Color at Drawing Time
In scenarios where a truly custom color is required, you have a few options. If the color is hard-coded in a drawing method, you may be able to get away with simply querying NSAppearance.current from the point where the drawing occurs. For example, a custom NSView subclass that simply fills itself with a hard-coded color:
override func draw(_ dirtyRect: NSRect) {
   super.draw(dirtyRect)

   // Custom yellow for light mode, custom purple for dark...

   let lightColor = NSColor(red:1, green:1, blue:0.8, alpha:1)
   let darkColor = NSColor(red:0.5, green:0.3, blue:0.6, alpha:1)

   if NSAppearance.current.isDarkMode {
      darkColor.setFill()
   } else {
      lightColor.setFill()
   }

   dirtyRect.fill()
}
Use Asset Catalogs
Special cases like above are fine when you draw your own graphics, but what about views that the system frameworks draw for you? For example, because NSBox supports drawing a custom background color, you’re unlikely to implement a custom view exactly like the one above. Its functionality is redundant with what NSBox provides “for free.” But how can you ensure that NSBox will always draw in the right color for the current appearance? It only supports one “fillColor” property.
A naive approach would involve paying attention to changes in appearance, and re-setting the fill color on NSBox every time. This would get the job done, but is more complicated and error-prone than simply setting a named system color like “textBackgroundColor” and letting it handle all the details of accommodating the current appearance.
Luckily, Apple provides a mechanism for adding custom named colors that behave the same way as standard colors do. Colors that are included in an asset catalog can be identified by name, and can be varied in the catalog to represent distinct colors depending on the appearance they are used in. In short, by defining all your hard-coded colors in asset catalogs, you can treat custom named colors like “funkyBackgroundColor” the same as standard colors like “textBackgroundColor.”
Ah, but there’s a catch. To take advantage of these fancy new asset catalog features, you need to not only build your app with Xcode 10, but you need to build it on a machine that is running macOS 10.14 or greater. Evidently the ability to generate suitable asset catalogs depends on some system functionality that Xcode 10 can’t (or at least doesn’t) replicate when running on 10.13. If you try to use these features in Xcode 10 on 10.13, you’ll run into warnings like:
warning: Named colors referencing system colors must be compiled on 10.14 to maintain dynamic behavior at runtime. Using fixed values for color 'textColor'
and
Varying images and colors by appearance requires building on macOS 10.14 or later.
Because of the utility of asset colors for both colors and images, I strongly recommend updating to Xcode 10 and building on 10.14.
Appearance-Sensitive Colors
If for some reason you can’t yet build your app with Xcode 10 on macOS 10.14, you might eke out a stopgap solution similar to mine. Because I started adopting Dark Mode shortly after WWDC 2018, before Xcode 10 or macOS 10.14 were final, I felt I needed something to simulate the behavior of catalog colors, but implemented independently of them.
I developed a class for my apps called RSAppearanceSensitiveColor, a subclass of NSColor that wraps multiple colors. If you decide to do something similar, be sure to take a look at the subclassing notes in NSColor’s documentation to ensure you override all the required methods. The most functionally important methods to override are “set”, “setFill”, and “setStroke”, because these methods are called at runtime by code that is responsible for drawing. If, for example, you implement a subclass that stores “lightModeColor” and “darkModeColor” as variants, you could add an internal helper method to resolve it:
var currentColor: NSColor {
   if NSAppearance.current.isDarkMode {
      return self.darkModeColor
   }
   else {
      return self.lightModeColor
   }
}
This takes advantage of the NSAppearance.isDarkMode property I described in Checking Appearances, making it easy to specialize based on the current appearance. Remember: that’s the one that is currently being used to perform drawing, etc. When a client that is configured with one of our colors, NSBox for example, calls our set() before drawing its background:
override public func set() {
   self.currentColor.set()
}
The actual drawing color will be appropriate for the current appearance, just as with Apple’s semantic and catalog-backed colors.