Category Archives: Cocoa

Designing macOS Menu Bar Extras

A great article by Marc Edwards, essentially the “missing manual” for macOS menu bar extras:

Apple’s HIG is great, but it doesn‘t contain much information related to designing menu bar extras. This article aims to provide additional details and context needed to create icons for macOS menu bar extras.

There are a lot of subtleties to get right, and this will help you if you are unfamiliar with the conventions!

Hacking NSAlert Button Appearance

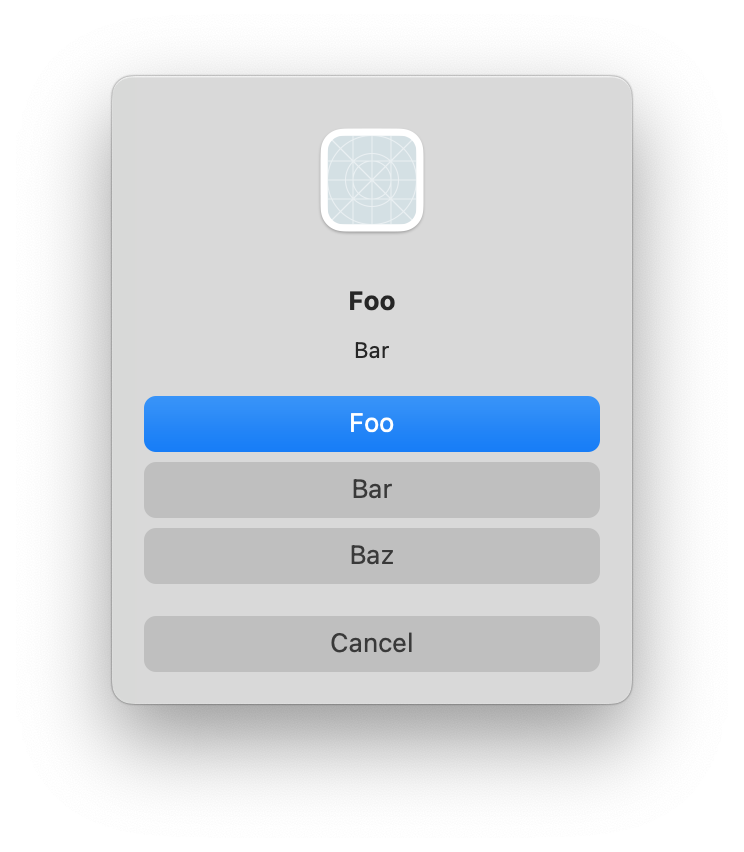
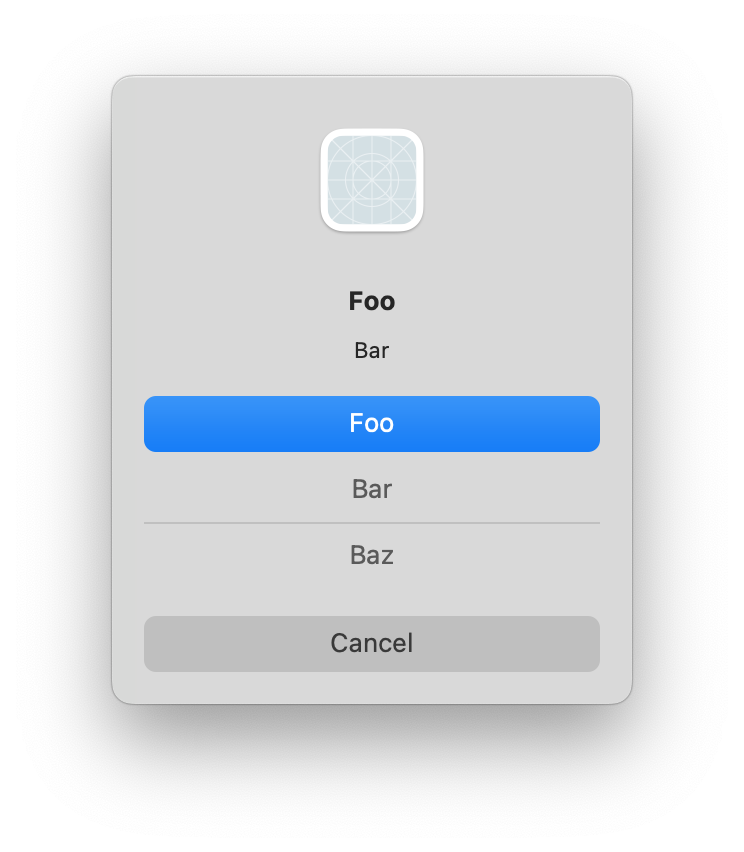
This morning my attention was grabbed by an old post in the Apple Developer Forums, bemoaning the appearance of NSAlert in Big Sur. No, not the usual complaints about alerts on Big Sur and later, but specifically about the way buttons appear when there are more than three:

screenshot of macOS alert panel with three primary buttons, two of which are drawn without a border or background

Notice how the “Bar” and “Baz” buttons do not have a border or background color, making it difficult to know whether they are even buttons at all. The line between Bar and Baz clunks up the interface even more.

At first I thought this situation was the result of more buttons than were expected being squeezed into too small a space, but after some experimentation I discovered that even forcing the alert to give the buttons more room did not alleviate the problem. This exploded view from the Xcode view debugger shows that the top, default button, is showing the background for the button, while the other buttons don’t have one at all:

screenshot of view debugger from Xcode with 3-dimensional layout of UI components

After a good amount of hacking about in the debugger, I discovered the cause was rooted in the buttons simply having their showsBorderOnlyWhileMouseInside property set to true. This suggests it’s a stylistic decision on Apple’s part, but I have to think it wasn’t completely thought through because this simply does not look good! Furthermore, that clunky line after the second button seems to be placed there as an alternative to the buttons being distinguished by their own backgrounds. It looks particularly weird to my eye, so much that it looks more like an unintended drawing glitch than an intentional interface element.

So how would you work around such a problem? As I shared in the thread on the forums, one approach that seems both safe and effective is to patch up the appearance of the buttons, and hide the unwanted line. Because NSAlert performs a great number of modifications as it’s displaying the alert, you have to subclass and override its “layout()” method to catch it after it’s done tweaking the UI:

class HackAlert: NSAlert {
  @objc override func layout() {
    super.layout()

    for button in self.buttons {
      button.showsBorderOnlyWhileMouseInside = false
    }

    if let container = self.buttons.first?.superview {
      let boxes = container.subviews.compactMap { $0 as? NSBox }
      boxes.forEach { $0.isHidden = true }
    }
  }
}

With the hack in effect, the alert looks much nicer:

screenshot of macOS alert with all buttons showing visible background bezel

The key to hacking framework shortcomings is to identify a way to make the tweak such that the desired outcome is achieved, with little risk of unwanted outcomes. The changes I made here are only likely to cause problems if, in the future, Apple redesigns the UI so that it really does make sense for these buttons to “hide their borders”, or if Apple adds additional NSBox elements to the container view that holds these buttons. These seem unlikely enough to proceed with caution, but as always you should weigh the risks yourself, and only ship what you’re comfortable with!

Casting Objective-C Message Sends

Mike Ash shares interesting news that the latest Xcode SDKs include a change to the function prototype of Objective-C’s msgSend family of functions. Where objc_msgSend was previously defined in terms of the couple of parameters it usually takes, and with the return type that it sometimes has, it is now declared as taking no parameters and returning no value:

OBJC_EXPORT void
objc_msgSend(void /* id self, SEL op, ... */ )

In practial terms, this will have an impact if you are still using direct objc_msgSend calls anywhere in your code. For example, imagine you have a “transformer” class that is capable of performing a variety of text manipulations on strings. You might have some code that derives a “SEL” programmatically and then messages the transformer to perform the action. Here’s a contrived example:

SEL tSEL = @selector(uppercaseString:);
NSString* upString = objc_msgSend(transformer, tSEL, lowString);

While that would have worked previously (apart from some ARC warnings), on the latest SDKs you’ll get a compile-time error on the objc_msgSend call:

Too many arguments to function call, expected 0, have 3

Obviously, you need to pass the arguments or the invocation will be useless, but how do you do it? Mike’s post has the advice:

Because it still has a function type, you can still cast it to a function pointer of the appropriate type and invoke it that way. This will work correctly as long as you get the types right.

As long as you get the types right … so, how does one do that? Mike includes an example of inline-casting objc_msgSend, but if you need to do this more than once in your code, I think a more elegant way of casting objc_msgSend is by declaring a global variable as a function pointer with the desired types:

#import "objc/message.h"

NSString* (*PerformWithStringReturningString)(id, SEL, NSString*) = (NSString* (*)(id, SEL, NSString*)) objc_msgSend;

Now when you want to invoke “objc_msgSend” on an object that you know accepts and returns a string type, you can do so like this:

NSString* upString = PerformWithStringReturningString(transformer, tSEL, lowString);

No compiler warnings, ARC knows just what to do with all the types, and you have a very clear understanding of what objc_msgSend is expected to do with this particular invocation.

Intrinsic String Encoding

I was baffled today while investigating a bug in MarsEdit, which a customer reported as only seeming to affect the app when writing in Japanese.

I pasted some Japanese text into the app and was able to reproduce the bug easily. What really confused me, though was that the bug persisted even after I replaced the Japanese text with very straight-forward ASCII-compatible English. I opened a new editor window, copied and pasted the English text in, and the bug disappeared. I copied and pasted back into the problematic editor, and the bug returned. What the heck? Two windows with identical editors, containing identical text, exhibiting varying behavior? I knew this was going to be good.

It turns out there’s a bug in my app where I erroneously ask for a string’s “fastestEncoding” in the process of converting it. The bug occurs when fastestEncoding returns something other than ASCII or UTF8. For example, with a string of Japanese characaters, the fastestEncoding tends to be NSUnicodeStringEncoding.

But why did the bug continue to occur even after I replaced the text with plain English? Well…

The documentation for NSString encourages developer to view it as a kind of encoding-agnostic repository of characters, which can be used to manipulate arbitrary strings, converting a specific encoding only as needed:

An NSString object encodes a Unicode-compliant text string, represented as a sequence of UTF—16 code units. All lengths, character indexes, and ranges are expressed in terms of 16-bit platform-endian values, with index values starting at 0.

This might lead you to believe that no matter how you create an NSString representation of “Hello”, the resulting objects will be identical both in value and in behavior. But it’s not true. Once I had worked with Japanese characters in my NSTextView, the editor’s text storage must have graduated to understanding its content as intrinsically unicode based. Thus when I proceeded to copy the string out of the editor and manipulate it, it behaved differently from a string that was generated in an editor that had never contained non-ASCII characters.

In a nutshell: NSString’s fastestEncoding can return different values for the same string, depending upon how the string was created. An NSString constant created from ASCII-compatible bytes in an Objective-C source file reports NSASCIIStringEncoding (1) for both smallest and fastest encoding:

printf("%ld\n", [@"Hello" fastestEncoding]);	// ASCII (1)

And a Swift string constant coerced to NSString at creation behaves exactly the same way:

let helloAscii =  "Hello" as NSString
helloAscii.fastestEncoding			// ASCII (1)

But here’s the same plain string constant, left as a native Swift String and only bridged to NSString when calling the method:

let helloUnicode = "Hello"
helloUnicode.fastestEncoding		// Unicode (10)

As confusing as I found this at first, I have to concede that the behavior makes sense. The high level documentation describing NSString representing “a sequence of UTF-16 code units” says nothing about the implementation details. It’s a conceptual description of the class, and for the most part all methods operating on an NSString comprising the same characters should be heave the same way. But the documentation for fastestEncoding is actually pretty clear:

“Fastest” applies to retrieval of characters from the string. This encoding may not be space efficient.

As I said earlier, my usage of fastestEncoding was erroneous, so the solution to my bug involves removing the call to the method completely. In fact, I don’t expect most developers will ever have a legitimate needs to call this method. Forthose who do, be very aware that it can and does behave differently, depending on the provenance of your string data!

Selective Selector Mapping

I ran into an interesting challenge while porting some Objective-C code to Swift. The class in question served both as an NSTableView delegate and data source, meaning that it implemented methods both for controlling the table view’s behavior and for supplying its content.

Historically in Cocoa, most delegate relationships were established as informal protocols. If you wanted a particular class to be a table view data source, you simply implemented the required methods. For example, to populate a cell based table view, a data source would implement various methods, including one to indicate how many rows the view should have:

- (NSInteger) numberOfRowsInTableView:(NSTableView *)tableView;

In recent years, Apple has increasingly converted these informal protocols to formal Objective-C protocols. These give the compiler the opportunity to generate errors if a particular class declares compliance, but neglects to implement a required method. At runtime, however, the compliance-checking is still pretty loose. NSTableView consults its data source, checks to see that it implements a required subset of methods, and dynamically dispatches to them if it does.

The dynamic nature of NSTableView hasn’t changed with Swift. An @objc class in Swift that complies with NSTableViewDataSource must still implement the required methods such that Apple’s Objective-C based NSTableView can dynamically look up and dispatch to the required delegate methods. Swift’s method rewriting “magic” even ensures that a delegate method can be written in modern Swift style, yet still appear identically to older Objective-C code:

class MyDataSource: NSObject {
	@objc func numberOfRows(in tableView: NSTableView) -> Int {
		return 0
	}
}

Given an instance of MyDataSource, I can use the Objective-C runtime to confirm that a the legacy “numberOfRowsInTableView:” selector is actually implemented by the class above:

let thisSource = MyDataSource()
thisSource.responds(to: Selector("numberOfRowsInTableView:")) // false

Or can I? False? That’s no good. I’m using the discouraged “Selector” initializer here to ensure I get Swift to look for a very specific Selector, even if it doesn’t appear to be correct to the Swift-adapted side of the runtime.

I was scratching my head, trying to figure out why Objective-C could not see my method. Did I forget an @objc marker? No. Did I forget to make MyDataSource a subclass of NSObject? No. I finally discovered that I could second-guess the default Swift selector mapping to obtain a result that “worked”:

class MyDataSource: NSObject {
	@objc func numberOfRowsInTableView(_ tableView: NSTableView) -> Int {
		return 0
	}
}

let thisSource = MyDataSource()
thisSource.responds(to: Selector("numberOfRowsInTableView:")) // true

Instances of MyDataSource will get the job done for Objective-C calls to “numberOfRowsInTableView:”, but I’ve lost all the pretty formatting that I expected to be able to use in Swift.

There’s something else I’m missing out in my Swift implementation: type checking of MyDataSource’s compliance with the NSTableViewDataSource protocol. Old habits die hard, and I had initially ported my class over with an old-fashioned, informal approach to complying with NSTableViewDataSource: I declared a plain NSObject that happens to implement the informal protocol.

It turns that adding that protocol conformance onto my class declaration not only gains me Swift’s protocol type checking, but changes the way key functions are mapped from Swift to Objective-C:

class MyDataSource: NSObject, NSTableViewDataSource {
	func numberOfRows(in tableView: NSTableView) -> Int {
		return 0
	}
}

let thisSource = MyDataSource()
thisSource.responds(to: Selector("numberOfRowsInTableView:")) // true

Armed with the knowledge that my class intends to comply with NSTableViewDataSource, Swift generates the expected mapping to Objective-C. Notice in this final case, I don’t even have to remember to mark the function as @objc. I guess when Swift is creating the selector mapping for a function, it does so in a few phases, prioritizing more explicit scenarios over more general:

  1. First, it defers to any explicit annotation with the @objc attribute. If I tag my “numberOfRows…” func above with “@objc(numberOfDoodads:)” then the method will be made available to Objective-C code dynamically looking for “numberOfDoodads:”.
  2. If there’s no @objc specialization, it tries to match function implementations with declarations in superclasses or protocols the class complies with. This is what gives us the automatic mapping of Swift’s “numberOfRows(in:)” to Objective-C’s “numberOfRowsInTableView:”.
  3. Finally it resorts to a default mapping based on Swift API Design Guidelines. This is what yielded the default “numberOfRowsIn:” mapping that I first encountered.

This is an example of a Swift growing pain that is particularly likely to affect folks who are adapting older source bases (and older programming mindsets!) to Swift. If you run across a completely vexing failure of Objective-C to acknowledge your Swift class’s protocol compliance, start by making sure that you’ve actually declared the compliance in your class declaration!

Swatch Your Step

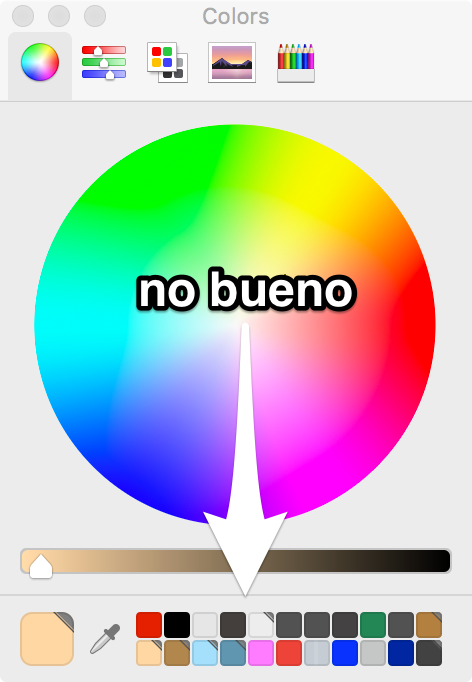
Shortly after macOS 10.13 was released, I received an oddly specific bug report from a customer, who observed that the little square “swatches” in the standard Mac color panel no longer had any effect on MarsEdit’s rich text editor.

Screenshot of the macOS standard color panel.

I was able to reproduce the problem in the shipping 3.7.11 version of MarsEdit, which for various reasons is still built using an older version of Xcode, against the 10.6 SDK. The MarsEdit 4 Beta, which is built against the 10.12 SDK, does not exhibit the problem.

It’s not unusual for the behavior of Apple’s frameworks to vary based on the version of SDK an application was built against. The idea is usually to preserve the old behaviors of frameworks, so that any changes do not defy the expectations of a developer who has not been able to build and test their app against a later SDK. Sometimes, the variations in behavior lead to bugs like this one.

Using a totally straightforward demo app, consisting only of an NSTextView and a button to bring up the color panel, I was able to confirm that the bug affects an app that links against the macOS 10.9 SDK, but does not affect an app that links against the 10.10 SDK.

I filed Radar #34757710: “NSColorPanel swatches don’t work on apps linked against 10.9 or earlier.” I don’t know of a workaround yet, other than compiling against a later SDK.

Unordered Directory Contents

Since I updated to macOS 10.13 High Sierra, some of my unit tests broke. Examining the failures more carefully, I discovered that they were making assumptions about the order that Foundation’s FileManager.contentsOfDirectory(atPath:) would return items.

I wrote a quick playground to test the behavior on a 10.12 machine:

import Foundation

let array = try! FileManager.default.contentsOfDirectory(atPath: "/Applications/Utilities")
print("\(array.debugDescription)")

The results come back alphabetically ordered by file name:

[".DS_Store", ".localized", "Activity Monitor.app", "Adobe Flash Player Install Manager.app", "AirPort Utility.app", "Audio MIDI Setup.app", "Bluetooth File Exchange.app", "Boot Camp Assistant.app", "ColorSync Utility.app", "Console.app", "Digital Color Meter.app", "Disk Utility.app", "Grab.app", "Grapher.app", "Keychain Access.app", "Migration Assistant.app", "Script Editor.app", "System Information.app", "Terminal.app", "VoiceOver Utility.app"]

The same playground on 10.13 tells a different story:

["AirPort Utility.app", "VoiceOver Utility.app", "Terminal.app", "Activity Monitor.app", ".DS_Store", "Grapher.app", "Audio MIDI Setup.app", ".localized", "System Information.app", "Keychain Access.app", "Grab.app", "Migration Assistant.app", "Script Editor.app", "ColorSync Utility.app", "Console.app", "Disk Utility.app", "Bluetooth File Exchange.app", "Boot Camp Assistant.app", "Digital Color Meter.app"]

I thought at first this might have been related to the APFS conversion that 10.13 applied to my boot volume, but the same ordering discrepancy occurs for items on my HFS+ volumes as well.

After checking the 10.13 release notes for clues, and finding none, I consulted the documentation. Well, what do you know?

The order of the files in the returned array is undefined.

So, mea culpa. The test code in question probably shouldn’t have ever made assumptions about the ordering of items returned from this method. While it has evidently always been undefined, it appears they are only making good on that promise in 10.13. You have been warned!

Update: It turns out I have some real bugs in my apps, not just in my tests, because of assuming the results of this call will be reasonably sorted. Luckily I use a bottleneck method for obtaining the list of files, and I can impose my own sorting right at the source. If you’re looking to make the same kinds of changes to your app, be sure to heed Peter Maurer’s advice and use “localizedStandardCompare” (available since macOS10.6/iOS4) to obtain Finder-like ordering of the results.

Evergreen Images

Brent Simmons, the original developer of MarsEdit and NetNewsWire, is building a new feed reader app called Evergreen:

Evergreen is an open source, productivity-style feed reader for Macs.

It’s at a very early stage – we use it, but we don’t expect other people to use it yet.

I’ve never been one to shy away from early-stage software, so of course I ran to the GitHub project page, cloned the repository, and built it immediately on my own Mac.

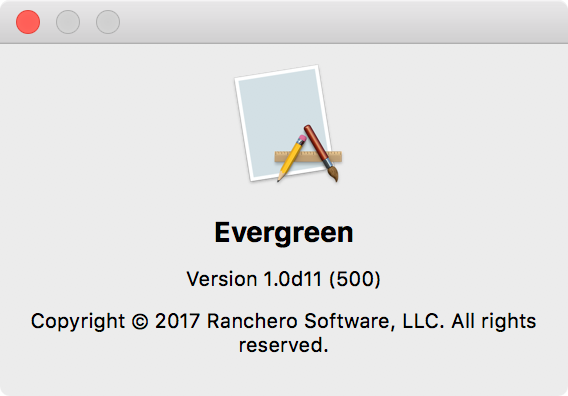
Screenshot of Evergreen about box without a custom icon.

Ahh, the tell-tale sign of a young app: the generic about box. Personally, I like to give apps-in-progress an icon, even if only a placeholder image, as soon as possible. It occurred to me that Apple has done the favor of providing a pretty-darned-suitable image for “Evergreen” in the form of its Emoji glyph of the same name:

🌲

Since I have the source code right here, why don’t I render that tree at a large size in a graphics app, resize it to a million different resolutions, bundle it up and check it in to the Evergreen source base?

Because that’s not nearly as fun as doing it in code. I dove into the Evergreen application delegate class, adding the following function:

private func evergreenImage() -> NSImage? {
	var image: NSImage? = nil
	let imageWidth = 1024
	let imageHeight = 1024
	let imageSize = NSMakeSize(CGFloat(imageWidth), CGFloat(imageHeight))

	if let drawingContext = CGContext(data: nil, width: imageWidth, height: imageHeight, bitsPerComponent: 8, bytesPerRow: 0, space: CGColorSpaceCreateDeviceRGB(), bitmapInfo: CGImageAlphaInfo.premultipliedFirst.rawValue) {

		let graphicsContext = NSGraphicsContext(cgContext: drawingContext, flipped: false)
		NSGraphicsContext.saveGraphicsState()
		NSGraphicsContext.setCurrent(graphicsContext)

		let targetRect = NSRect(origin: NSZeroPoint, size: imageSize)
		NSString(string: "🌲").draw(in: targetRect, withAttributes: [NSFontAttributeName: NSFont.systemFont(ofSize: 1000)])

		NSGraphicsContext.restoreGraphicsState()

		if let coreImage = drawingContext.makeImage() {
			image = NSImage(cgImage: coreImage, size: imageSize)
		}
	}

	return image
}

In summary this code: creates a CoreGraphics drawing context, renders a huge evergreen Emoji glyph into it, and creates an NSImage out of it.

Then from the “applicationDidFinishLaunching()” function:

if let appIconImage = evergreenImage() {
	appIconImage.setName("NSApplicationIcon")
	NSApplication.shared().applicationIconImage = appIconImage
}

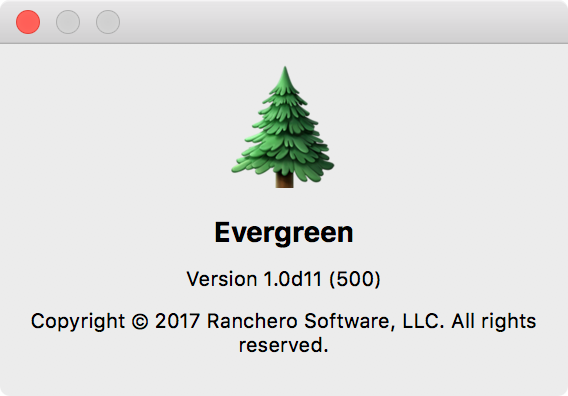
Give the newly created image the canonical name, used by AppKit, for looking up the application icon, and immediately change the application’s icon image to reflect the new value. It worked a treat:

EvergreenEmoji

In programming there is usually a hard way, an easy way, and a fun way. Be sure to take the third option as often as possible.

Resolving Modern Mac Alias Files

When a user selects a file in the Mac Finder and chooses File -> Make Alias, the resulting “copy” is a kind of smart reference to the original. It is similar to a POSIX symbolic link, but whereas a symbolic link references the original by full path, an alias has historically stored additional information about the original so that it stands a chance of being resolved even if the original full path no longer exists.

An alias, for example, can usually withstand being copied from one volume to another. To test this: create a Folder in your home folder called “Test”, and a file within it called “File”. Now, make an alias to “File”. You should have a folder hierarchy that looks like this:

Test
	File
	File alias

Click on the “File Alias” item, then choose “File” -> “Show Original” from the Mac menu bar to see how it resolves to the original.

Now, copy the whole folder to another volume, for example to a thumb drive or other external drive on your Mac. Click on the alias file and “Show Original” again. Instead of resolving to the file on your home volume, it resolves relative to the location on the new volume.

That’s pretty neat.

In the old days, if a developer needed to resolve an alias file on disk, they would use a Carbon function such as FSResolveAliasFile. In recent years, particularly as Application Sandboxing was introduced on the Mac, Apple has shifted away from aliases as a developer-facing concept, towards the use of “Bookmark Data”. As a result, an “alias file” created in the Finder is no longer a traditional alias, but a blob of bookmark data. You can confirm this by examining the hex content of the “File Alias” you created above. From the Terminal:

% xxd File\ alias
00000000: 626f 6f6b 0000 0000 6d61 726b 0000 0000  book....mark....
00000010: 3800 0000 3800 0000 f003 0000 0000 0410  8...8...........
00000020: 0000 0000 0061 0000 768c 979b 7ed8 be41  .....a..v...~..A
00000030: 0000 0000 ff7f 0000 0403 0000 0400 0000  ................
00000040: 0303 0000 0004 0000 0700 0000 0101 0000  ................

It was nice of them to design the format with the tell-tale “book….mark” data right there in the header!

Although you can still use FSResolveAliasFile on these beasts, the function is deprecated and Xcode will warn you about such behavior. The way forward is to use the newer

-[NSURL URLByResolvingBookmarkData:...]

method in Objective-C, or

URL.init(resolvingBookmarkData: ...)

in Swift. Just load the NSData from the alias file’s URL, and pass it to NSURL/URL as appropriate.

There’s a big catch, however, which is that you must take care to pass the alias file’s URL as the “relativeTo:” parameter when resolving the bookmark. Otherwise the bookmark will resolve as expected in typical scenarios, but will fail to resolve in all the scenarios where bookmarks really shine, as for example in the case of moving a bookmark and its target to another volume. So, for example, to resolve an alias file you know exists at “/private/tmp/Test/SomeAlias”:

var targetURL: URL? = nil
do {
	let aliasFileURL = URL(fileURLWithPath: "/private/tmp/Test/SomeAlias")
	let thisBookmarkData = try URL.bookmarkData(withContentsOf: aliasFileURL)
	var ignoredStaleness: Bool = false
	targetURL = try URL(resolvingBookmarkData: thisBookmarkData, options: .withoutUI, relativeTo: aliasFileURL, bookmarkDataIsStale: &ignoredStaleness)
}
catch {
	print("Got error: \(error)")
}

Notice how I ignore the staleness? It’s because I think this notion of staleness is tied more to resolving data with security scope, or in any case a bookmark that you are holding as pure Data, and not one that persists as a file on disk. The safety of ignoring staleness is supported by the fact that, starting in macOS 10.10, there is a new convenience method on NSURL specifically for resolving “alias files”:

var targetURL2: URL? = nil
do {
	let aliasFileURL2 = URL(fileURLWithPath: "/private/tmp/Test/SomeAlias")
	targetURL2 = try URL(resolvingAliasFileAt: aliasFileURL2)
}
catch {
	print("Got error: \(error)")
}

Which takes care of ensuring the “relativeTo:” information is considered, on your behalf. If you don’t need to support Mac OS X 10.9 or earlier, you should use the newest method! Otherwise, I hope the information preceding is of some use.
Test With Swift

I have recently passed a sort of tipping point where I’m indulging more and more in Swift for new code that I add to my projects. There are some instances where I will still create a new class in Objective C, primarily where I anticipate the need for dynamic runtime hijinx that might be more complicated in Swift. In general though, I’m opting for Swift. Finally.

There are many reasons to remain gun-shy about Swift, and I don’t fault anybody too much for choosing to continue forestalling the transition. I’ve spoken with many people who are as tentative as I was or moreso. Some of our collective reasons for waiting may sound familiar to you:

Swift …

  • … is not mature.
  • … requires adding bloated libraries to the app.
  • … presents an impedance mismatch with existing Cocoa design patterns.
  • … is still too risky for production code.

I don’t agree with all of these rationale, especially now that I’ve decided to dive in myself. However, they make a good basis for the argument I’d like you to consider: you should write all new unit tests in Swift.

For many of us who spent years developing a vast collection of Objective-C based classes, it does seem daunting to transition to a new language. But unit tests are different from “regular code” in a number of ways that make them a suitable place to start delving into Swift:

Unit tests …

  • Don’t ship to customers.
  • Can be as bloated as you like.
  • Test the exposed interfaces of classes more than the internal design.
  • Are not technically production code.

I’m sure somebody will argue that tests are so vital to the development process, that they are the last place one should invest in risky technology. I guess what I’m urging you to believe is that Swift is no longer risky technology. It’s not longer coming, it’s here. We will serve ourselves well to adopt it as quickly as practical. And those of us who are daunted by the challenge incorporating it into our existing, Objective-C heavy source bases, have a perfect opportunity in unit testing to get our feet wet while establishing a Swift source base that will live on well into the future. After all, your unit tests should, in theory, outlive any specific implementations of your shipping code.