Category Archives: Xcode

Accepted CDHash

A bit over a month ago, Apple announced big changes to the way Mac OS X versions 10.9.5 and 10.10 will recognize the code signatures of 3rd party applications, hinting very strongly that consequences would be dire for any developer neglecting to re-sign their apps:

Important: For your apps to run on updated versions of OS X they must be signed on OS X version 10.9 or later and thus have a version 2 signature.

Few details were given as to why the old signatures would no longer be respected, leaving developers with little to go on except to take Apple’s word that we should drop everything and update our code signing processes, which for some of us was a non-trivial amount of work. Those of us willing to grant Apple the benefit of the doubt assumed that there was some greater purpose to our collective suffering. Surely this nuisance is in the name of preserving or increasing security for all of Apple’s and our mutual customers.

That, and the fact that Apple stated bluntly that if we don’t make these changes, our apps will not pass Gatekeeper’s assessment and thus will not be allowed to launch without considerable work by users. This is an unacceptable user experience to any developer worth her or his salt, so of course the vast majority of us complied.

Some of us complied even when the logic of doing so was comically bent. For example Apple implied that developers of apps for the Mac App Store also needed to update their code signatures, in spite of the fact that all Mac App Store apps are signed by Apple, not by the original developers. The process of submitting software for sale on the App Store does include a code signing phase, but the signature is replaced by Apple before it is distributed to customers. So, if there is a security issue with version 1 code signatures, Apple is in a position to remedy the problem without the involvement of 3rd party developers. Some of us sought clarification from Apple on this point. Questions in the Apple Developer Forums along the lines of “do we really have to re-sign apps and submit a new version just to accommodate this new requirement?” were met by terse restatements from Apple along the lines of “all apps must be signed with version two code signatures.”

Sigh.

To make matters yet more confusing, a developer who has signed off on the chore of complying with Apple’s requests would not necessarily be able to verify the job was done right, because for example on pre-release builds of 10.9.5 and 10.10, many apps with “old and busted” version 1 signatures unexpectedly passed the system’s Gatekeeper check, contrary to the firm indication from Apple that they shouldn’t. Apple’s documentation provided a specific command to run from the Terminal that would verify or reject any specific app’s code signing:

spctl -a -t exec -vv Foo.app

For many of us with very old version 1 code signatures, the command line came back with a cryptic “accepted cdhash”, and the system happily opened and ran the apps without issue.

I reported the problem as a security bug because it seemed to suggest that apps with broken, insecure code signatures would still be allowed to run. I waited to see whether, with each subsequent beta release, Apple would finally ratchet things down to give me a taste of how customers would experience trying to run these apps with outdated signatures. But each beta release continued to allow them to run without incident.

Finally, a few days ago I got my bug sent back to me to be closed. Oh, they finally fixed it? Nope. It was returned with the classification “Behaves as intended.” Then yesterday, 10.9.5 shipped and lo and behold, contrary to every warning and veiled threat from Apple, many of these apps with old, version 1 code signatures, of the variety that yield a cryptic “accepted cdhash” assessment from the spctl tool, well, they just work. They’re fine. This happens to apply to my entire line of apps and this is probably also the case for many other developers. In short? I dropped everything, spent hours revising my code signing process, investigating unexpected results, contacting Apple for clarification, trying to make sense of Apple’s terse replies, and finally doing my best to comply regardless of doubt. And it turns out I didn’t actually have to lift a finger.

Which is not to say that nobody had to lift a finger. Any developer whose code signatures involved the use of “custom resource rules,” and (I think) any developer whose version 1 signature was signed with a new enough version of Xcode to escape the “accepted cdhash” loophole, but not new enough to be a “version 2” signature, did need to re-sign their apps.

This was a classic case of Apple communicating far too poorly about a situation that purported to affect potentially every Mac developer. Many of us spent way too much time trying to decode and make sense of the situation when Apple could have done so for us through careful clarification of the specific code signatures that needed updating, how they could be reliably verified, and what the actual consequences of inaction would be.
Re-signing Code

Given the implied urgency of Apple’s demand that developers provide updated versions of apps with “version 2” code signatures, many people are scrambling to get their build processes updated so that e.g. the apps are built on 10.9 or higher. This is the most natural and attractive technique for ensuring that your Mac apps are signed properly.

However, for a variety of reasons many of us either need to build with older versions of Mac OS X or Xcode. We face a conundrum that can be solved by signing (or more accurately, re-signing) the apps on 10.9, ensuring that the signature is up to snuff even if the code was compiled and the app was assembled with earlier tools.

This is a fairly straight-forward process, but there are some gotchas and you should be aware of what effect running codesign with various flags will have on your finished product. In a nutshell, you want to establish new code signatures on all the binaries in your bundle, but you don’t necessarily want to reset specific entitlements or other metadata that was set on the code by your old-and-busted code signatures.

Felix Schwarz offers a bash script suited to re-signing and further packaging the resulting app into a .pkg file suitable for submission to the Mac App Store. If you’re looking at automating this process, his script may serve as a good starting point!

In my tests I ran into some issues having to do with the fact that some of my apps have custom “designated requirements.” I have ironed out all the kinks yet but it seems to help in this scenario to re-establish all the code signing for the bundle first and then as a final icing on the cake, re-sign the app package with the custom designated requirement.

Take This Code and Sign It

Big news from Apple this week that forthcoming releases of Mac OS X 10.9.5 and 10.10 will enforce new policies that will render some 3rd party apps “untrusted” unless they are updated. The long and short of it is that apps using an older version of code signing will not be trusted, and even those using the newer version must forego the use of custom “resource rules,” which allowed developers to exclude certain files in a bundle from consideration as part of the code signature. A file that was thus excluded could be removed or modified without “breaking the seal” and triggering warnings about the code signature.

Jeff Johnson points out a far-reaching implication of this new limitation, which is that developers who bundle frameworks in their apps will need to see to it that the header files are either removed before signing the framework, or left in-tact. Removing the headers after signing will now necessarily lead to a broken seal and thus an untrusted app that Gatekeeper refuses to run.

Jeff’s novel solution involves overriding the default location both for where frameworks install their headers while being built, and for where host apps look for the headers of frameworks they depend upon. This seems like a reasonable solution that many people will benefit from.

Me? I’ve been burned too many times by default code signing behaviors, so I long ago switched to an approach which many will consider too complicated, but which has nonetheless saved my bacon on repeated occasions. The “resource rules” change from Apple wouldn’t have even registered on my radar, because the final code signing of all my bundled frameworks, plugins, XPC services … every darned executable, is controlled by a custom build phase which is run very late in my apps’ build process, right before the final code signing of the overall app that Xcode handles at the very end.

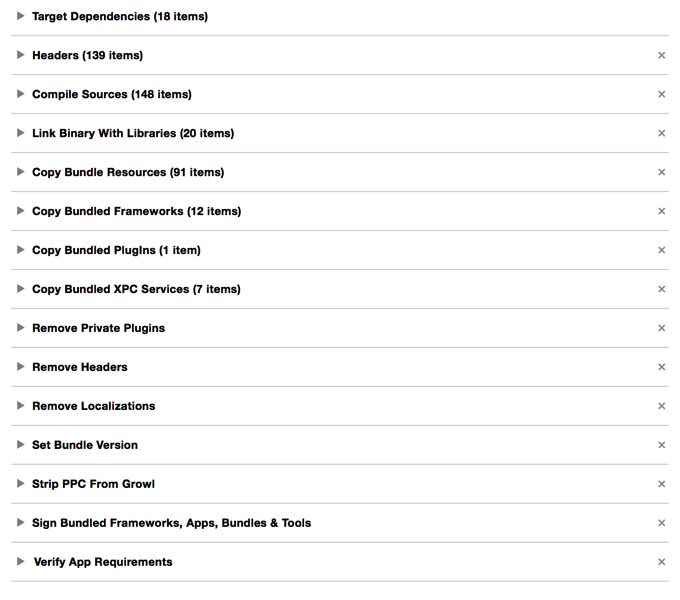
How does this work in practice? Here’s what MarsEdit’s build process looks like from Xcode’s build phase editor:

Screen Shot 2014 08 05 at 2 51 43 PM

You can see that the process of assembling a typical Red Sweater app involves a lot of building up (copying things in), followed by a lot of tearing down, in which I remove framework headers, localizations, etc. These processes are basically fast enough that I don’t mind doing it all programmatically at build time, because it lets me worry less about the pristineness of individual components, and leaves me with with confidence that everything in the final product has been cleaned up. For the Mac App Store build I even have an additional build phase at the end called “Verify Mac App Store Requirements” in which I double check things that have bit me before in App Store submissions, but which Apple doesn’t flag themselves as part of the submission process.

That item at the very bottom is where all the good code signing happens. It’s a somewhat complicated python script that in turn relies upon a library of utility script modules I’ve written for these kinds of things, but the gist of what the “Sign Bundled Frameworks, Apps, Bundles & Tools” build phase does is:

1. Identify the target app being built. In python, you can do this using something like this in a build phase script:

appBundlePath = "%s/%s/" % (os.environ["BUILT_PRODUCTS_DIR"], os.environ["WRAPPER_NAME"])

2. Iterate through the target app bundle, looking for “executable” code. I could hard-code this for every project, but I like the relative safety of knowing that if I add a framework, tool, whatever, it will get caught in this phase. There is also a little gotcha here in that you want to find and sign the deepest items first e.g. so that you sign a helper tool in a framework before the framework that contains it. I have a python module that handles iterating for these items and returns the path to each one in appropriate order.

3. Now the moment of truth: for each item you find, you want to sign it in such a way that you give it your final blessing with all the nuanced code signing flags you care about. My actual code is a little more complicated than this in that I have special cases to avoid using Apple’s timestamp server for debug builds, and some other little tweaks. A common kind of customization you might want to make is to e.g. add arguments to codesign that will cause the preservation of entitlements, so that e.g. an XPC service with its own entitlements will not have those blown away by your re-signing of the app. See “man codesign” for more information about the “-preserve-metadata” option and other flags. But keeping things simple, the gist of signing the code manually from python in a build phase looks like this:

def signAppOrExecutable(thePath):
	signingIdentity = os.environ["CODE_SIGN_IDENTITY"]
	signArgs = ["/usr/bin/codesign",]
	signArgs += ["-f", "-s", signingIdentity, thePath]

	myCall = subprocess.Popen(signArgs, stdout=subprocess.PIPE)
	myResults = myCall.communicate()
	return (myCall.returncode == 0)

Pass the path of every executable tool, plugin, bundle, library, framework, and helper app to this function right before your app is finished building, and all of your custom tweaks, removed header files, adjusted content will be sealed into the final code signature, and you’ll never (ha!) have to think about it again. “Simple,” right?

Bridging iOS WebViews

I hinted in my previous post that similar techniques could be used to bridge JavaScript to Objective-C on iOS, but that it would require using undocumented methods. As with the Mac-based solution, it’s not such a big deal so long as you’re only going to use it for private, debugging builds of your app. So how can it be done?

WebKit on iOS is for the most part famously, frustratingly hidden from developer use. As apps like Safari show, there is an extensive, powerful WebKit framework just as there is on the Mac, but iOS developers are limited to the comparatively impotent UIWebView.

But here’s a hint: UIWebView is itself a client of “proper WebKit,” and thus implements many of the powerful delegate methods that you would implement as the Mac delegate of a WebView. So if I were an iOS developer and wanted to play around with bridging WebView to Objective-C, I would simply subclass UIWebView, and override the delegate methods methods I am interested in:

#if DEBUG
@interface UIWebView (PrivateMethods)
- (void)webView:(UIWebView*)webView
      didClearWindowObject:(id)windowObject
      forFrame:(id)frame;
@end

@interface MyWebView : UIWebView
@end

@implementation MyWebView

// Override methods on UIWebView that it itself employs
// as delegate of a "proper" WebKit WebView object
- (void)webView:(UIWebView*)webView
      didClearWindowObject:(id)windowObject
      forFrame:(id)frame
{
   [super webView:webView didClearWindowObject:windowObject forFrame:frame];

   id myDelegate = [[UIApplication sharedApplication] delegate];
   [windowObject setValue:myDelegate forKey:@"appDelegate"];
}

@end

#endif

Set your WebView to use the custom class “MyWebView”, and now your iOS-based WebView can pass whatever information it needs to directly to your delegate, just as I illustrated for the Mac version.

JavaScript Bug Traps

I am the kind of developer who leans heavily on automated systems for the improvement of my code. For this reason I tend to enable the maximum number of warnings, rely upon static analysis to discover nuanced bugs, develop and run unit tests to automatically confirm expected behaviors, and I encourage my apps to crash hard if they are going to crash at all.

I would characterize all of these behaviors as part of an overall attitude of vigilance against software defects. Learning about problems in code quickly and clearly is a key step maintaining an overall high level of code quality.

Most of my software is developed in Objective-C, which enables me to leverage compile-time and run-time tools from Apple that catch my errors quickly. Between compile-time warnings and errors, and runtime exceptions and crashes, the vast majority of my programming errors in Objective-C are caught within minutes of writing them.

On the other hand, MarsEdit features a rich HTML text editor largely implemented in JavaScript, a language which tends not to afford any of these convenient alerts to my mistakes. I have often stared in bewilderment at the editor window’s perplexing behavior, only to discover after many lost minutes or hours, that some subtle JavaScript error has been preventing the expected behavior of my code. I’ll switch to the WebKit inspector for the affected WebView, and discover the console is littered with red: errors being dutifully logged by the JavaScript runtime, but ignored by everybody.

Wouldn’t it be great if the JavaScript code crashed as hard as the Objective-C code does?

In fact, these days mine does. By a combination of JavaScript hooks that are alerted to the errors, Objective-C bridges that propagate them to the host app, and the judicious use of undocumented WebKit Inspector methods, development versions of my WebView-based apps now automatically present an inspector window the moment any error occurs in the view’s underlying JavaScript code.

For those of you who also develop JavaScript-heavy WebKit apps, I’ll share the steps for enabling this same type of behavior in your app. These steps all apply to Mac-based WebViews, but most of the same techniques could be used with iOS if you are willing to use some private methods to establish a bridge between the WebView and host app (for debug builds only, of course).

Step 1: Catch the error in JavaScript.

In whatever the main source content is for your WebView-based user interface, add some script code to register a callback for JavaScript errors:

<script type="text/javascript">
   function gotJavaScriptError(errorEvent)
   {
      console.log("Error: " + errorEvent.message);
   }

   window.addEventListener("error", gotJavaScriptError,  false);
</script>

Now if you encounter some error and happen to be attached with the web inspector, you’ll see additional confirmation that the error has in fact been noticed. if you’re following along in your own code while you read, I strongly encourage you to add a testing mechanism for generating errors. A simple “click” event callback (or “touchstart” on iOS) does the trick well:

<script type="text/javascript">
   function gotClick(theEvent)
   {
      blargh
   }

   window.addEventListener("click", gotClick, false);
</script>

Now when you click, you blargh. And when you blargh, the error is logged. Of course, just logging the error isn’t very useful because it’s quiet and goes ignored. Just like JavaScript errors usually do…

Step 2: Propagate the error to the host app.

You could do some interesting stuff in the WebView itself. For example you might convert the error into a string and display a prominent alert message. But since there’s so much more you can do once the host app is in charge, it’s worth going the extra mile for that functionality.

To tie the host app to the WebView we need to wait for the WebView’s frame to finish preparing its “window script object,” and then set a named attribute on that object that refers to an Objective-C instance. See that your WebView has a frameLoadDelegate configured, and within that delegate object implement this method:

- (void)webView:(WebView *)webView 
        didClearWindowObject:(WebScriptObject *)windowObject
        forFrame:(WebFrame *)frame
{
   // Expose ourselves as a JavaScript window attribute
   [[webView windowScriptObject] setValue:self forKey:@"appDelegate"];
}

At this point any JavaScript code, including our error-handling callback, can reference the Objective-C delegate directly. But in order to make good use of the delegate we’ll have to add a couple other methods. The first lets the WebKit runtime know that we are not fussy about which of our methods are accessible to the WebView:

+ (BOOL) isSelectorExcludedFromWebScript:(SEL)aSelector
{
   return NO;
}

Now JavaScript code within the WebView can call any method it chooses on the delegate object. Implement something suitable for catching the news of the JavaScript error:

- (void) javaScriptErrorOccurred:(WebScriptObject*)errorEvent
{
   NSLog(@"WARNING JavaScript error: %@", errorEvent);
}

And back in your WebView HTML source file, amend the JavaScript error handler to call through to Objective-C instead of pointlessly logging to the JavaScript console:

<script type="text/javascript">
   function gotJavaScriptError(errorEvent)
   {
      console.log("Error: " + errorEvent.message);
      window.appDelegate.javaScriptErrorOccurred_(errorEvent);
   }

   ...
</script>

Notice that the colons in Objective-C method names are simply replaced with underscores to make them compatible with the JavaScript function naming rules. The errorEvent argument in this case is translated to a DOMEvent object instance in Objective-C, where it can be further interrogated. Alternatively you could pull the parts of the event you want out in JavaScript, and pass along only those bits.

Now we’ve done a considerable amount of work, only to upgrade our easy to ignore JavaScript errors from littering the web console to littering the system console. At least we’d notice these errors in the Xcode debugger console, and might eventually get around to taking a closer look. But we can still do much better.

Step 3: Get face to face with the error.

Of course from Objective-C there are any manner of ways you could handle the error. In a shipping app it might make sense to prompt the user with news of the issue and offer, much like a crash reporter would, to send information about the error to you. Or if the contents and behavior of your WebView are critical enough, maybe it’s worth forcing the app to quit just as it would for a native code crash. But for debugging builds I’ve find it very helpful simply to have the error force the Web Inspector open so I am no longer able to quietly ignore all the red console logging. In the delegate class, go back to the javaScriptErrorOccurred: method and replace the NSLog call with this string of fancy mumbo-jumbo

- (void) javaScriptErrorOccurred:(id)errorEvent
{
#if DEBUG
   id inspector = [[self webView] performSelector:@selector(inspector)];
   [inspector performSelector:@selector(showConsole:) withObject:nil];
#endif
}

That’s it. Now when you run into a WebView-based JavaScript error, the web inspector appears and the list of pertinent errors is front-and-center.

I encourage you to leave the DEBUG barrier in place, because as the prolific use of “performSelector” may suggest, these are private WebKit methods that would probably not be viewed as acceptable by e.g. App Store reviewers. Anyway, you probably don’t want customers being pushed into the Web Inspector.

I hope this technique proves useful for those of you with extensive JavaScript source bases of your own. For everybody else, perhaps I’ve helped to drive home the idea that we should be as vigilant as possible against software defects. All developers write bugs, all the time. It’s only fair that we try to balance the scales and give ourselves a fighting chance by also being alerted to the bugs we write, all the time.

Coding Under Par

Brent Simmons reflects on his ambition to stop coding “late at night”:

I may think I’m adding productive hours to my day – but I’m not. I’m writing bugs, or, at best, not the best code I could be writing. And I pay for it later.

I read Brent’s piece with a lot of nodding my own head. I find late night coding perhaps more alluring than ever because as a husband and father of two, who happens to work from home, much of my daytime development time is compromised by commitments to family, distractions, or even just the knowledge that whatever I’m working on now has a firm and fixed stopping time.

I suppose the same is true late at night, but when it’s midnight and I’m on a perceived roll with some coding challenge, there doesn’t appear to be any stopping me. I “have all night,” or at least that’s what my monkey brain says. Of course, the smarter half of me knows I should be getting calling it a day and getting some much-needed rest.

The next morning, I usually realize that whatever challenge was tantalizing me into the wee hours was in fact a 15 minute problem that I could have, should have, put off until I was more capable.

I think Brent’s observation about the perils of late-night coding are a special case of a larger problem: your best work will come at unpredictable times. As a rule, we probably won’t do our best work at midnight, but there will be mornings when 9AM is not the best time for cranking out code, either. I have often made, and continue making the mistake of assuming that productivity in software development is directly related to time. It’s not. Any of us with a history of working in code has memories of those “weird days” where weeks of work seemed to vanish under the inspired direction of 4 hours “working in the zone.”

I don’t know how to get in the zone reliably, but I am learning to recognize that when I’m not there, it’s not worth pushing it. If you’re banging away at the keyboard and nothing seems to be working as well as it should, maybe it’s time to go to sleep, go for a run, go to a museum, get lunch with a friend, you get the idea. Maybe it’s time to do anything but endeavor to write code as well as you do when you’re at your best.

F-Script Anywhere With LLDB

Ever since the start of my career at Apple, working with the venerable Macsbug, I have prided myself on making the most of whatever debugging facilities are at my disposal. I came to be quite capable with Macsbug, adding custom commands and data templates that helped me speed through crucial debugging sessions that would have otherwise taken much longer.

When I moved from the classic Mac OS team to Mac OS X, I was forced, only slightly earlier than every other Mac developer, to adapt to gdb. I did so with modest aplomb, adding custom commands that made it easy to, for example, continue until the next branch instruction (as it happens, also the first real post on the Red Sweater Blog).

When Apple started shifting away from gdb to lldb a few years ago, I realized I would have to throw out all my old tricks and start building new ones. To my great shame, progress on this front has been slower than I wished. The shame is made greater by the fact that lldb is so delightfully extensible, it practically begs for a nerd like me to go town adding every manner of finessing to suit my needs.

The nut of lldb’s extensibility is that much of its functionality is actually implemented in Python, and developers such as ourselves are invited to extend that functionality by providing Python modules of our own.

I finally decided to break the ice with lldb’s extensibility by adding a shortcut command for something I often want to do, but frequently put off because it’s too cumbersome: injecting F-Script into an arbitrary application running on my Mac. F-Script is a novel dynamic programming interface that lets you query the runtime of a Cocoa app using a custom language. It also features a handy tool for drilling down into an app’s view hierarchy and then navigating the various superviews and subviews, along with all their attributes. In some respects it’s very similar to a “web inspector,” only for native Objective-C applications on the Mac (and sadly, with far fewer features).

There are Automator workflows that aim to automate the process of injecting F-Script into a target app, by running the required commands, via gdb or lldb, to make the injection work seamlessly. For some reason, these workflows have never worked so seamlessly for me, so I’m always reduced to attaching to the process with lldb, and running the required commands manually to get the framework loaded.

Fortunately for me, “having to run lldb” is not such a big deal. Usually when I want to poke around at an app, I’m in lldb anyway, trying to break on a specific function or method, or examining the application’s windows and views via the command line. Once I’m attached to a process with lldb, getting F-Script to inject itself is as easy as running these two commands:

expr (void) [[NSBundle bundleWithPath:@"/Library/Frameworks/FScript.framework"] load]
expr (void) [FScriptMenuItem insertInMainMenu]

That’s all well and good but to do that I always have to find the memo I took with the specific commands, then copy and paste them individually into lldb. Far too often, I wind up imagining the struggle of this work and put it off until I’ve spent minutes if not hours doing things “the harder way” until I finally relent and load F-Script.

Today I decided that I need to stop manually copying and pasting these commands, and I need to finally learn the slightest bit about lldb’s Python-based script commands. The fruit of this effort is summarized in this GitHub gist. Follow the directions on that link, and you’ll be no further away than typing “fsa” in lldb from having all of its utility instantly injected into the attached app from lldb.

Even if you’re not interested in F-Script Anywhere, the gist is a concise example of what it takes to install a simple, Python-backed macro command into lldb. Enjoy!

Timestamp Disservice

Any developer who has worked on apps for Apple’s Mac or iOS platforms has undoubtedly run up against confounding issues with code signing. Some issue may be rooted in the behavior of the codesign tool itself, while others have to do with Xcode’s valiant but sometimes confounding attempt to mask all the complexity of code signing in its build settings. On top of that, there are myriad ways in which one can introduce subtle abnormalities over time, by allowing certificates and private keys to outstay their welcome in one’s keychain, or by neglecting to transfer them to another machine which will now be used for development.

When code signing works, it just works. And when it doesn’t? I hope you didn’t have anything planned for the rest of the week.

One vexing issue arises when Apple’s “timestamp service” is not available for whatever reason. Perhaps you’re hacking on an airplane without internet access, or as is commonly the case, Apple’s servers are taking an unplanned siesta. I’m sure you’ll recognize the problem by the tell-tale error that appears in Xcode, just before you would otherwise expect a build to succeed:

% codesign MyApp.app
MyApp.app: The timestamp service is not available.

The purpose of the timestamp server is to provide authenticated timestamps to the codesign tool, so that it can embed along with its code signature a future-proof confirmation of the date the code was signed. What purpose could this serve? For example, if a piece of software was found to have a critical bug that compromised the security of users, but was fixed as of January 1, 2014, Apple and other consumers of the code could consider the timestamp of that vendor’s code while evaluating how much to trust it. In practice, I don’t think code signature timestamps are being put to much use on Mac OS X, but I can see the reasoning for them and they seem like a pretty good idea. I don’t mind supporting them as long as it isn’t too much of a hassle. (Update: See the comment below from Václav SlavÁ­k about the more fundamental purpose of timestamps tying a code signature’s date to the era of the certificate that was used to sign it).

In the event that the timestamp server cannot be reached for whatever reason, codesign simply fails. This is probably a good idea, because if it’s important for signed code to also contain a timestamp, you wouldn’t want to accidentally ship a major release of your app without it. But because the timestamp server can be unavailable for a variety of reasons, some of them common, we need some simple solution for continuing with the the day-to-day building of our apps without ever being bothered by the pesky timestamp service issue.

Lucky for us, such a solution exists in the form of a codesign command-line flag: “–timestamp”. Ordinarily this flag is used to specify the URL of a timestamp server, if you choose to use one other than the Apple default. But a special value none indicates that timestamping of the signed code should be disabled altogether. Let’s see, when could we care less about the timestamping of code? For example, when we’re on an airplane or iterating on debugging builds in Xcode, in the privacy of our own offices and homes.

In short, save yourself a lot of headaches by configuring your projects such that code signing does not consult the timestamp server unless you are building a release build. You can add the option directly to the “Other Code-Signing Flags” section of your build settings, configured to only affect Debug builds. In my case, I employ a variety of cascading Xcode configuration files, upon which all of my projects and targets are based. By changing the value in the configuration file, I’m assured that all my apps will be helped with one fell swoop. This comes straight out of my “RS-Project-Debug.xcconfig” file:

// For Debug builds, we don't require timestamping because
// Apple's server may be down or we may be off-network
OTHER_CODE_SIGN_FLAGS = --timestamp=none

Now any build configuration that inherits the configuration will default to not consulting the timestamp server. My Debug build configurations inherit this setting, my Release builds do not. There is always the small chance that a Release build will be caught up by a misbehaving Apple timestamp server, but whenever I’m hacking on an airplane or iterating on debug builds in my office, code signing occurs without any risk of being stopped by this pesky error.

Transplanting Constraints

Over the past few months I have become quite taken by Auto Layout, Apple’s powerful layout specification framework for Mac and iOS.

For the past few years I’ve heard both that Auto Layout is brilliant and that it has a frustrating learning curve. I can now attest that both of these are true.

One of the problems people have complained most about with respect to Auto Layout is the extent to which Xcode’s Interface Builder falls short in providing assistance specifying constraints. As many people have noticed, Apple is addressing these complaints slowly but surely. Xcode 5’s UI for adding constraints and debugging layout issues is dramatically superior to the functionality in Xcode 4.

Still, there is much room for improvement.

One frustrating behavior arises when one deigns to move a large number of views from one position in a view hierarchy to another. For example, the simple and common task of collecting a number of views and embedding them in a new superview. This task is so common that Apple provides a variety of helpful tools under Editor -> Embed In to streamline the task.

Here’s the big downer with respect to constraints: whenever you move a view from one superview to another, all of the constraints attached to the old superview, constraints that you may have laboriously fine-tuned over hours or days, simply disappear. Poof!

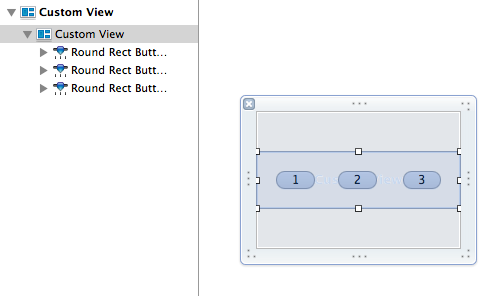
This isn’t such a big deal when your constraints happen to match what Interface Builder suggests for you. But even very simple interfaces may have a fairly large number of constraints. Consider this contrived example, in which three buttons are arranged to roughly share the width of a container view:

SimpleButtons 1

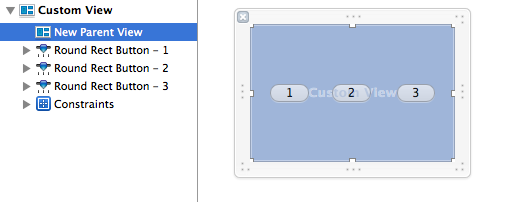
Nine constraints, and the removal or misconfiguration of any one will lead to incorrect layout in my app. Yet simply embedding the views in a custom view wipes them all out:

TestView2 xib 1

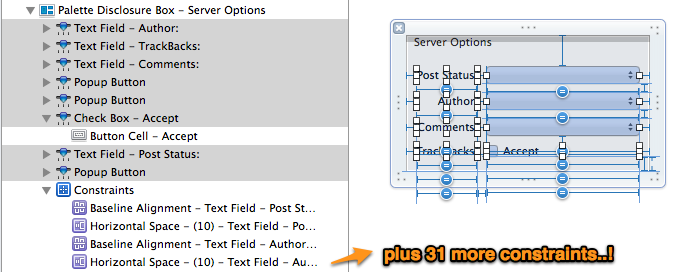
This problem is bad enough in the contrived scenario about, but in my much more complicated interfaces, a collection of views might comprise 50 or more customized constraints. Here’s a “simple” subsection of MarsEdit’s post editor side panel:

ServerOptions

Having to piece those all together again just because I want to rearrange some views, well it makes me mad. And when I get mad? I get … innovative!

A Pattern For Transplanting Constraints

Thanks to recent changes in Interface Builder’s file-format for xib files, it’s more straight-forward than ever to hand-tune the contents of a xib file outside of Xcode. It should go without saying that in doing so, you take your fate into your hands, etc., etc. But if you’re anything like me, a little hand-editing in BBEdit is worth the risk if it saves hours of much more intricate hand-editing back in Interface Builder. You’ll save valuable time and also reduce the very real risk of missing some nuanced detail as you try to reimplement everything by hand.

So without further ado, here are steps you can follow to transplant a set of views in a xib file such that the constraints from the old view follow over to the new view:

  1. Make a backup of your .xib file. You’re going to screw this up at least once, so you’ll want something “sane” to fall back on when you do.
  2. In Interface Builder, create the parent view if it doesn’t exist already. Give it a real obvious name like “New Parent View” so you’ll be able to spot it later:

    NewParentView xib

  3. Save changes in IB to make sure the .xib file is up-to-date.
  4. Open the .xib file in a text editor such as BBEdit, or right-click the file in Xcode and select Edit As -> Source Code to edit as text right in Xcode.
  5. Locate the new parent view by searching on the name you gave it. For example, in my sample project the view looks like this in the text file:
    <customView ... id="5M5-9Q-zMt" userLabel="New Parent View">
    ...
    </customView>
  6. Locate the old parent view. If you have trouble, you may want to give it a custom name as well before saving again in IB. In my trivial example, the old parent is the first and only top-level view in the xib file, so it looks like this:
    <customView id="1">
    ...
    </customView>
    
  7. Take note of the id for the old parent view and the new parent view. We’re going to need these in a minute to tie up some loose ends.
  8. Locate the constraints from the old parent view, cut them, and paste them into the new parent view’s XML content. Again in my case it’s trivial because I want all the constraints from the old parent view. I cut them out of the old and into the new so things looks something like this:
    <customView ... id="5M5-9Q-zMt" userLabel="New Parent View">
            ...
            <constraints>
                    <constraint firstItem="rfg-hN-1Il" firstAttribute="leading" secondItem="1" secondAttribute="leading" constant="20" symbolic="YES" id="LOu-nX-awU"/>
                    <constraint firstItem="8Ju-hM-RbA" firstAttribute="baseline" secondItem="Sgd-MR-FMw" secondAttribute="baseline" id="Mwc-6y-uaP"/>
                    ...
            </constraints>
    </customView>
    
  9. Locate the subviews themselves from the old parent view, and cut and paste them in the same way, making sure they reside in a <subviews> node in the new parent view. You should now have a new parent view whose xml topology looks something like this:
    <customView ... id="5M5-9Q-zMt" userLabel="New Parent View">
    	<rect ... />
    	<autoresizingMask ... />
    	<subviews>
    		... your transplanted subviews here ...
    	</subviews>
    	<constraints>
    		... your transplanted constraints here ...
    	</constraints>
    </customView>
    

    We’re close! But not quite finished. If you save and try to use the .xib now, you’ll find that Interface Builder rejects it as corrupted. What’s wrong? The constraints we transplanted mostly reference only the other views that we transplanted, but some of them also reference the old parent view.. To fix the integrity of these constraints, we need to update them to reference the new parent view instead.

  10. Refer back to the Interface Builder “id” values you noted in step 7. We need to locate any reference to the old parent view and adjust it so it references the new parent view. In our example, the old parent view id is “1” and the new parent view id is “5M5-9Q-zMt”. Specifically, we’re looking for attributes on our transplanted constraints where the “firstItem” or “secondItem” references the old parent ID:
    <constraint firstItem="rfg-hN-1Il" firstAttribute="leading" secondItem="1" secondAttribute="leading" constant="20" symbolic="YES" id="LOu-nX-awU"/>
    

    Change the value secondItem=”1″ to secondItem=”5M5-9Q-zMt”, and repeat for any other instances where the old parent view is referenced.

  11. Save the text-formatted .xib file, cross your fingers, and hope you didn’t make any mistakes.
  12. Reopen the .xib file in Interface Builder, or if you’re already in Xcode’s text editor, right-click the file and select Open As -> Interface Builder.

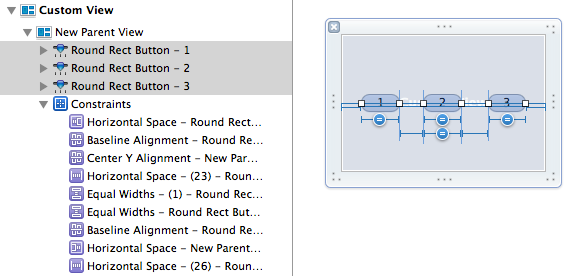
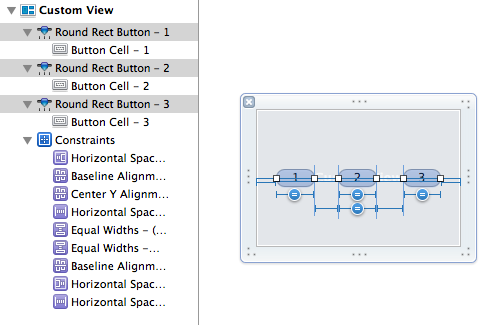
If your combination of luck and skill paid off as planned, then you’ll see something beautiful like this:

TestView xib

All of my views, now situated within the new parent view, and the desired constraints in-tact.

I hope this helps serve as a specific reference for folks in the same boat as I am in, wanting to shuffle views around without losing the hard work I’ve put into my constraints. And I hope it also serves to inspire you to think beyond the limitations of our tools. As great as Xcode, Interface Builder, and a host of other essential technologies are, they often fall short of desired behavior. When they do, it’s often in our power to work around the issues and carry on developing software as effectively as we know how.