Category Archives: Xcode

The Curious Case Of Xcode’s Commit Message

Xcode has a behavior with its source code integration, wherein the pending commit message is persisted so that if you cancel a commit, and then go back to commit again later, the text you already typed is preserved.

This is a nice feature.

However, my friend Seth Dillingham lamented on Twitter that for some reason the persisted commit text on his Mac was crashing Xcode. Yikes. No problem, he just needed to find the persisted text and delete it. It should be in some Xcode preferences file, or maybe in ~/Library/Developer, or somewhere else sane like that, right? Right?

Wrong. A little snooping on my part reveals that Xcode saves this bit of text in just about the least likely place I would expect…

Most people consider the OS X pasteboard pretty monolithic, especially since it’s so easy by default to obliterate the contents of the default pasteboard by e.g. copying new text to overwrite the old. But there are in fact multiple default pasteboards in OS X. For example there is a general pasteboard for typical copy and paste, but a different pasteboard for dragging content from one place to another. This is a good thing, because we wouldn’t want a drag to obliterate the copied text we were about to paste.

Have you ever noticed that on OS X, when you search for some text in one app, and then switch to another app to use its “Find” functionality, the same search text is already present in the search field? Thank, or blame, the system standard “Find” pasteboard, which makes this possible.

There are also an endless number of possible custom pasteboards, named by the creator and used for whatever purpose they see fit. Usually this is to accommodate the movement of data within an app in such a way that it doesn’t muck up the standard system pasteboards. But Xcode uses it for something more akin to the “Find” pasteboard described above. They declare and use a whole custom pasteboard to store … drum roll please … the commit message.

If you use Xcode for Source Control, select “Commit…”, type something into the commit message text area, then cancel the commit. Now, from the Terminal:

echo "from AppKit import NSPasteboard\nprint NSPasteboard.pasteboardWithName_(\"IDESourceControlCommitMessagePasteboard\").stringForType_(\"IDESourceControlCommitMessagePboardType\")" | /usr/bin/python

There’s your commit message!

Now, let’s suppose you have run into the same bad luck as Seth, and need to clear out that commit message text to prevent Xcode crashing? NSPasteboard’s “releaseGlobally” method should do the trick:

echo "from AppKit import NSPasteboard\nNSPasteboard.pasteboardWithName_(\"IDESourceControlCommitMessagePasteboard\").releaseGlobally()" | /usr/bin/python

Now you know possibly a bit more about NSPasteboard on the Mac and probably a lot more about how Xcode persists its commit message text. I know I sure do!

Swift Libraries Code Signing

I wrote last year about problems arising from Developer ID signed apps and their dependence upon an Apple “timestamp server” during the code signing phase. In the article, I describe a workaround for scenarios where the timestamp server is either down or there is no internet connection: disable the functionality by adding “–timestamp=none” to the OTHER_CODE_SIGN_FLAGS Xcode build setting.

Swift based apps currently install a complete copy of the Swift standard libraries in the built app’s bundle, and during this phase, Xcode implicitly signs the Swift libraries with whatever code signing identity is defined by the project and/or target. Unfortunately in doing so, it ignores the OTHER_CODE_SIGN_FLAGS build setting, removing the opportunity to finesse code signing of the Swift libraries in the way I described.

The long and short of it? You can’t build a Developer ID based Swift application when you’re offline. I discovered this recently when I dug into a Swift application in a jet, high above the Pacific. Hours of uninterrupted, focused development time lay before me, but I was met with this annoying build failure:

The timestamp service is not available.
*** error: Couldn't codesign [...]/My.app/Contents/Frameworks/libswiftCore.dylib: codesign failed with exit code 1
Command [...]/XcodeDefault.xctoolchain/usr/bin/swift-stdlib-tool failed with exit code 1

The workaround is to turn off code signing completely, or to switch to a Mac App Store code signing identity (which doesn’t rely upon the timestamp service feature of the code sign tool). I filed this bug as a Radar #21891588.

Right Storyboard, Wrong Platform

If, in haste, you inadvertently add a storyboard file to your Mac or iOS project from the wrong platform palette, you’ll end up with a storyboard that compiles and installs into the app bundle, but which products cryptic errors upon building and running. For example, a Mac storyboard lost in an iOS world:

*** Assertion failure in -[UIStoryboard initWithBundle:storyboardFileName:identifierToNibNameMap:designatedEntryPointIdentifier:], /SourceCache/UIKit_Sim/UIKit-3347.44.1/UIStoryboard.m:52

*** Terminating app due to uncaught exception 'NSInternalInconsistencyException', reason: 'Invalid parameter not satisfying: nibNameMap != nil'

The assertion above occurs when, internally to UIStoryboard, the Info.plist for your compiled “.storyboardc” file is consulted to determine its constituent “.nib” files. In the Mac case, the keys for storyboard Info.plist entries have an “NS” prefix, e.g. NSViewControllerIdentifiersToNibNames, whereas on iOS, it goes hunting for a UI-prefixed key: UIViewControllerIdentifiersToNibNames.

Granted, as soon as you proceeded to the next step, trying to populate the storyboard with UI elements that make sense for the platform, you would probably figure out your mistake. But if you’re just trying to get the ball rolling and end up immediately scratching your head over the failure, hopefully this blog post will have helped you figure out more quickly what was wrong.

I don’t think there’s any official way to change a created storyboard’s platform target. Best bet if you run into this is to delete the storyboard and recreate it from scratch, taking care to select the file template from the appropriate platform in Xcode’s “New File” panel.

Storyboard To Nib And Back

At some point along the way Xcode has consolidated the “Main Storyboard” and “Main Interface” fields pertaining to storyboard and nib files into a single “Main Interface” field that simply updates whichever of the pertinent Info.plist fields Xcode thinks you are working with.

The problem is that if you switch from storyboard to nib or back, then the value of the Info.plist entry is changed, but the key is not updated to reflect whether the new value is either a storyboard or a nib.

I’ve reported Radar 20954053 to Apple, requesting that Xcode should intuit from the file extension of the file named by “Main Interface” whether the Info.plist should advertise a storyboard or a nib.

In the mean time, if you switch from storyboard to nib or back, you need to manually update the Info.plist key to match: UIMainStoryboardFile if you’re using storyboards, or NSMainNibFile if you’re using nibs.

Auto Layout: Copy First, Then Edit

Here’s a possibly-too-obvious tip for folks who are adapting older iOS and Mac UI from traditional “springs and struts” to Auto Layout: always make a copy of the nib content you are working on before you start hacking away.

Because Auto Layout requires you to flip the switch for e.g. a whole window at once, and because the various adjustments to frames you make while adapting to Auto Layout may affect views in unwanted and unexpected ways, it’s extremely convenient to have at hand the UI layout as it was before surgery, so to speak.

Sure, because everybody in their right mind these days uses version control software, it’s easy enough to check out a previous iteration of a xib file and open it up for comparison, but it’s become such a certainty that I will find value in the reference, I usually just make a redundant copy in the xib itself while I’m working:

1. Select the window element in Xcode’s Interface Builder.
2. Copy and paste to make a new copy.
3. Adjust the original’s Auto Layout information until satisfied.
4. Delete the copy.

Having the reference copy is very handy as well for trying to isolate layout behaviors to just specific parts for the UI. For example, a deeply nested view seems to behave unexpectedly and you can’t get the layout right. Copy just the original from your “backup window”, and paste the view in isolation. Now see if you can get the layout right in terms of itself, without respect to the larger window. This can help you figure out the “aha!” constraint that you need to go back and add to the “real window.”

Reordering Xcode’s Products Group

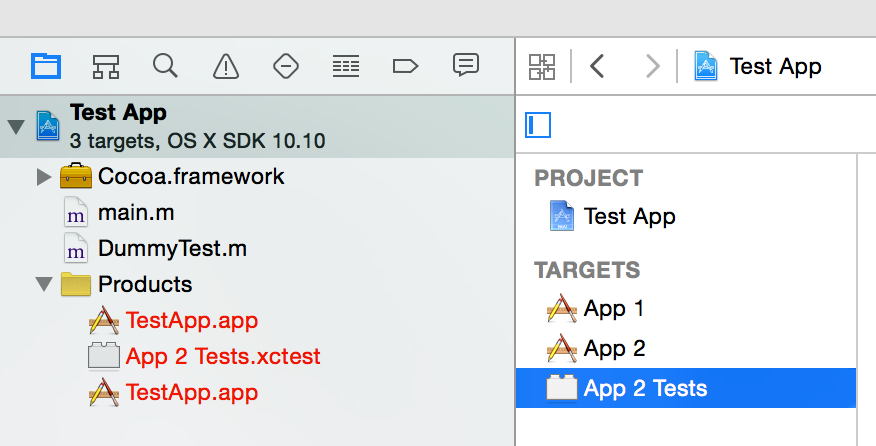
In my last post I alluded to the problem of Xcode showing multiple products with the same name without differentiation in the UI:

Screenshot of Xcode project navigator with unorganized product items.

It’s bad enough to have two items there with exactly the same description, but it’s particularly annoying (especially when the products list is quite long) that the ordering of items in this section apparently cannot be customized at all.

If memory serves correctly, the Products folder used to just be an ordinary group in Xcode, where you might happen to organize your “product items.” It’s only recently that Apple has barred reordering of the items in the group.

It occurred to me that I could probably hand-edit the project.pbxproj file inside the Xcode project. Sure enough, rearranging the lines of the file such that the “children” of the “Products” PBXGroup item are in the desired order does the trick.

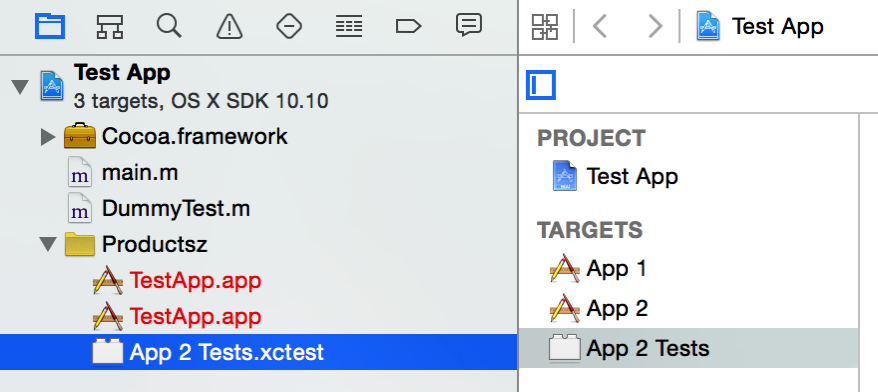
However, I won’t be hand-editing Xcode project files for this purpose anytime soon, because If found another glitch in Xcode that makes it even simpler. Just rename the “Products” group to anything but Products, then rearrange at will:

Screenshot of the products group with contents reorganized

Change the name back to “Products” when you’re done, and you’re done.

Nutty Namesakes

When Apple introduced the Mac App Store, it was clear that I would need to produce two distinct versions of my apps: one custom-built so suit the specific requirements of the App Store, and one built the way it always ever was, to be distributed directly to customers.

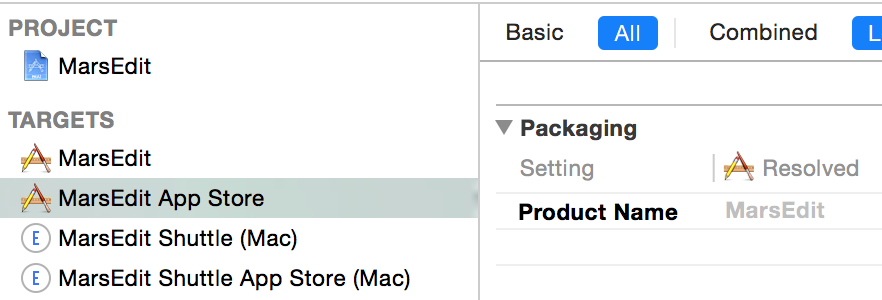
The approach I took was to simply duplicate the application target in all of my Xcode projects, such that for every final app target, there is a counterpart for the App Store:

Xcode build settings showing MarsEdit App Store having the same product name as MarsEdit.

Because the vast majority of build settings for all of my products are specified in Xcode configuration files, there isn’t much duplication here. True, each of the targets has to list its dependencies, resources, linked libraries, etc., but for the most part I go about editing source files on a day-to-day basis and when I ship an app update it just comes down to building and archiving each target in turn.

If you look carefully at the screenshot above, you will see that the MarsEdit App Store target has “MarsEdit” set as its product name. This is good, because I want each of the resulting apps to be named “MarsEdit.app.” As far as I know, there is no getting around it: the two targets have to share the same product name in order for them to build differing products that nonetheless have the same name.

This mostly works fine, in spite of a few Xcode glitches. One example is the auto-generated “Products” group in the project navigator shows two entries called “MarsEdit.app,” and doesn’t give any indication of which one is which. This can make it slightly annoying to easily e.g. right-click on a product and reveal it in the Finder.

Now as it happens I also define multiple targets that share the same product name in some of my supporting framework projects. Particularly since Apple started supporting the use of frameworks for iOS code, I’ve changed my iOS static library bundles over to frameworks. So where I used to have RSFoundation.framework and RSFoundation.o, I now have two targets, each producing a framework for the desired platform. Here’s an example where Xcode actually handles the doppelgängers with some aplomb. If you go to add a framework to a target and there are duplicates with the same name, it takes care to differentiate them:

Screenshot showing Xcode finding multiple libraries with the same name

Recently I ran into a troubling behavior with Xcode’s testing schemes, that I’ve correlated with the scenario of having a testing bundle target in a project that specifies as its test host a specific one of two targets whose product names match. The bug, in a nutshell, is Xcode can end up deciding that both targets should be built as forced dependencies of the test bundle, leading to annoying, hard to explain behaviors. I wrote this up as Radar 19924983 if you’re interested in reading more. And here’s the sample project I included with the bug, if that is something you’re interested in checking out.

On the whole I’m pretty happy with the approach of using separate targets with the same name. I am pretty sure I could work around whatever bugs I come across by resorting to splitting the two targets up into independent Xcode projects, but that feels a lot less elegant to me. The fact that Xcode supports duplicate names as well as it does in e.g. the “add libraries” panel I showed above gives me hope that support for namesake product targets will continue to improve in the future.

Convenient Build Settings

I wrote almost ten years ago about a trick I use in my Xcode projects that lets me set the marketing version for my products in one place, a build setting, and then reference that build setting everywhere else the version number needs to be expressed. This is a cool trick that has saved me a bunch of dumb hand-editing over the years.

And yet, all these years I have been laboriously, and usually behind schedule, updating my source bases every year to advance the range of years that my copyright statement applies to. For example, here is the string for MarsEdit’s NSHumanReadableCopyright string:

MarsEdit ${APPLICATION_VERSION}, ©2003-2015 Red Sweater Software

You can see my use there of the aforementioned marketing version build setting. With the opportunity staring me in the face, why have I spent the past decade manually advancing the year from 2005 to 2006 to 2007 to … well, I guess the charitable explanation would be that I’ve had better things to do, but that particular tedium also ends today.

My projects make heavy use of Xcode configuration files, such that every application or framework target inherits consistent default build settings that reflect my opinions about which warnings should be enabled, what platforms to support, etc. My configuration files all take advantage of a kind of cascade of imported files such that ultimately, every target in every Xcode project in my source base inherits settings from a file called RS-Target-All.xcconfig, and every project likewise inherits settings from RS-Project-All.xccconfig.

Today I added a simple line to RS-Project-All.xcconfig:

CURRENT_YEAR = 2015

The result is that every project and target in my source base now has access to this custom build setting, thus I can change the contents of all my NSHumanReadableCopyright strings to e.g.:

MarsEdit ${APPLICATION_VERSION}, ©2003-${CURRENT_YEAR} Red Sweater Software

And I will never have to update the marketing string’s copyright year again, on any of my projects, for as many years as I keep updating and releasing new versions of them. Quite appropriately, the terminating year on the copyright span will always be the year when I built and shipped the app. All I have to do every January is edit the solitary Xcode configuration file.

Technically I could go a step further and incorporate the product name as a variable as well:

${PRODUCT_NAME} ${APPLICATION_VERSION}, ©2003-${CURRENT_YEAR} Red Sweater Software

But since the product name isn’t changing all the time, that just starts to feel a bit fussy.

Some people also take advantage of the Xcode option to preprocess the Info.plist file, which could potentially allow for even more fancy substitutions. Maybe you could use the C preprocessor’s built-in __DATE__ variable to extract just the current year somehow? I never turned on preprocessing of Info.plist files because, at least when I last considered it, there seemed to be some bugs with it.

For now, I’m satisfied by the little bits of time that defining this once will save me, not to mention the avoidance of inevitable errors I would make when editing each occurrence by hand.

Enable Clang Modules, Disable Auto Linking

When Apple announced support for clang modules a few years ago, I jumped right in. I was curious to see what the build-time improvements might be, among other promised advantages.

Unfortunately things didn’t go well at the beginning. I ran into at least one bug, and probably more if I scratch my memory a bit harder. As cool as modules might turn out to be, they were not ready, at least for me.

Time heals some wounds, so I decided to take another look recently. I was annoyed by mysterious Xcode build failures, and at least some of them had to do with precompiled headers. I remembered in the back of my mind that modules were meant to (at your discretion) completely supersede precompiled headers, so I decided to give them another try.

True to form, I ran into another bug. This time, though, I could see a workaround in breaking down my monolithic project structure into smaller pieces. It was something I wanted to do anyway, and it would work around the modules problem. Win, win?

When I say I wanted to “break down” a monolithic project, I mean that, for example, a single ABC.xcodeproj that contains targets for A.framework, B.framework, and C.framework should be broken up so that each framework has its own .xcodeproj file. The monolithic structure is not too problematic on the face of it, but when you end up harboring references to specific targets in the monolithic project from various levels of other projects, things get a little hairy. In the case of the modules bug I reported, it seemed that some amount of cyclical referencing was responsible for surfacing the issue.

Unfortunately, breaking an Xcode project up can be fraught with peril. There is no easy way to say “take this target from ABC.xcodeproj, and move it to A.xcodeproj.” On the face of it, you’re stuck making a new A.xcodeproj and then painstakingly recreating the target definitions, file references, build phases, etc., that make up the rules for generating the target’s products.

A trick I use in this situation is to literally duplicate the ABC.xcodeproj file, then go in and hack out everything that isn’t contributing to the target you care about preserving. In this case, to get A.xcodeproj, I make a copy, then delete from the project any files that are solely used for B.framework or C.framework. The result is a standalone project for building A.framework. Of course, to avoid harboring redundant build targets for A.framework, you also remove from ABC.xcodeproj any of the files that are solely meant for building it.

That solves part of the problem, and you end up with a shiny new A.xcodeproj. But now you have to go trawling through your source bases, looking for any references to ABC.xcodeproj that expect to link to A.framework through it. These builds will now fail, because ABC.xcodeproj doesn’t have a target for the desired build. Worse, the way Xcode copes with this failure (dependent target suddenly missing), is to simply remove the dependent framework from both the dependencies and linked libraries list for the higher-level target.

To solve the problem, you have to add a project reference to the new A.xcodeproj, and then reconstitute both the dependency and linkage rules for the target. Once you do this for all the possibly umpteen-million targets that previously referenced A.framework in ABC.xcodeproj, you will once again enjoy a working build.

Ah, but thanks to an insidiously helpful new feature of modules, you don’t strictly have to do all of this. Enabling modules for your Xcode targets also opens the door to a feature called automatic linking which will cause modules that are imported by a target’s sources to be automatically linked. So, in a nutshell as long as my source code still contains references like:

#import <A/A.h>

Then Xcode and clang will helpfully also add the required framework linkage when building my target.

Ugh, that is so frustrating!

This sounds so helpful, how could I possibly be against it? The problem with auto linking is it will quietly mask any absent-minded dependencies on frameworks that violate the separation of concerns you have diligently instilled on your codebase. Put more bluntly: auto linking encourages spaghetti code.

One of the great advantages of frameworks is that they put up firm put permeable walls between the various components of a source base. If a given framework in your source base is intended to operate independently of the user interface, it’s easy to maintain this discipline by, for example, abstaining from linking with UIKit, AppKit, or whatever other user-interface frameworks may be at your disposal. Then when you absent-mindedly add a dependency to NSImage in your Foundation-level code, you’ll be greeted by a compiler error when it goes to link.

Not so with auto linking. The build completes without error, and now your LowLevelStuff.framework depends on UI frameworks. The permeable walls afforded by frameworks are no longer firm. You might argue: “What’s the big deal? It’s one little NSImage reference.” True, but it’s one little chink in the dam that gives you any sense of ownership or sanity about the scope of your code. Let that dam erode and you have cross-references not just between UI and Foundation layers of your code, but among and between any and all frameworks of varying, allegedly precise purposes. I.e. spaghetti code.

Discipline is one of the greatest and most rewarding challenges of programming. To the extent we successfully impose effortless standards on ourselves, we make the task of maintaining discipline that much easier. The firm walls of framework dependency are one such standard: a gentle reminder in the course of our daily work that things are running, even if only slightly, off the rails. Without those gentle reminders we’re bound to discover only months or years from now just how far we’ve diverged from our intended course.

In summary: enable clang modules, they’re pretty good.

CLANG_ENABLE_MODULES = YES

But automatic framework linking leads to lack of insight about actual dependencies between targets.

CLANG_MODULES_AUTOLINK = NO

Now that my source base is completely converted to using modules and eschewing precompiled headers, I feel good. I haven’t noticed any particular speed improvements, but I feel on board for the future. Adopting them sets me up for easier interoperation with Swift, when the time comes, and will surely spare me any bugs that sprout up specifically with precompiled headers, which Apple is no longer strongly motivated to fix.
Unit Testing Precision

In the course of practicing my on-again, off-again unit testing discipline, I find myself frequently wanting to zero in on just a few tests, so that I can quickly invoke tests from Xcode (Cmd-U) without suffering the lengthy re-running of a bunch that I already trust will pass.

Luckily the Xcode scheme editor provides for this, allowing tests to be disabled or enabled by file and even by individual test method. Instead of testing with Cmd-U, use Cmd-Opt-U to bring up the scheme configuration panel.

However, I’ve found the logic behind whether Xcode will enable or disable a whole slew of tests to be somewhat unpredictable. You can hold down the option key while clicking to affect its behavior, but I inevitably wind up clicking it the wrong way, such that the test I actually want to click is no longer enabled (because its parent file is unchecked).

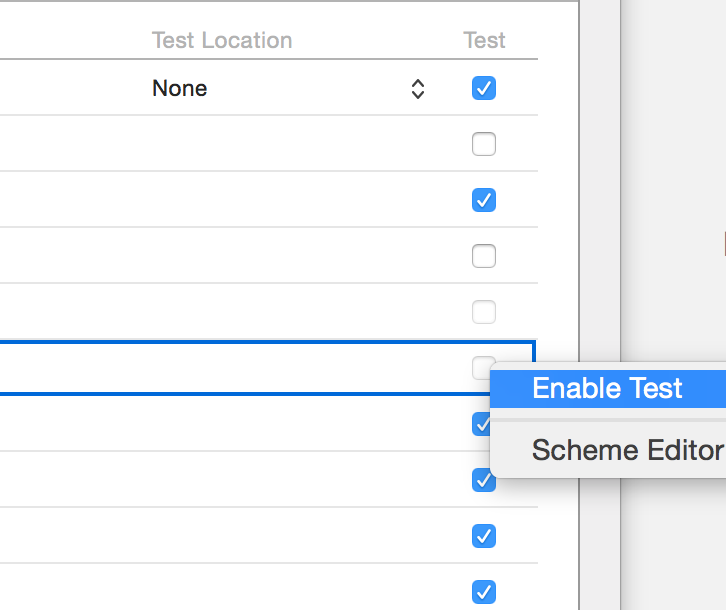
Today I discovered a handy trick which is probably an oversight on Apple’s part: even when the checkbox for a specific test is disabled, it can be selected by control-clicking on the test’s row and selecting “Enabled Test” from the popup menu.

EnableTest

The great thing about this method is it takes care of whatever other enabling needs to take place for the selected test to be allowed to be enabled. I’m sure I will use this trick often.