Brent’s Coding Nits

I agree with every one of Brent Simmons’s coding nits, even if I don’t practice what he preaches completely. Everybody has to make some mistakes to keep life interesting, right?

There’s also one point he makes:

All of your class names should have a prefix. All of them.

Which I think is particularly applicable to shared code such as the kind he’s reviewing on GitHub when compiling this list of nits. It’s not nearly so important, and in fact not really that important at all, for a project’s private classes to have prefixes. For example if you make a new app called “Motorcycle Derby,” you should be forgiven for calling your app’s delegate class “AppDelegate.m” if that is what suits you. By this point in history, Apple takes virtual namespacing seriously enough that you’re unlikely to clash with an unprefixed name from them, and so long as everybody distributing shared library code follow’s Brent’s rule above, you won’t clash with them either.

Still, you can’t go wrong by adding prefixes to be extra sure that you won’t conflict with anybody.

Timestamp Disservice

Any developer who has worked on apps for Apple’s Mac or iOS platforms has undoubtedly run up against confounding issues with code signing. Some issue may be rooted in the behavior of the codesign tool itself, while others have to do with Xcode’s valiant but sometimes confounding attempt to mask all the complexity of code signing in its build settings. On top of that, there are myriad ways in which one can introduce subtle abnormalities over time, by allowing certificates and private keys to outstay their welcome in one’s keychain, or by neglecting to transfer them to another machine which will now be used for development.

When code signing works, it just works. And when it doesn’t? I hope you didn’t have anything planned for the rest of the week.

One vexing issue arises when Apple’s “timestamp service” is not available for whatever reason. Perhaps you’re hacking on an airplane without internet access, or as is commonly the case, Apple’s servers are taking an unplanned siesta. I’m sure you’ll recognize the problem by the tell-tale error that appears in Xcode, just before you would otherwise expect a build to succeed:

% codesign MyApp.app
MyApp.app: The timestamp service is not available.

The purpose of the timestamp server is to provide authenticated timestamps to the codesign tool, so that it can embed along with its code signature a future-proof confirmation of the date the code was signed. What purpose could this serve? For example, if a piece of software was found to have a critical bug that compromised the security of users, but was fixed as of January 1, 2014, Apple and other consumers of the code could consider the timestamp of that vendor’s code while evaluating how much to trust it. In practice, I don’t think code signature timestamps are being put to much use on Mac OS X, but I can see the reasoning for them and they seem like a pretty good idea. I don’t mind supporting them as long as it isn’t too much of a hassle. (Update: See the comment below from Václav SlavÁ­k about the more fundamental purpose of timestamps tying a code signature’s date to the era of the certificate that was used to sign it).

In the event that the timestamp server cannot be reached for whatever reason, codesign simply fails. This is probably a good idea, because if it’s important for signed code to also contain a timestamp, you wouldn’t want to accidentally ship a major release of your app without it. But because the timestamp server can be unavailable for a variety of reasons, some of them common, we need some simple solution for continuing with the the day-to-day building of our apps without ever being bothered by the pesky timestamp service issue.

Lucky for us, such a solution exists in the form of a codesign command-line flag: “–timestamp”. Ordinarily this flag is used to specify the URL of a timestamp server, if you choose to use one other than the Apple default. But a special value none indicates that timestamping of the signed code should be disabled altogether. Let’s see, when could we care less about the timestamping of code? For example, when we’re on an airplane or iterating on debugging builds in Xcode, in the privacy of our own offices and homes.

In short, save yourself a lot of headaches by configuring your projects such that code signing does not consult the timestamp server unless you are building a release build. You can add the option directly to the “Other Code-Signing Flags” section of your build settings, configured to only affect Debug builds. In my case, I employ a variety of cascading Xcode configuration files, upon which all of my projects and targets are based. By changing the value in the configuration file, I’m assured that all my apps will be helped with one fell swoop. This comes straight out of my “RS-Project-Debug.xcconfig” file:

// For Debug builds, we don't require timestamping because
// Apple's server may be down or we may be off-network
OTHER_CODE_SIGN_FLAGS = --timestamp=none

Now any build configuration that inherits the configuration will default to not consulting the timestamp server. My Debug build configurations inherit this setting, my Release builds do not. There is always the small chance that a Release build will be caught up by a misbehaving Apple timestamp server, but whenever I’m hacking on an airplane or iterating on debug builds in my office, code signing occurs without any risk of being stopped by this pesky error.

Transplanting Constraints

Over the past few months I have become quite taken by Auto Layout, Apple’s powerful layout specification framework for Mac and iOS.

For the past few years I’ve heard both that Auto Layout is brilliant and that it has a frustrating learning curve. I can now attest that both of these are true.

One of the problems people have complained most about with respect to Auto Layout is the extent to which Xcode’s Interface Builder falls short in providing assistance specifying constraints. As many people have noticed, Apple is addressing these complaints slowly but surely. Xcode 5’s UI for adding constraints and debugging layout issues is dramatically superior to the functionality in Xcode 4.

Still, there is much room for improvement.

One frustrating behavior arises when one deigns to move a large number of views from one position in a view hierarchy to another. For example, the simple and common task of collecting a number of views and embedding them in a new superview. This task is so common that Apple provides a variety of helpful tools under Editor -> Embed In to streamline the task.

Here’s the big downer with respect to constraints: whenever you move a view from one superview to another, all of the constraints attached to the old superview, constraints that you may have laboriously fine-tuned over hours or days, simply disappear. Poof!

This isn’t such a big deal when your constraints happen to match what Interface Builder suggests for you. But even very simple interfaces may have a fairly large number of constraints. Consider this contrived example, in which three buttons are arranged to roughly share the width of a container view:

SimpleButtons 1

Nine constraints, and the removal or misconfiguration of any one will lead to incorrect layout in my app. Yet simply embedding the views in a custom view wipes them all out:

TestView2 xib 1

This problem is bad enough in the contrived scenario about, but in my much more complicated interfaces, a collection of views might comprise 50 or more customized constraints. Here’s a “simple” subsection of MarsEdit’s post editor side panel:

ServerOptions

Having to piece those all together again just because I want to rearrange some views, well it makes me mad. And when I get mad? I get … innovative!

A Pattern For Transplanting Constraints

Thanks to recent changes in Interface Builder’s file-format for xib files, it’s more straight-forward than ever to hand-tune the contents of a xib file outside of Xcode. It should go without saying that in doing so, you take your fate into your hands, etc., etc. But if you’re anything like me, a little hand-editing in BBEdit is worth the risk if it saves hours of much more intricate hand-editing back in Interface Builder. You’ll save valuable time and also reduce the very real risk of missing some nuanced detail as you try to reimplement everything by hand.

So without further ado, here are steps you can follow to transplant a set of views in a xib file such that the constraints from the old view follow over to the new view:

  1. Make a backup of your .xib file. You’re going to screw this up at least once, so you’ll want something “sane” to fall back on when you do.
  2. In Interface Builder, create the parent view if it doesn’t exist already. Give it a real obvious name like “New Parent View” so you’ll be able to spot it later:

    NewParentView xib

  3. Save changes in IB to make sure the .xib file is up-to-date.
  4. Open the .xib file in a text editor such as BBEdit, or right-click the file in Xcode and select Edit As -> Source Code to edit as text right in Xcode.
  5. Locate the new parent view by searching on the name you gave it. For example, in my sample project the view looks like this in the text file:
    <customView ... id="5M5-9Q-zMt" userLabel="New Parent View">
    ...
    </customView>
  6. Locate the old parent view. If you have trouble, you may want to give it a custom name as well before saving again in IB. In my trivial example, the old parent is the first and only top-level view in the xib file, so it looks like this:
    <customView id="1">
    ...
    </customView>
    
  7. Take note of the id for the old parent view and the new parent view. We’re going to need these in a minute to tie up some loose ends.
  8. Locate the constraints from the old parent view, cut them, and paste them into the new parent view’s XML content. Again in my case it’s trivial because I want all the constraints from the old parent view. I cut them out of the old and into the new so things looks something like this:
    <customView ... id="5M5-9Q-zMt" userLabel="New Parent View">
            ...
            <constraints>
                    <constraint firstItem="rfg-hN-1Il" firstAttribute="leading" secondItem="1" secondAttribute="leading" constant="20" symbolic="YES" id="LOu-nX-awU"/>
                    <constraint firstItem="8Ju-hM-RbA" firstAttribute="baseline" secondItem="Sgd-MR-FMw" secondAttribute="baseline" id="Mwc-6y-uaP"/>
                    ...
            </constraints>
    </customView>
    
  9. Locate the subviews themselves from the old parent view, and cut and paste them in the same way, making sure they reside in a <subviews> node in the new parent view. You should now have a new parent view whose xml topology looks something like this:
    <customView ... id="5M5-9Q-zMt" userLabel="New Parent View">
    	<rect ... />
    	<autoresizingMask ... />
    	<subviews>
    		... your transplanted subviews here ...
    	</subviews>
    	<constraints>
    		... your transplanted constraints here ...
    	</constraints>
    </customView>
    

    We’re close! But not quite finished. If you save and try to use the .xib now, you’ll find that Interface Builder rejects it as corrupted. What’s wrong? The constraints we transplanted mostly reference only the other views that we transplanted, but some of them also reference the old parent view.. To fix the integrity of these constraints, we need to update them to reference the new parent view instead.

  10. Refer back to the Interface Builder “id” values you noted in step 7. We need to locate any reference to the old parent view and adjust it so it references the new parent view. In our example, the old parent view id is “1” and the new parent view id is “5M5-9Q-zMt”. Specifically, we’re looking for attributes on our transplanted constraints where the “firstItem” or “secondItem” references the old parent ID:
    <constraint firstItem="rfg-hN-1Il" firstAttribute="leading" secondItem="1" secondAttribute="leading" constant="20" symbolic="YES" id="LOu-nX-awU"/>
    

    Change the value secondItem=”1″ to secondItem=”5M5-9Q-zMt”, and repeat for any other instances where the old parent view is referenced.

  11. Save the text-formatted .xib file, cross your fingers, and hope you didn’t make any mistakes.
  12. Reopen the .xib file in Interface Builder, or if you’re already in Xcode’s text editor, right-click the file and select Open As -> Interface Builder.

If your combination of luck and skill paid off as planned, then you’ll see something beautiful like this:

TestView xib

All of my views, now situated within the new parent view, and the desired constraints in-tact.

I hope this helps serve as a specific reference for folks in the same boat as I am in, wanting to shuffle views around without losing the hard work I’ve put into my constraints. And I hope it also serves to inspire you to think beyond the limitations of our tools. As great as Xcode, Interface Builder, and a host of other essential technologies are, they often fall short of desired behavior. When they do, it’s often in our power to work around the issues and carry on developing software as effectively as we know how.

AppleScript XML-RPC

My mind was fairly well blown this morning to learn that for more than ten years, AppleScript on Mac OS X has included a built-in command for communicating with XML-RPC and SOAP endpoints on the web.

XML-RPC is a well-known semi-standard method for communicating between processes over the internet. As it happens, a large number of blogging APIs including the WordPress API and many others, were also designed around XML-RPC. For this reason, XML-RPC is a major component of MarsEdit, my Mac-based blogging application.

The funny thing is, I knew that Apple had developed built-in support for SOAP: one of my teammates at Apple was responsible for it! But I either blocked out the XML-RPC support, or disregarded it as uninteresting at the time. And I don’t think I ever knew that the support had been extended to AppleScript in such a native fashion.

XML-RPC isn’t, as they say, rocket science. However, it’s pretty cool that with an off-the-shelf Mac one can throw together a simple script to, for example, grab the latest post off your blog, build a link to it by its title, and copy the HTML to the pasteboard:

set myBlogUsername to "sweatertest"
set myBlogPass to "xxx"

tell application "http://sweatertest.wordpress.com/xmlrpc.php"
	set myPosts to call xmlrpc {method name:"wp.getPosts", parameters:{"1", myBlogUsername, myBlogPass, "1"}}

	set myPost to item 1 of myPosts

	set theLink to link of myPost
	set theTitle to post_title of myPost
	set myPostLink to "<a href='" & theLink & "'>" & theTitle & "</a>"
end tell

set the clipboard to myPostLink

Wire it up with a FastScripts keyboard shortcut and you’re really cooking! This example may be a bit contrived, but one can imagine writing similar scripts to query a blog for information, or even to fire off short blog posts after prompting for content. (Note that if you do automate something like this you will probably want to store the password securely in the keychain).

People love to hate AppleScript, but this is one example of how many nifty little treats lurk within it. The fact that it’s omnipresent on Mac OS X makes it an excellent resource for providing simple solutions, when a simple solution will do.

Taking the Shine Off

I have used Sparkle, the open source project for automating in-app updates to Mac apps, for years. It’s been an invaluable gift to myself and hundreds if not thousands of other developers.

It’s precisely because of this popularity that I want to share a convoluted scenario in which catastrophic data loss may occur.

Sparkle’s basic operation consists of checking for an updated version of the host app, downloading it, replacing the host app, and relaunching the freshly-installed version. To achieve this, it makes use of a secondary helper app called finish_installation.app. The app is built and bundled into the Sparkle.framework which a host app links to and bundles in the Frameworks folder of its own app bundle.

If, for any reason, finish_installation.app cannot be located at update time, the host app’s entire application support folder is wiped out.

The very good news is it’s extremely unlikely your app would find itself unable to locate the finish_installation.app in Sparkle’s bundle. Three obvious scenarios jump to mind for how this could happen in practice:

  1. The helper app could be removed from the Sparkle bundle after your app is downloaded and installed on a user’s Mac. This could involve a user fishing around inside your app and deciding that the helper app is not needed, or perhaps a misguided utility app deciding that the helper should be deleted.
  2. The NSBundle-based code for dynamically locating the Sparkle bundle and its contents could fail at runtime. For this to happen I think that there would need to be some bug in Apple’s bundle registration, or change in the expected behavior of either -[NSBundle bundleWithIdentifier:] or -[NSBundle pathForResource:ofType:]. This scenario seems extremely unlikely but nonetheless worth guarding against.
  3. The helper app could be missing from the Sparkle bundle because it was omitted at build time. If in the course of your own mucking about with Sparkle’s Xcode project, you make some change that causes the helper to be removed from the Copy Files phase that normally adds it to Sparkle’s bundle, you would end up with a copy of Sparkle that exhibits the bug.

Why do I know about this bug? Because I fell for scenario #3 above. While merging changes from another version of Sparkle with my own repository, something happened to cause the file to come off the Copy Files list. This sounds unlikely, but anybody who has used Xcode extensively knows that sometimes little changes, a drag here or there, can cause unexpected side effects to membership in targets or copy phase lists.

How does the bug manifest, exactly? During the previously described process of updating an app, Sparkle gets to the point where it wants to run the helper. Before running, it copies it into the host app’s Application Support folder. At least, that’s what it intends to do. It determines the destination path based on the name of the helper app found in the Sparkle bundle. But when that name is nil, the constructed path consists only the host’s Application Support folder:

“Library/Application Support/YourApp” + (nil) = Library/Application Support/YourApp

It then proceeds to try copying from “nil” to the target folder, and … you can probably guess how well that turns out.

The simple fix that prevents catastrophic damage in all cases is to simply skip that copying process whenever the source path comes up nil. For any reason whatsoever. This will cause Sparkle to fall into another failure mode which displays a somewhat cryptic error message, but which at least doesn’t wipe out all of your user’s data for your app.

You can find my patch for addressing the bug on GitHub.

Static Analysis

I am thus far primarily a Mac developer, though I have dipped my toes in the iOS development arena many times in the — sheesh! — 5 years since iOS 2.0 shipped with its developer-facing SDK.

My first, and only shipping app for iOS is Shush, a static noise generator that was inspired by my son Henry’s birth. He was born in August, 2008, months after iOS had been opened to the public. As you might imagine, I didn’t have a lot of spare time to play around with iOS programming, but I did have a screaming baby. For those of you who don’t know, static noise is famously soothing to small babies. Shush 1.0 was my bare-bones solution for dispensing infinite, soothing static noise from the magical device I could hold in my hands:

Shush1 0

Pretty hot, huh? It did the trick. I would hold crying, months-old Henry against my chest and, with the iPhone quietly shushing in my hand, he would drift off to sleep.

I mostly forgot about Shush after Henry got old enough to no longer benefit from it. Fast-forward 3 years and my second son, Matthew was about to be born. I realized I was going to need to dust off the old soothing machine, and it seemed like a great excuse to finally brush up the UI a little.

There isn’t much reason to look at the screen while using Shush: its primary purpose is generating audio noise. But despite Shush 1.0’s extremely minimalist design, I had always imagined the app was a prime candidate for a skeuomorophic design. In the old days of analog television, a common technique for generating this sound was simply to tune to an unused station. While the audio of the room filled with static white noise, the screen similarly rumbled with visual black-and-white “snow.” I thought it would be pretty cool to simulate this on the iPhone, as a throwback to those nostalgic days and so a Shush user would have something vaguely interesting to gaze at if they chose to.

It turns out, simulating the static television snow of my analog youth is extremely challenging to do, even on a fancy iPhone. Generating audio white noise is relatively easy: you can get close to the desired output by simply taking random numbers and feeding them to the audio system as samples. It seems reasonable to assume you could do the same for video. For each frame, you could simply generate a random grey between 0.0 and 1.0 for each pixel, rendering the result to an image:

This yields a pretty TV-snow-like image:

Static snow image

The problem is it’s incredibly CPU intensive to calculate that many random numbers and construct an image. Even testing this naive approach again today on my relatively speedy iPhone 5, the naive approach produces an animation where the frames only alternate every 3 seconds or so. Clearly, this would not do.

I experimented with a variety of approaches to speed up the rendering. What if I didn’t generate a wholly random number, but just alternated between 0 and 1? Also, do I really need to generate a random value for every pixel? What if I clump the pixels together to cover more ground? I tried a variety of techniques to speed up the view drawing:

The result was faster, but still not fast enough. What’s worse? It looked more like an homage to a Commodore 64 than to a vintage analog television set:

Another snow image

I was about ready to throw in the towel. Maybe this was simply not possible on an iPhone. I did some research on the web and it was not promising: not only is this a hard problem on an iPhone, it’s a hard problem everywhere. I learned that I’m not the first person who tried to generate an approximation of visual static on a digital computer, and that most people eventually resort to using a canned video animation of static. Modern television sets typically do this to give you the old-timey sense of “nothing is plugged in,” but if you look closely you can see repeating patterns in the static. In other words, it’s not really random. It’s not really static. If I couldn’t make this strange, skeuomorphic homage look more or less like real TV static, I was not interested in the challenge.

Up to this point all of my efforts had been at the level of the CPU: how can I fill this image buffer with random pixels faster? Having no experience with OpenGL or directly programming a GPU, I hadn’t even considered the possibility of approaching that. But a conversation with my friend Mike Ash put the idea in my head, and I ran with it. Since iOS devices are famously optimized for leveraging the GPU, I figured it might be a simple matter of asking the GPU to generate the random pixels for each frame on the fly, obviating the need for the generation of any CPU-bound image data.

I gave myself a crash course education in OpenGL, learning the bare minimum I needed to know before tackling the problem. To give you an idea of where I was starting, I had heard the term “shader” before, but honestly had no idea what it did. I eventually learned that probably what I needed was a bit of OpenGL magic called a “pixel shader.” Essentially it’s a chunk of code that runs on the video card and gets to choose what color each pixel in a given scene should be. For my scenario, I would be setting up OpenGL with a sheer surface pointed directly at the camera, so as to appear 2D. The shader’s job would be to fill that 2D surface up with random gray pixels.

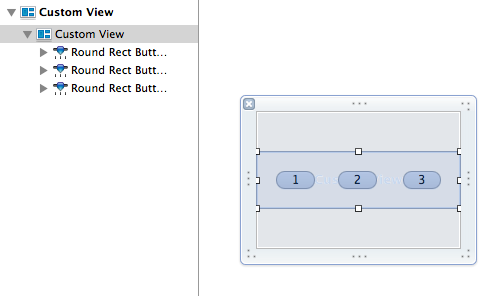
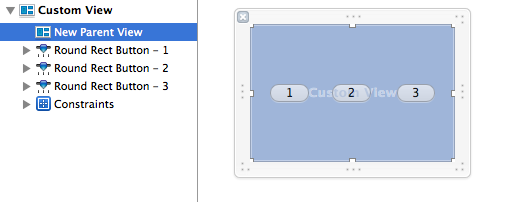
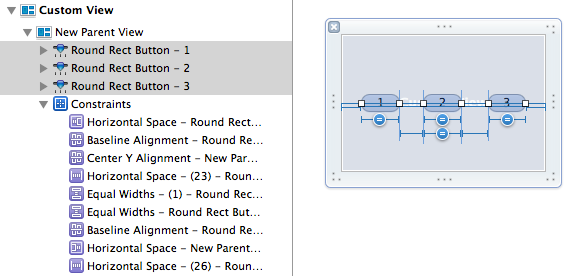
Using Apple’s GLKViewController, I was able to skip over much of the hardcore OpenGL setup, and skip right to the work on the shaders. I used some boilerplate code to get my GLKViewController wired to my pixel shader, and was able to e.g. demonstrate my ability to fill the surface with a specific color:

It works! And while I was working out how to make OpenGL do my bidding, I put some work into the TV frame appearance for the app:

Skitched 20130927 153929

At this point, it feels like I’m almost home. I just need to swap out the constant RGB values for ones that insert random values of gray. What’s that you say? There’s no random generator in OpenGL? Well, I’ll be damned.

Once again things appeared hopeless. I played around with the addition of a “vertex shader,” which is a shader that has access to additional information about the scene. Using the fact that a vertex shader and pixel shader can communicate with each other, I was able to incorporate the specific coordinate for the pixel being shaded. Scouring the web, I found example code for OpenGL that would take a varying number like this and “fuzz” it sufficiently that it appeared to be somewhat random. Thus, my next effort involved taking the x and y coordinates for the current pixel and transforming them into a seemingly random shade of gray:

Shush

Oh my god! It’s beautiful. We’re done, this is exactly what I’ve been striving to do for weeks, now. Except… it doesn’t animate. It’s just a rendered scene of random grey pixels in which the random grey pixels are always exactly the same as before. Why? Because the inputs to the pseudo-random fuzz function are always the same: the coordinates of each pixel in the scene.

My final stroke of insight was to inject “just enough randomness” into the scene by hooking up a value that the pixel shader obtains from the client app. If I can supply random numbers to shader, you may ask, what’s the big deal? Why not just supply all the random numbers? Because the facility for injecting values into the shader only gives the client app access once per complete rendering. Once it starts rendering, the determination of values for each of the pixels in the scene is completely up to the shader itself. But by combining the pseudo-random generation based on pixel coordinate, and further fuzzing that value with a random value injected once per rendering, the results are as in the image above, but beautifully, quickly rendered (video capture doesn’t do it full justice).

Here is a final code snippet of both the vertex and fragment shaders. You can pop them into a project in Apple’s OpenGL Shader Builder to get a better feel for how they work.

On January 17, 2012, I released Shush 2.0. The next day, Matthew was born. It worked great for the few months that I needed it, and just as I did before, I have since mostly stopped using the app myself. However, it was a great exercise in pushing the limits of what the iPhone seemed capable of doing. Hopefully this experience will inspire you to look deeper for solutions to the problems that vex you while working with these fascinating, limited devices.

A Place for One’s Code

I recently shifted my personal technical blogging away from my company blog, where I used to write quite a bit about not only my products, but about various programming tips & tricks, as well as taking stands on various technical controversies of the moment.

It has seemed less and less appropriate to me to use the company’s site as my personal soapbox, so I recently started the Bitsplitting blog as a general “techie stuff” blog, directed toward fellow software developers but also towards a wider technical audience.

This is the place where I will resume sharing software development advice, tricks, and sample code. The nature of my business means the emphasis will be largely on Mac and iOS development with Xcode, but I occasionally venture in web-based programming technologies and python. Who knows what will happen?