Supporting Dark Mode: Checking Appearances

As you adapt your app to support Dark Mode, you may run into situations where you need to determine, in code, what the active appearance is. This is most typical in custom views that vary their drawing based on the current appearance, but you may also need to test higher level appearance traits to determine, for example, whether the whole application is being run “in Dark Mode” or not.

Current and Effective Appearances

To work effectively with Dark Mode support, you must appreciate the distinction between a few key properties that are all of type NSAppearance. Take some time to read the documentation and watch the videos I referenced in Educational Resources, so you really understand them. Here is a capsule summary to use as reference in the context of these articles:

  • appearance is a property of objects, such as NSApplication, NSWindow, and NSView, that implement the NSAppearanceCustomization protocol. Any such object can have an explicit appearance deliberately set on it, affecting the appearance of both itself and any objects that inherit appearance from it. As a rule, views inherit the appearance of their window, and windows inherit the appearance of the app.
  • effectiveAppearance is a property of those same objects, taking into account the inheritance hierarchy and returning a suitable appearance in the likely event that no explicit value has been set on the object.
  • NSAppearance.current or +[NSAppearance currentAppearance] is a class property of NSAppearance that describes the appearance that is currently in effect for the running thread. Practically speaking you can think of this property as an ephemeral drawing variable akin to the current fill color or stroke color. Its value impacts the manner in which drawing that is happening right now should be handled. Don’t confuse it with high-level user-facing options about which mode is set for the application as a whole.

High-Level Appearance Traits

As you modify your code to respect the current or effective appearance, you will probably need to make high level assessments like “is this appearance light or dark?” Because of the aforementioned complication that there are many types of NSAppearance, that they can be nested, etc., it’s not possible to simply compare the current appearance with a named appearance. Instead, you use a method on NSAppearance designed to evaluate which high-level appearance it is most like. If it’s a matter of simply distinguishing between light and dark appearances, you can use something like this:

let mode = NSAppearance.current
let isDark = mode.bestMatch(from: [.darkAqua, .aqua]) == .darkAqua

In my applications, I found myself testing NSAppearance instances for lightness or darkness commonly enough that I implemented an “isDarkMode” property in an extension to NSAppearance:

// NSAppearance extension

@objc(rsIsDarkMode)
public var isDarkMode: Bool {
   let isDarkMode: Bool

   if #available(macOS 10.14, *) {
      if self.bestMatch(from: [.darkAqua, .aqua]) == .darkAqua {
         isDarkMode = true
      } else {
         isDarkMode = false
      }
    } else {
        isDarkMode = false
    }

    return isDarkMode
}

As you can see this is laden with the requisite tests to ensure it works even if the app is running on a pre-10.14 Mac. A nice side-effect of centralizing this code in one place, is eliminating the need to include those checks at every call point.

This helper method is handy for working with NSAppearance instances, but in some contexts what I really want to know is bluntly: is this app running in dark mode or not? To accommodate this, I extend NSApplication to offer an identically named property:

// NSApplication extension

@objc(rsIsDarkMode)
public var isDarkMode: Bool {
   if #available(macOS 10.14, *) {
      return self.effectiveAppearance.isDarkMode
   } else {
      return false
   }
}

This method takes advantage of NSAppearance.isDarkMode, so it doesn’t have to replicate any of the important, but slightly clumsy “bestMatch” code either.

Having these convenient methods at my fingertips has been a great aid because it allows me to quickly answer the high-level question of whether an appearance is dark or not, regardless of whether I’m implementing drawing code or making a higher-level semantic interpretation of the application’s user-facing appearance.

Supporting Dark Mode: Opting In

To run any app in Dark Mode, you must to be running macOS Mojave 10.14 or greater. By default, all existing apps will run in Light Mode even if the system is configured to run in Dark Mode. An app that is launched on macOS Mojave will run in Dark Mode when two criteria are met:

  1. The system considers the app to be compatible with Dark Mode
  2. The running application’s appearance is set to Dark Aqua

An app’s compatibility with Dark Mode is determined by a combination of the SDK it was built against, and the value of the “NSRequiresAquaSystemAppearance” Info.plist key. If your app is built against the 10.14 SDK or later, it will be considered compatible unless the key is set to YES. If your app is built against the 10.13 SDK or earlier, it is considered incompatible unless the Info.plist key is set to NO.

When a compatible app is launched, its appearance is set to match the user’s system-wide preference, as selected in the System Preferences “General” tab. To streamline development, Apple also provides a switch in Xcode itself so that the appearance of a running app can be switched on the fly without affecting the appearance of other apps running on your Mac.

Although the Xcode switch is handy for making quick comparisons between modes, there is not, as far as I know, any mechanism to always launch an app from Xcode in Dark Mode when the system is in Light Mode, or vice-versa. If you strongly prefer one mode over the other, you may want to build in affordances to your app that support debugging in “the other mode” when you need to. For example, in the build settings for your app, find “Other Swift Flags,” and add “-DDEBUG_DARK_AQUA”:

Screnshot of the Xcode build settings for Other Swift Flags with -DDEBUG_DARK_AQUA set as the value.

Then, somewhere early in your app’s launch, you can conditionally force the appearance if specified:

func applicationDidFinishLaunching(_ notification: Notification) {
   #if DEBUG_DARK_AQUA
      NSApp.appearance = NSAppearance(named: .darkAqua)
   #endif
}

This arrangement will allow you to run Xcode and other apps in Light Aqua while debugging your own app in Dark Mode.

Supporting Dark Mode: Educational Resources

The first trick to tackling any new challenge is getting your technical references sorted. My advice to all developers is to watch the pertinent WWDC sessions, read the high-level documentation, and to immerse oneself in the Dark Mode aesthetic by perusing other applications that support it:

WWDC Sessions

It goes without saying that every Mac developer should watch What’s New in Cocoa for macOS. This is always a great overview that touches on the major changes to follow up on in other sessions. For Dark Mode in particular, be sure to watch both the Introducing Dark Mode and Advanced Dark Mode sessions. These include a lot of excellent advice about both high-level design considerations and low-level practical uses of the NSAppearance API.

Documentation

Apart from the reference documentation on NSAppearance, be sure to read the longer-form Supporting Dark Mode in Your Interface, and Providing Images for Different Appearances. These high-level guides will orient you to the types of work you will likely need to do in your app. Finally, the macOS 10.14 Release Notes include a number of details about Dark Mode, and particularly about special background blending modes and how they affect the user interface of an application.

Immerse Yourself

Although dark interfaces are nothing new, Apple’s official take on it with macOS Mojave establishes specific aesthetic choices. You’ll want to become acquainted with the decisions Apple has made so you can make the right call in your own app. I recommend switching your macOS Mojave Mac to Dark Mode and running as many apps as possible in Dark Mode to get a sense for the prevailing aesthetics.

The vast majority of Apple’s own apps have been tastefully adapted, and a growing number of 3rd party titles are listed on the Mac App Store as Apps That Look Great in Dark Mode. I’m honored that one of my own apps, MarsEdit, is listed there.

Supporting Dark Mode: Introduction

I spent a good part of the summer learning about macOS Mojave’s new Dark Mode theme, and how Mac apps can support the theme both in technical and practical ways. I adapted MarsEdit, Black Ink, FlexTime, and FastScripts to the new interface style.

During that process, I learned a lot about where to look for advice, and how to handle common scenarios. I’d like to share that advice with folks who have yet to undertake this work.

The gist of what I have to share comes from tackling challenge after challenge in my own apps. Some interfaces adapted effortlessly to Dark Mode, some needed only a little finessing, while others demanded relatively hard-core infrastructural changes.

My advice will focus on the dichotomy of Light Mode and Dark Mode. The Mac’s appearance support is more nuanced than that. NSAppearance supports a hierarchy of appearances that build upon one another. The light and dark modes are the two most prominent user-facing examples, but variations such as high contrast modes should also be considered.

These articles are loosely organized in order from more fundamental to more arcane, with a priority on establishing knowledge and techniques in earlier articles that you may need to reference in later articles. Feel free to jump around if you’re looking for something special:

Finder Quick Actions

In the What’s New in Cocoa for macOS session at WWDC 2018, Apple announced Quick Actions, which are handy little contextual tasks you can invoke on selected items in the Finder, either from a contextual menu or from the Preview side panel.

The emphasis in the session was on creating Quick Actions via Automator. There, it’s as simple as creating a new workflow document, selecting “Quick Action” from the template palette, and saving. It even puts it in the right place (~/Library/Services).

Essentially, Quick Actions appear to be macOS Services, which have a long history and which Automator has previously been able to create. In fact in macOS Mojave betas, the Quick Action document seems to completely supersede the “Service” type.

But what about native applications that want to provide Quick Actions? I didn’t see anything in the WWDC session to address this scenario, so I started poking around myself. When you click the “More…” button in Finder’s Preview panel, it opens up System Preferences’s Extensions settings, focused on a special “Finder” section. In the list are several built-in extensions.

I thought these were likely to be implemented as binary app extensions, so I instinctively control-clicked on one. A “Reveal in Finder” optionĀ appeared, so I selected it. Sure enough, they live inside Finder itself, and are packaged as “.appex” bundles, the same format that Apple supports for 3rd-party applications.

What’s handy about finding an example of an app extension you want to emulate, is you can open up its bundle and examine the Info.plist. Apple’s approach to identifying app extensions’s capabilities and appearance is based heavily on the specification of values in an NSExtension entry. Looking at one of Apples models, I saw confirmation that at least this variant was of type “com.apple.services” and that its attributes included many useful values. NSExtensionActivationRule, are substantially documented, and can be used to finely tune which types of target items an extension can perform useful actions on.

Others, such as NSExtensionServiceAllowsFinderPreviewItem and NSExtensionServiceFinderPreviewIconName do not appear to be publicly documented yet, but one can guess at what their meaning is. I’m not sure yet if the icon name has to be something public or if you can bundle a custom icon and reference it from the extension. I was alerted on Twitter to at least one other key: NSExtensionServiceAllowsTouchBarItem, which evidently triggers the action’s appearance in the Touch Bar while a qualified item is selected.

Dumping AppKit’s framework binary and grepping for likely matches reveals the following key values which are pretty easy to guess the meaning of:

NSExtensionServiceAllowsFinderPreviewItem
NSExtensionServiceFinderPreviewLabel
NSExtensionServiceFinderPreviewIconName
NSExtensionServiceAllowsTouchBarItem
NSExtensionServiceTouchBarLabel
NSExtensionServiceTouchBarIconName
NSExtensionServiceTouchBarBezelColorName
NSExtensionServiceToolbarPaletteLabel
NSExtensionServiceToolbarIconName
NSExtensionServiceToolbarIconFile
NSExtensionServiceAllowsToolbarItem

Of course, until these are documented, and even when they are, until macOS Mojave 10.14 ships, you should consider these all to be preliminary values which could disappear depending on further development by Apple of the upcoming OS.

Apple Events Usage Description

In case you haven’t heard, macOS Mojave is bringing a new “Apple Events sandbox” that will affect the behavior of apps that send Apple Events to other apps either directly, or by way of running an AppleScript. I wrote more about this on my non-development blog, Bitsplitting: Reauthorizing Automation in Mojave.

Typically, the system is simply supposed to ask users whether they approve of the Apple Events being sent from one app to another, but in some instances it seems the events are rejected without ever prompting the user. My friend Paul Kim of Hazel fame asked in a developer chat room whether any of us were having this kind of trouble specifically with apps built in Xcode 10, against the macOS 10.14 SDK.

This rang a bell for me on two levels: first, I had seen a similar behavior with FastScripts, which I eventually fixed by switching it to a much newer build system, and dropping support for versions of macOS older than 10.12. It was the right time for me to make those changes, so I didn’t mind doing it, but I never quite understood why the behavior was happening.

I noticed after building and running on my developer Mac (which is running the 10.14 beta), I was still experiencing the behavior Paul described. With FastScripts, these kinds of alerts pop up all over the place, because by virtue of running scripts, users are often incidentally sending Apple Events to other apps. Here’s a simple example script that I can run via FastScripts:

tell app "Preview"
    get document 1
end tell

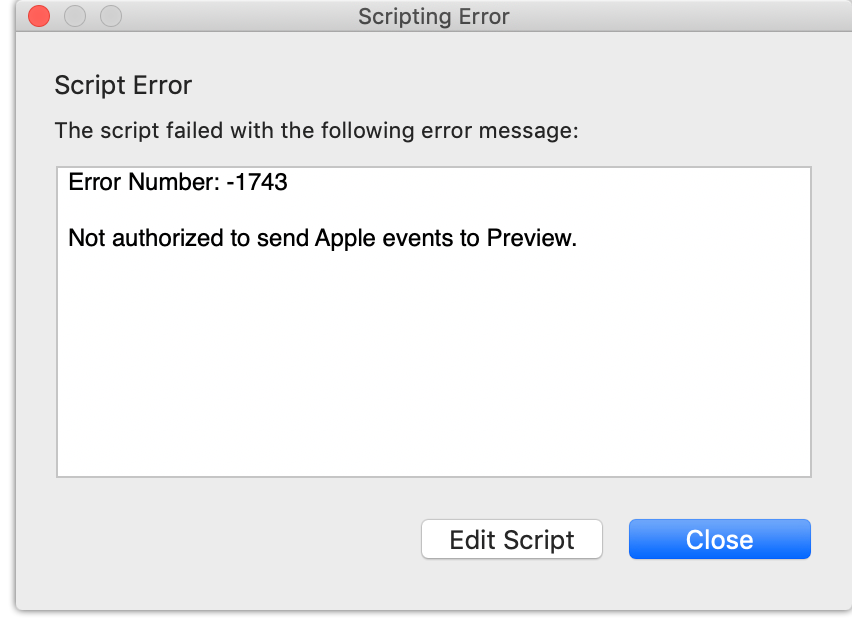
When I run this with a version of FastScripts that was linked against the 10.14 SDK, I get this error message from FastScripts itself. The system never prompts to grant permission:

Scripting error received when attempting to run a script from FastScripts

Until Paul mentioned his own problems, I glossed over these failures because I was satisfied that my production built versions, linked against the 10.13 SDK, were “working fine.” But Paul’s report got me thinking: was it possible there is some unspoken contract here, whereby linking against the 10.14 SDK opens up my app to additional privacy related requirements?

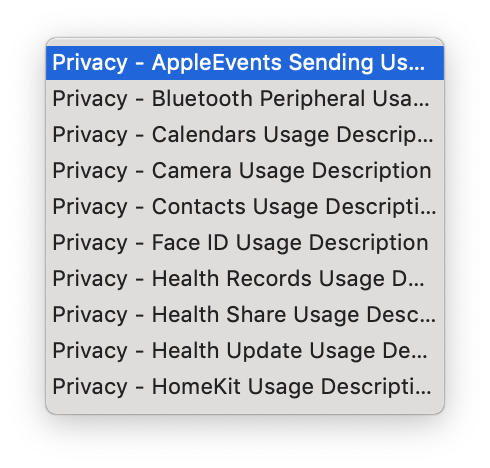
I tapped into Xcode’s Info.plist editor for FastScripts, added a new field, and typed “Privacy” on a hunch, because I’ve come to realize that Apple prefixes the plain-English description for most, if not all, of their “usage explanation” Info.plist fields with this word:

Screenshot of the list of Privacy-related Info.plist strings that appears

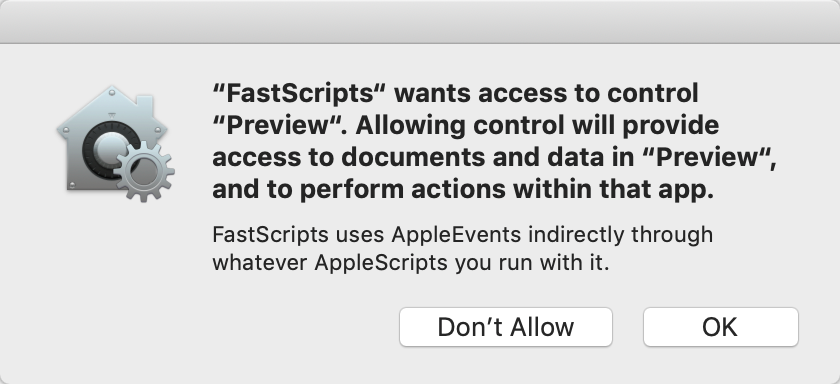
Aha, that first one looks promising. You can right-click on an Info.plist string in Xcode to “Show Raw Keys/Values”, and doing so reveals that the Info.plist key in question is “NSAppleEventsUsageDescription”. After adding the key to my app, I built and run again, and running the same script as above now yields the expected authorization panel:

Screenshot of Apple's standard panel requesting access for FastScripts to control another app.

I’m not sure if requiring the usage description string is intentional or not, but it’s probably a good idea even if, as in the case of FastScripts, you have to be pretty vague about what the specific usage is. I don’t think this usage string was covered in the WWDC 2018 session about macOS security. Hopefully if you’ve run into this with your Mac app, this post will help you to work around the problem.

Let it Rip

In the latest Mojave public beta, I noticed a foreboding warning in the console when I build and run FastScripts, my macOS scripting utility:

FastScripts [...] is calling TIS/TSM in non-main thread environment, ERROR : This is NOT allowed. Please call TIS/TSM in main thread!!!

Ruh-roh, that doesn’t sound good. Particularly with the emphasis of three, count them three, exclamation points! I better figure out what’s going on here. But how?

Sometimes when Apple adds a log message like this, they are kind enough to offer advice about what to do to alleviate the problem. Sometimes the advice implores that we stop using a deprecated method, or in a scenario like this, offers a symbolic breakpoint we might set to zero in on exactly where the offending code lies. For example, a quick survey of my open Console app reveals:

default	11:54:18.482226 -0400	com.apple.WebKit.WebContent	Set a breakpoint at SLSLogBreak to catch errors/faults as they are logged.

This particular warning doesn’t seem to apply to my app, but if it did, I would have something good to go on if I wanted to learn more. With the TIS/TSM warning, however, I have no idea where to go. Do I even use TIS/TSM? What is TSM?

I’ve worked on Apple platforms for long enough to know that TSM stands for Text Services Manager. However, I have also worked on these platforms long enough to forget whether I’ve actually used, or am still using, such a framework in my apps! When these kinds of warnings appear in the console, as many times as not they reflect imperfections in Apple’s own framework code. Is it something Apple’s doing, or something I’m doing, that’s triggering this message?

Ideally we could set a breakpoint on the very line of code that causes this console message to be printed. This can be surprisingly difficult though. There have always been a variety of logging mechanisms. Should you set the breakpoint on NSLog, os_log, printf, fprintf, or write? I could probably figure out a comprehensive method for catching anything that might write to the console, but am I even sure this console method is being generated in my app’s main process? There are a lot of variables here. (Hah! In this particular case, I ended up digging deeper and discovering it calls “CFLog”).

This is a scenario where combining lldb’s powerful “regular expression breakpoints” and “breakpoint commands” can help a great deal. Early in my app’s launch, before the warning messages are logged, I break in lldb and add a breakpoint:

(lldb) break set -r TIS|TSM.*

I’m banking on the likelihood that whatever function is leading to this warning contains the pertinent framework prefixes. It turns out to be a good bet:

Breakpoint 5: 634 locations.

I hit continue and let my app continue launching. Here’s the problem, though: those 634 breakpoint locations include quite a few that are getting hit on a regular basis, and for several consecutive breaks, none of them is triggering the warning message I’m concerned about. This is a situation where I prefer to “let it rip” and sort out the details later:

(lldb) break command add 5
Enter your debugger command(s).  Type 'DONE' to end.
> bt
> c
> DONE
(lldb) c
Process 16022 resuming

What this does is add a series of commands that will be run automatically by lldb whenever breakpoint 5 (the one I just set) is hit. This applies to any of the 634 locations that are associated with the regular expression I provided. When the breakpoint is hit, it will first invoke the “bt” command to print a backtrace of all the calls leading up to this call, and then it will invoke the “continue” command to keep running the app. After the app has run for a bit, I search the debugger console for “!!!” which I remembered from the original warning. Locating it, I simply scroll up to see the backtrace command that had most recently been invoked:

  thread #7, stop reason = breakpoint 5.568
    frame #0: 0x00007fff2cd520fd HIToolbox`TSMGetInputSourceProperty
    frame #1: 0x00000001003faef2 RSFoundation`-[RSKeyboardStatus update](self=0x00006000002b8c00, _cmd="update") at RSKeyboardStatus.m:56
    [...]

Command #2 'c' continued the target.
2018-08-14 12:15:40.326538-0400 FastScripts[16022:624168] pid(16022)/euid(501) is calling TIS/TSM in non-main thread environment, ERROR : This is NOT allowed. Please call TIS/TSM in main thread!!! 

Sure enough, that’s my code. I’m calling TSM framework functions to handle key translation for FastScripts’s keyboard shortcut functionality, and I’m doing it (gasp!) from thread #7, which is certainly not the main thread. I oughta be ashamed…

But I’m proud, because I tracked down the root of the problem pretty efficiently using lldb’s fantastic breakpoint commands. Next time you’re at a loss for how or where something could possibly be happening, consider the possibility of setting a broad, regular expression based breakpoint, and a series of commands to help clarify what’s happening when those breakpoints are hit. Then? Let it rip!

Completely Useful

Particularly as a developer coming from an Objective C background, it’s common to head into an override implementation in a subclass thinking of a property as a function. For this reason, I find myself commonly starting to implement a property override by typing something like “override func canBecome” when I want to override UIView’s “canBecomeFirstResponder”. A completion pops up like this:

Screenshot of Xcode offering a code completion with non-pertinent options.

Instead of the expected method, Xcode has twisted itself into knots to contrive that letters from the whole prototype for “addObserver” can be used to spell out “canBecome”. Not particularly useful.

It always takes me a few seconds, or longer, to realize that I haven’t misremembered the existence of a method or property that I want to override, I’ve simply disregarded whether it’s identified in Swift as a “var” or a “func”. One simple change to “override var canBecome” does the trick:

Screenshot of Xcode offering a useful code completion popup list.

In my not so very humble at all opinion, Xcode should go the extra mile here and look for matches in the “var” realm when you’ve type “func”, and vice-versa. If it finds something that perfectly matches everything you’ve typed except whether it’s a func or a var, then it should offer the completion and fix the mistyped designation when you accept it. I’ve filed Radar #42660012 requesting this enhancement.

Update: Several folks have suggested a good workaround: simply get in the habit of omitting the decorative terms, such as “override”, “func”, and “var”. It turns out if you leave out the narrowing term, Xcode does find the pertinent matches, and also inserts the required decoration upon inserting one.

My friend Chris Liscio pointed out that changing the behavior as I recommend might be a questionable move, because it defies a kind of rule for type-completion. In general, whatever the user has already typed should be considered what the user knows they want, and completion should only offer pertinent matches. It’s a compelling argument but I think that in cases like this the computer actually knows more about what I really want than I do.

Icon for File with UIKit

There’s a general consensus among many Mac and (mostly) iOS developers, that AppKit is “old and busted” and UIKit is “new and refined.” I am still fairly limited in my experience with UIKit, but in many ways I agree that in developing the framework, they left some of the more annoying baggage of AppKit behind. However, they also left off many conveniences that AppKit developers like myself have come to rely upon.

One of the easiest things in the world in AppKit is asking the framework for an image to represent a file’s icon. Say you’ve got a Swift source file handy and you want to show it in your app with an appropriate icon. It’s an easy one-liner on the Mac:

let swiftIcon = NSWorkspace.shared.icon(forFile: "/tmp/Test.swift")

Screenshot of Xcode showing code to request an icon from NSWorkspace.

On UIKit, as far as I can tell, it takes a bit more work. There is no UIWorkspace, which is probably fine, but there is also no UIImage.iconForFile, or similar method to make this quite as straightforward as it is on the Mac.

I came across “UIDocumentInteractionController” which seems to be the key to easily obtaining icons for arbitrary image types on iOS. After initializing it with a file URL, you can ask it for an array of icons, which it will reveal in order from smallest to largest. Tying this all together in an extension on UIImage, you could add a pretty handy helper method to your collection of code (sorry, one of these days I’ll get syntax highlighting working on this blog):

import UIKit

extension UIImage {
	public enum FileIconSize {
		case smallest
		case largest
	}

	public class func icon(forFileURL fileURL: URL, preferredSize: FileIconSize = .smallest) -> UIImage {
		let myInteractionController = UIDocumentInteractionController(url: fileURL)
		let allIcons = myInteractionController.icons

		// allIcons is guaranteed to have at least one image
		switch preferredSize {
		case .smallest: return allIcons.first!
		case .largest: return allIcons.last!
		}
	}
}

Now I’ve got basically the same functionality I had on AppKit:

Screenshot of invoking the helper method from code snippet above.

This is cool enough, but what’s even cooler is the UIKit method works on a URL irrespective of whether the underlying file actually exists! This, combined with the fact that a URL can be initialized with just about any String, means we can expand our icon utilities with a method for obtaining icons by file name alone:

extension UIImage {
	public class func icon(forFileNamed fileName: String, preferredSize: FileIconSize = .smallest) -> UIImage {
		return icon(forFileURL: URL(fileURLWithPath: fileName), preferredSize: preferredSize)
	}
}

Here we use it to get the icon for an arbitrary Pages file which may or may not exist:

Screenshot of calling the code snippet above to obtain a file icon for a Pages document.

Ah, now this is starting to feel even cooler than AppKit. But wait, NSWorkspace also supports another handy method:

let zipIcon = NSWorkspace.shared.icon(forFileType: "zip")

Well, we can achieve similar by taking advantage of the icon(forFileNamed:) method:

extension UIImage {
	public class func icon(forPathExtension pathExtension: String, preferredSize: FileIconSize = .smallest) -> UIImage {
		let baseName = "Generic"
		let fileName = (baseName as NSString).appendingPathExtension(pathExtension) ?? baseName
		return icon(forFileNamed: fileName, preferredSize: preferredSize)
	}
}

Now we’re really catching up:

Screenshot of code calling the iconForPathExtension example above.

But AppKit’s equivalent actually works on UTI type strings, as well. Wouldn’t that be cool to support on iOS? Seeing as MobileCoreServices gives us access to low level functions for converting UTI and file extensions, we can take a UTI, convert it, and let our existing helper methods take it from there:

import MobileCoreServices

extension FileManager {
	public func fileExtension(forUTI utiString: String) -> String? {
		guard
			let cfFileExtension = UTTypeCopyPreferredTagWithClass(utiString as CFString, kUTTagClassFilenameExtension)?.takeRetainedValue() else
		{
			return nil
		}

		return cfFileExtension as String
	}
}

extension UIImage {
	public class func icon(forUTI utiString: String, preferredSize: FileIconSize = .smallest) -> UIImage? {
		guard let fileExtension = FileManager.default.fileExtension(forUTI: utiString) else {
			return nil
		}
		return icon(forPathExtension: fileExtension, preferredSize: preferredSize)
	}
}

And voila!

Screenshot of code calling the iconForUTI code above.

It would be fairly easy to further extend this to support creating icon images from MIME types. Hope this helps some of you folks, especially coming from the Mac, who expected getting icons for file types to be slightly easier than it is.

Internal Typealias Promotion

In some scenarios it might be useful to declare a typealias internally to a module, to make it easier to implement the functionality of the module itself, but less useful to export that typealias to clients of the module. For example, consider an image manipulation framework that can work with NSImage or UIImage instances, depending on the platform. Internally to the module, I might define:

#if os(macOS)
	typealias RSPlatformNativeImage = NSImage
#else
	typealias RSPlatformNativeImage = UIImage
#endif

Then I can implement methods, including public facing methods like:

public func monochromeImage(fromImage image: RSPlatformNativeImage) -> RSPlatformNativeImage { ... }

Since I haven’t marked my typealiases as ‘public’, they won’t be exported to clients, but the above will also fail to compile. Swift requires that public methods work only with public types. This makes sense, because if the types aren’t public, how are clients expected to be able to work with them?

But if I mark the typealiases public, I impose a new type “RSPlatformNativeImage” on clients, when as far as they are concerned, this method operates on either an NSImage or UIImage. They might quickly get the idea that RSPlatformNativeImage is just a typealias, but it’s a bit of unwanted clutter on the public-facing API.

Obviously I can solve this by adding more platform-specific directives to the module so that whole functions are declared as working with either NSImage or UIImage, but it would be nice if Swift would help me out here. Instead of giving a compiler error, Swift could simply export the method using the public type that the typealias resolves to. In which case a client of the module for iOS would see the method as:

public func monochromeImage(fromImage image: UIImage) -> UIImage { ... }

And for Mac:

public func monochromeImage(fromImage image: NSImage) -> NSImage { ... }

Handling internal typealiases like this would cause the behavior for Swift clients to match what is already being done for Objective-C clients. The generated Module-Swift.h for this method in a Mac project is:

- (NSImage * _Nonnull) monochromeImageFromImage:(NSImage * _Nonnull)image SWIFT_WARN_UNUSED_RESULT;

Thus for Objective-C clients the clutter of the typelias definition is tidied away, but for Swift clients, it must still be dealt with. I filed a bug requesting this behavior in the Swift bug tracking system.